Thursday 29 November 2012

Egg Spiral - A Review

Recently I was asked to review a product from the handpicked collection. If you've never been to this site, don't blame me if you end up with a hefty credit card bill! They have really lovely gifts on their site for yourself or for a loved one. If you're stuck for Christmas presents, do check out their Christmas gift range.

According to their site, "The Handpicked Collection is an award-winning gift shop providing a unique selection of well-priced, stylish and high quality gifts. We aim to make present buying a breeze, and our collection also showcases gorgeous treats for you, your home and your garden."  They have a panel of experts who are independent and vet everything they sell.  They also have a helpful gift finder service. 

The site itself is easy to navigate.  It has tabs on top for main categories such as her, him, kids, home, garden & outdoor, special occasions and new in.  There are also top 10 gift categories on their homepage.  

I was really excited to be sent this egg spiral to review as I'd seen it on someone else's blog and have been looking for one since. The description on the site says "This is a brilliant and attractive way of storing fresh eggs in date order. As you take out the bottom egg, another gently rolls along to take its place, meaning you always use the oldest egg first." This would be particularly helpful if you had your own hens. I use a lot of eggs for my baking so this looks great in my kitchen (well when I get a new place) and is functional. It comes in a choice of cream or black colour and currently retails for £24.95. It is handmade in Devon and holds up to 20 eggs. 

Apologies for the background of the photos!


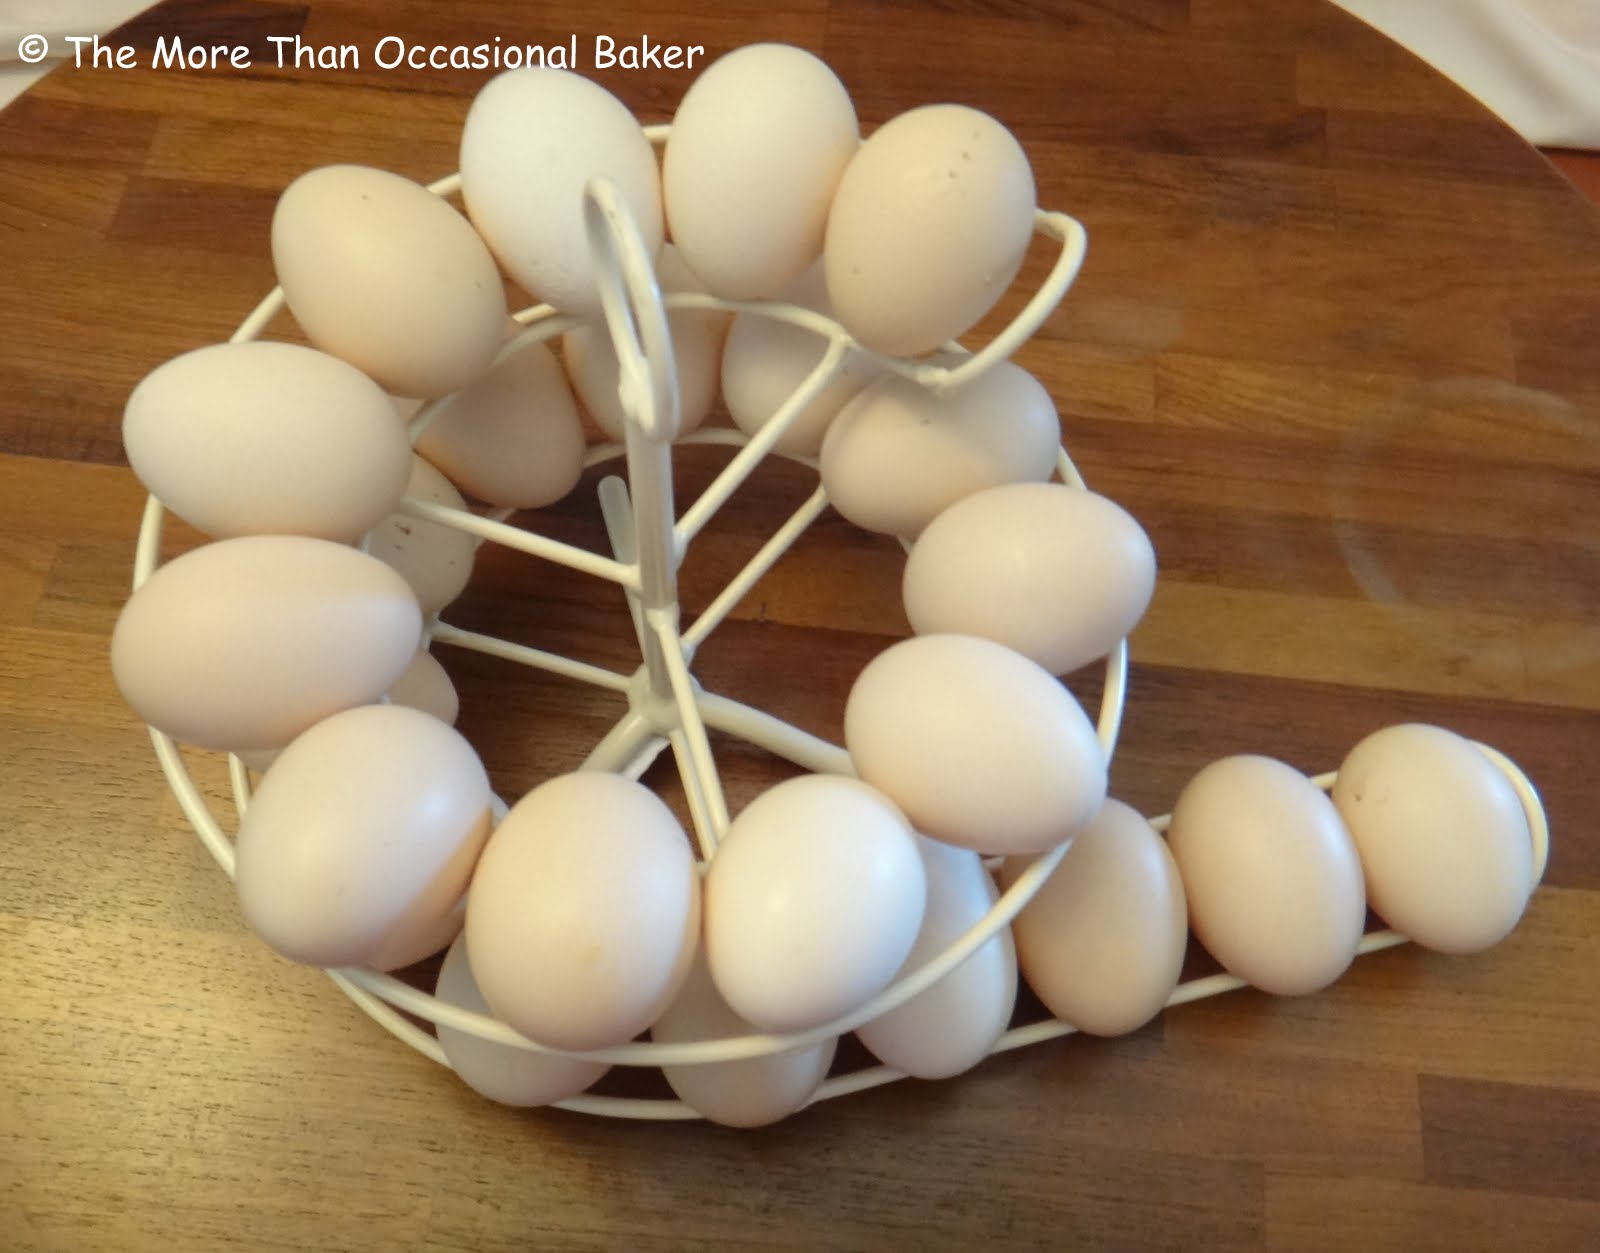
I also decided to have a little fun with the egg spiral. I'm sure you are not meant to roll the eggs down and I did end up with 5 broken eggs making this video so it was omelette and eggs for the next few meals! Warning - I can't guarantee that your eggs will remain intact if you try this at home but it's really fun :) 


The next video shows what happens when you remove an egg from the end, the next egg rolls down very smoothly - no risk of broken eggs here! 


My Verdict - a great British product which is well made, has great design and functionality. It's particularly useful if you have your own hens.  It also provides hours of entertainment if you are silly like me ;) I've already ordered a few as Christmas presents and I'm sure they will be very well received. 

Disclaimer: I was sent this product to review free of charge. I was not required to write a positive review and all opinions expressed here are my own. 


Monday 26 November 2012

Secret Recipe Club: Coffee Cookies


It's time for another Secret Recipe Club Group D reveal day. I was worried I would not have time to bake for this as assignments are given out in the first week of November for a reveal day at the end of November. I knew I had to pack all my kitchen equipment (click here to read why) but nevertheless I didn't want to miss out on one of my favourite challenges especially as the club is taking a break for December. Unfortunately, I won't be able to participate in January as I will still be travelling and homeless so I will be back in February 2013!

My assignment this month is Chocolate and Dreams who resides in India. She was introduced to the world of baking in 1999 after her mother sent her to a cookery class. Today she cooks and blogs and hopes to start her own cafeteria where food and dreams are cherished and relished. Her blog is beautifully laid out with lovely pictures to accompany each post. I headed straight for the recipe index and looked at her baking section. I shortlisted busy day cake, banana chocolate cupcakes, lemon bars and classic brownies. In the end, I decided on coffee cookies as I had all the ingredients to hand and it did not require any special equipment.

The cookies were amazing! They were soft and crumbly with a strong coffee taste. They were really aromatic and I love the extra sugar crunch on top which also helped to sweeten the cookie as it's not overly sweet. Definitely perfect with a cup of tea or coffee.


 honey and coffee


ready to go in the oven


handmade with love :)

Recipe from Chocolates and Dreams 

50g brown sugar (use more if you prefer a sweeter cookie)
85g honey
170g butter
2.5 tablespoons coffee granules
2 tablespoons hot water
1 egg
1 teaspoon baking powder
155g flour
Demerera sugar for sprinkling (or any coarse brown sugar)
  • Preheat the oven at 175C and grease and line a baking sheet.
  • Dissolve the coffee in the hot water and set aside to cool.
  • Beat the brown sugar, honey and butter until light and fluffy.
  • Add in the egg and mix well.
  • Add in the coffee mix.
  • Finally, fold in the flour and baking powder.
  • Drop by spoonfuls on a lined baking sheet.
  • Sprinkle with brown sugar and bake for 10 minutes to get soft cookies and 12 – 13 minutes to make them crunchy.


Thursday 22 November 2012

Lemon Brownies


This is a really quick and simple recipe with lemons. I saw this on Me and My Sweets back in May this year and bookmarked it as I love lemon recipes. I made them in between packing so I couldn't find the right tin and used a foil takeaway container instead! It worked well though and although I didn't get a chance to try it, I was told it was delicious.

I'm sending this recipe to Bookmarked Recipes hosted by Jacqueline from Tinned Tomatoes.


 ready to go in the oven 

 lots of lemony glaze on top! 

For the brownies 
90g flour
150g golden caster sugar (I reduced it from the original amount so you may need to add more if you have a sweet tooth)
1/4 teaspoon salt
113g butter
2 eggs
2.5 teaspoon lemon zest (approximately 1.5 lemons)
2 tablespoons lemon juice

For the glaze
60g icing sugar
1 tablespoon lemon juice
2 teaspoon lemon zest (approximately 1/2 lemon) 

  • Preheat oven to 180C. 
  • Add flour, sugar, salt and softened butter to a bowl and beat until combined.
  • In a separate bowl, whisk together egg, lemon zest and lemon juice. 
  • Pour into the flour mixture and beat until smooth and creamy.
  • Pour mixture into a suitable baking dish and bake for about 20-25 minutes, or until golden brown and a toothpick inserted into the center of the brownies comes out clean. 
  • Allow to cool completely before glazing.
  • To make the glaze, mix all the ingredients together until smooth. You may want to add more lemon juice depending on the consistency required.
  • Spread glaze evenly on top of the brownies and add some lemon zest if desired. 

Monday 19 November 2012

Reeses Peanut Butter Cup Baked Buttermilk Mini Donuts


I'm sure you all know how much I love American goodies and having made 2 trips to America this year, I've accumulated an impressive collection of American related baking ingredients and equipment. I really wanted to enter United Bakes of America hosted by Gem from Cupcake Crazy Gem and decided on a recipe that Gem herself suggested I might like back in July when I made my Olympic Mini Ring Donuts. Well it's been a few months but here it is! They were just like I imagined - a lovely (read healthier) baked peanut butter flavoured donut dipped in chocolate ganache and topped with peanut butter cups. Definitely one for the peanut butter lover :)


 I knew there was a reason I bought a packet of vanilla pudding the last time I was in America! 

 Mini donut pan 

 Fresh from the oven 

 ready to eat! 

Recipe adapted from Picky Palate

93g flour
1 tablespoon baking powder
1/4 teaspoon salt
56g sugar
1 egg
1 teaspoon vanilla
3 tablespoon instant vanilla pudding mix
8 mini Peanut Butter cups , roughly mashed with a fork + extra to decorate
3/4 cup buttermilk
100g chocolate, broken into pieces
2-3 tablespoon soured cream or double cream 
  • Preheat oven to180C.
  • Place flour, baking powder, salt, sugar, egg, vanilla and pudding mix into a large mixing bowl.
  • Add mashed Reeses Peanut Butter Cups and pour in the buttermilk, stir to combine.
  • Scoop batter into prepared donut pan (in batches if necessary). Bake for 8-10 minutes, until baked through.
  • Remove and allow to cool for 10 minutes before removing from pan.
  • To prepare the chocolate ganache, melt the chocolate in a microwave or ina bowl over a pan of simmering water.
  • Stir in the cream and mix until smooth.
  • Dip tops of donuts in chocolate and decorate with chopped up mini Reeses Peanut Butter Cups.


Friday 16 November 2012

Apple Cinnamon Chocolate Braid


Would you believe I've never made my own bread? Well, apart from banana bread and beer bread but they're not proper bread of the yeasted variety. I don't know why but I have this (irrational) fear of baking bread.  As you know I love entering blogging challenges and I realised I could enter quite a few challenges this month if I conquered my fear.

So I had a little think and initially thought of making a variation on a cinnamon roll but when I was browsing through pinterest I came across this apple braid by eat, live, run. As I'd already decided I would rise to the challenge of baking bread, I figured it wasn't too much more of a leap to start with a complicated looking one like this!! It was not too difficult in the end and I didn't end up crying over it - phew! Instead I did a little happy dance and couldn't wait to eat it as soon as it came out of the oven as it smelt so good baking. The bread was absolutely delicious! I loved the combination of apples, cinnamon and chocolate and the dough was surprisingly light (I was worried that I'd overworked the dough). Definitely best eaten warm but still good the next day.

So on to the challenges.  Calendar Cakes hosted by Laura from Laura Loves Cake and Rachel from Dolly Bakes chose bread, rolls and buns as Nov 17th is Homemade Bread Day. 

We Should Cocoa created by Choclette from Chocolate Log Blog and Chele from Chocolate Teapot which is guest hosted this month by Nazima from Franglaiskitchen chose bread or yeasted sweet dough bakes which have to include the compulsory ingredient chocolate. 


I'm also entering this to the Breakfast Club created by Helen from Fuss Free Flavours and guest hosted this month by Choclette from Chocolate Log Blog. The theme of course is chocolate!


As apples are in season, I'm also entering this to Simple and in Season hosted by Ren from Fabulicious Food.


Last but not least, I am also entering this to Made with Love Mondays hosted by Javelin Warrior where the idea is to cook everything from scratch .


And to another challenge that Javelin Warrior told me about called Bake Your Own Bread hosted by Heather from girlichef and Connie from My Discovery of Bread.


 you'll need bread flour, sugar, cinnamon, yeast, apples, lemon juice and chocolate chips 

 apples with cinnamon, sugar and lemon juice 

 roll out dough into a rectangle shape 

 cut strips on both sides, leaving the centre of the dough uncut 

 place your filling - apples, cinnamon and chocolate in this case in the middle 

 start braiding from one end to the other 

 the finished product - it's going to be a giant bread! As there was a lot of apple/cinnamon/lemon juice left which I didn't want to waste ...

 .. I decided to brush it over the whole bread

 which leaked slightly but not too badly and it gave it a nice brown top after baking 


 best served warm. Vanilla ice cream essential optional. 


Recipe adapted from Eat, Live, Run 

For the Apple Filling
3 medium-sized apples
3 tablespoons granulated sugar
1 1/2 teaspoons cinnamon
2 teaspoons lemon juice
100g chocolate chips

For the bread
350g  bread flour
50g caster sugar
1 tablespoon instant yeast
3/4 teaspoon salt
1 cup warm water
2 1/4 teaspoons vegetable oil

You can also make a glaze for the bread but I decided not to.
  • Preheat the oven to 180C.
  • To make the apple filling, peel, core, and slice the apples into thin slices, then cut the slices in half. 
  • Toss the apple pieces with the sugar, cinnamon, and lemon juice. 
  • Bake the apple filling in small tin for 15 minutes. 
  • Remove from the oven and set aside. 
  • Once it's cooled completely, stir in the chocolate chips - the chocolate will melt if you add it in too early! 
  • (Note: Do not turn the oven off at this point. You will be using it to bake the finished braid.)
  • To make the bread, mix the dry ingredients together in a large mixing bowl. 
  • Add the water and oil and mix the dough for 6 minutes using an electric mixer on medium-high speed.
  • (The flour amount I've included here is more than suggested as I found my dough was still very wet - you may need to adjust this youself)
  • Spray a smooth clean surface with cooking spray and turn the dough out onto the surface. 
  • Knead the dough briefly to give it a smooth surface 
  • Spray a rolling pin with cooking spray and roll the dough out into a large rectangle, about 12-inches by 16-inches in size. 
  • Lift onto a greased baking sheet.
  • Using a pizza cutter or sharp knife, cut each side into strips about 1-inch wide down each side, leaving the center third of the dough uncut. 
  • Spread the apple filling down the middle third of the dough. 
  • Fold strips of dough into the center, crisscrossing the filling by alternating strips from each side. 
  • Lightly press ends to seal, and straighten out the braid with your hands, if necessary, to straighten.
  • Bake the braid in the oven for 25 minutes, or until golden brown. Remove from the oven and let the braid cool for several minutes.

Wednesday 14 November 2012

Apple muffins


I was contacted by the lovely people at flora to see if I wanted to try out their Flora Cuisine.  I was sent a recipe book and ingredients and asked to make apple muffins on page 49.
I was really pleased with the choice as I love baking with apples especially at this time of they year.  These muffins are really quick and easy to put together and tastes delicious! I love the combination of apples and cinnamon and may consider adding in nuts and or raisins next time.

Flora is currently offering readers a chance to win a copy of Let's Get Cooking and a week's worth of delicious dinners for a family of four.  To be in with a chance of winning, all you have to do is to choose a dish from their cookbook which is available to download for free from their website and submit a recipe review in one of the following ways:

  • Follow @OfficialFloraUK on twitter and tweet a bite sized review using the hashtag #CookbookComp
  • Find the recipe on the Flora website and leave a review in the comments section below it. Then drop a quick email to flora@tmw.co.uk so they can contact you if you win. 
All the recipes in their book is suggested by mums and dads on Facebook. I love using the Flora cuisine as there was no need to soften butter especially in this weather! I leave my butter out to soften but after a day it's still quite solid! 

 This is the recipe I was asked to make 

 Ingredients I received and the cookbook

 Mix Flora Cuisine, flour, sugar and cinnamon

 Add chopped apples at the end 

 delicious and moist! 

Recipe from Flora's Let's Get Cooking, page 49

Makes 12-18 cakes
Prep 10 mins
Cook 12-15 mins

115ml Flora Cuisine
115g self raising flour
115g caster or muscovado sugar
1 teaspoon ground cinnamon
2 eggs
2 dessert apples, cored and chopped into small chunks.

  • Preheat the oven to 190C.
  • Mix together the Flora cuisine, flour, sugar and cinnamon.
  • Break in the eggs and mix together until smooth. 
  • Fold chopped apples into the cake mixture.
  • Divide among cupcake cases, remembering not to over-fill them. 
  • Bake in the oven for 12-15 minutes.
  • The cakes are ready when they spring back when lightly touched with a finger. 
Disclaimer : I was sent the ingredients and a copy of the cookbook free of charge to review. I was not required to write a positive review. All opinions expressed are my own. 


Tuesday 13 November 2012

A Short Announcement

I mentioned in my previous post that I have secured a new permanent job. It's a very exciting time for me as I feel like I've worked very hard to get to this point! It's a very exciting opportunity and it's a permanent job which will offer some stability. To mark this milestone, I am taking a 3 month break and will start my new job in Feb 2013. I've been really busy recently as you can probably imagine with sorting, packing and moving. Most of my stuff is now in storage and I am about to embark on a very exciting journey around the world which will take me to Europe, Asia and Australia. 

I have quite a few posts to schedule for November as I had one day of frenzied baking before I packed all my beloved baking equipment. I will also still host AlphaBakes in December so do send in your entries! I may be tweeting at odd times as I will be halfway round the world and may be a little slow in visiting your blogs so I apologise in advance. Being the bakingaddict that I am, I will probably find the opportunity to bake as some of my travels is to visit family so don't be too surprised if you see baking in a variety of kitchens! I've actually packed a few baking related items into my suitcase!! :) 

Ros xx 


Saturday 10 November 2012

Carrot, courgette and pineapple garden cake


Today is one of my good friend's birthday! I managed to meet up with her last week for a celebration and of course I had to make a cake. Last year I made a raspberry ripple cake which was fraught with disasters but luckily tasted very good. This year I wanted to do something different so I decided to push the boat out and looked through my copy of The Birthday Cake Book by Fiona Cairns. I've never made anything from this book as they all look quite scary and complicated but I was feeling brave! 

When I saw her vegetable plot cake, I decided I wanted to make a garden cake as my friend loves gardening. So this cake is inspired by Fiona Cairns but I've created my own 'garden vegetable' cake recipe. I thought it was only fitting that the cake should be full of fruits and vegetables. I also used spelt flour for the extra "earthiness" and healthiness and the result was a delicious, moist and flavourful cake. It went really well with the cream cheese frosting and I'll definitely be making these again perhaps in a muffin form for breakfast/snacks. 

My friend was really pleased with the cake and said it was the best cake she's ever had!! :) I feel so touched but am also slightly worried that I won't be able to make anything as good as this for future birthdays! 

Happy Birthday Charlotte!! 


As this is a birthday and celebration cake, I'm also entering it to Tea Time Treats who are celebrating their first birthday this month and the theme is cake. Tea Time Treats is hosted by Karen from Lavender and Lovage and Kate from What Kate Baked


 You need courgette, carrots, pineapple and I threw in a banana as well as I had one going brown - it adds to the moistness of the cake 

 mash the bananas, grate the carrots and courgettes and open the tin of pineapple (you can also use fresh pineapple)

 ready to go in the oven. I love the colour of the batter from the spelt flour 

 sandwich the cakes with cream cheese frosting tinted green. Cover the top and sides 


 Buy 2 boxes of matchmakers to make the fence 

 roll a small piece of green fondant into a sausage like shape with tapered ends 

 press the end of a paintbrush to create an indentation for the pea pod

 neaten the ends like this 

 roll 3 small balls of green fondant and place in the pod - these are a little big but I'm sure you get the idea! 

 Roll some orange fondant to a similar shape and use a knife to score ridges across to make it look like a carrot. I shaped the green fondant by hand and stuck it on top of the carrot 

 roll a piece of green fondant into a small ball. flatten with your palm. use a sharp knife to cut out a star shape pattern like this 


 roll a small ball of red fondant. place the green 'star' that you cut earlier. Use a paintbrush to make a hole in the centre. Please tell me they look like tomatoes!

 To assemble the cake - cover the top and sides with green cream cheese frosting. Place the matchmakers around the cake to create a fence. I made them different heights but you can keep it even. Blitz 5 oreo cookies in a food processor and spread on top of the cake. I made some 'grass' from green dessicated coconut which I sprinkled on the cake board using the same cream cheese frosting to stick it to the board. 

 I also made some potatoes by rolling small balls of brown fondant and making indentations with the end of a paintbrush 

 I bought some coconut mushrooms as I didn't have time to make my own 


 The finished cake 

An original recipe by bakingaddict

For the cake
65mls or 1/3 cup vegetable oil
3 eggs
2 teaspoon vanilla extract
3 teaspoon ground cinnamon
1/4 teaspoon ground nutmeg
2 teaspoon bicarbonate of soda
1 teaspoon salt
400g brown sugar
375g spelt flour
200g carrots, grated (approximately 2 medium sized carrots)
200g courgette, grated (approximately 1 medium sized courgette)
225g tinned pineapple, drained
1 banana
120g pecan nuts, roughly chopped 

For the cream cheese frosting
225g cream cheese
113g butter
2 teaspoon vanilla extract
400g icing sugar
green food colouring

  • Preheat the oven to 180C.
  • Grease and line 2 sandwich tins.
  • Mix oil, eggs, vanilla, spices, bicarbonate of soda, salt and sugar in an electric mixer or large bowl.
  • Add in the flour and mix well.
  • Add the grated vegetables, fruits and nuts and mix well.
  • Divide the batter evenly between two pans (I usually weigh mine).
  • Bake for approximately 50minutes to 1 hour or until a skewer inserted into the middle comes out clean.
  • Allow to cool completely on a wire rack before decorating.
  • To make the frosting, beat the butter, cream cheese and vanilla extract in an electric mixer until smooth.
  • Slowly add in the icing sugar and continue mixing until smooth. 
  • Add the green colour at the end. 
For the decorations as shown

5 oreo cookies
2 boxes of matchmakers
ready rolled fondant icing - you can either buy them coloured or colour your own using paste colours
I used green, orange, red and brown
1 paintbrush
1 small, sharp knife
dessicated coconut
green food colouring
coconut mushrooms
wafer daisies
2 red m&m's
black writing icing