Showing posts with label honey. Show all posts

Friday, 17 July 2015

Honey Chocolate Cake


I've been baking quite a bit with Hans Sloane Chocolate beads recently. So far I've made banana, pecan and chocolate waffles, chocolate cookies with ginger or cranberry and a dark chocolate salted caramel oreo pie. Those recipes were made using rich dark chocolate beads or Ecuador 70% chocolate beads. I saw that they have a natural honey with milk chocolate version and was intrigued as I love honey. I absolutely love dark chocolate which is my favourite type of chocolate but I have to say that these natural honey chocolate beads have jumped straight to the top of the favourite list. I've tried honey chocolate products before and often you can't really taste the honey or it tastes artificially sweeter. When you open this pack, the delicious smell of honey hits you immediately. The chocolate is smooth and really tastes like honey. I could have just eaten the whole pack as it is but I had to exert some self control and save it for the recipes. I've also used the natural honey chocolate beads to make a hot chocolate drink and it's absolutely divine.

I started thinking about recipes to showcase the honey chocolate and decided on an old favourite which is Nigella's chocolate honey cake. I've made this recipe quite a few times and it never fails to impress. I have tried different ways of decorating it and I think this is the winner. I put a Kit Kat fence around the cake and added crushed Crunchie bars on top. The bees are my favourite part and they look great sitting in a pool of honeycomb. I also made another cake and decorated it with fresh flowers from the garden and sugar bees.

The cake is light, chocolatey and full of honey flavour. The natural honey chocolate beads adda a really strong honey aroma to the cake and the glaze. The Kit Kats and Crunchie bars add more chocolate and also provides different textures to the cake. The sugar bees are literally the icing on the cake. They look really cute and add a fresh burst of colour to the cake.


 adding honey to the cake mixture 

 adding natural honey chocolate to the cake mixture 

 honey chocolate cake! 

 how cute are the bees in a pool of honeycomb?

 This is the second cake decorated very simply with fresh pansies and sugar bees. 

Recipe adapted very slightly from Nigella 

Makes 1 x 23cm/9 inch round cake
For the cake
100g Hans Sloane Natural Honey Chocolate beads, melted
275g light brown muscovado sugar
225g butter, softened
80ml runny honey
2 large eggs
200g plain flour
1 teaspoon bicarbonate of soda
1 tablespoon cocoa powder
250ml boiling water

For the sticky honey glaze
60ml water
25 ml runny honey
175grams Hans Sloane Natural Honey Chocolate Beads
75g icing sugar, sifted

For the bees
25 grams yellow ready to roll icing
12 flaked almonds

For the decoration
Kit kat
3 crunchie bars

  • Preheat the oven to 180C.
  • Grease and line a 23cm/9 inch round springform cake tin. 
  • Melt the chocolate in a small bowl over a pan of simmering water. Allow to cool slightly. 
  • Beat the butter and sugar in an electric mixer until pale and fluffy.
  • Add in the runny honey and mix well. 
  • Add in the eggs, one at a time.
  • Fold in the melted chocolate, flour, bicarbonate of soda and cocoa powder.
  • Finally pour in the boiling water and mix well.
  • Pour the cake batter (which will be quite liquid) into the prepared cake tin and bake for an hour. 
  • Check the cake after 45 minutes and cover with foil if the top of the cake is brown. 
  • Allow the cake to cool completely in the tin on a wire rack. 
  • To make the glaze, put the water and honey in a small pan and bring to the boil. Remove from the heat. 
  • Add the Hans Sloane Natural Honey Chocolate Beads and whisk gently until the chocolate has melted.
  • Add in the icing sugar and continue whisking until smooth. 
  • To make the bees, divide the yellow icing into 6 even pieces.
  • Roll each piece in the palm of your hand into a sausage shape roll that's tapered at one end.
  • Use a wooden skewer to paint 2 stripes on each 'bee' with the sticky honey glaze as shown. Add 2 dots in the front for eyes.
  • Place 2 almond flakes, one at either end to form the bee's wings. 
  • To decorate the cake, place 4 strips of parchment paper on a cake stand to form a square. This is a great tip from Nigella as the icing is quite runny initially and prevents a mess on the cake stand. 
  • Place the cooled cake in the centre of the cake stand.
  • Pour the sticky honey glaze on top of the cake allowing it to drip down the sides.
  • Gently slide out the strips of baking paper so you have a clean cake stand. 
  • Cut Kit Kat bars in half and arrange them around the border of the cake the form a fence.
  • Crush 3 Crunchie bars and sprinkle on top of the cake.
  • Carefully add the bees on top.
  • Alternatively decorate with some fresh pansies and sugar bees. 
  • (Note - the sticky honey glaze is very sticky and a little runny so make sure you allow plenty of time for it to set before serving) 
Disclaimer: I was sent Hans Sloane chocolate beads for review purposes. A positive review was not required and all opinions are my own. This is not a sponsored post. 

Tuesday, 28 April 2015

Chocolate Aubergine Cake


Yes you read the title correctly. The main ingredient in this cake is aubergine! I've baked with vegetables before mostly carrot, courgette, parsnip and beetroot but I've never tried using aubergine. I got the recipe from Red Velvet Chocolate Heartache which is a lovely book by Harry Eastwood. She writes beautifully and the recipes are naturally gluten free. She uses vegetables and a combination of ground almonds and/or rice flour which makes the cakes healthier. This replaces the usual butter and sugar that goes in cakes. I really liked the title of this cake which is Chocolate heartache. I decided I had to bake it as it's named in the title of the book. Plus I was looking for a gluten free cake that contained chocolate for a celebration. The cake was really dense and chocolatey and you definitely can't taste the aubergine in the cake. Everyone could not believe that the cake was gluten free and contained vegetables! The cake was so good I baked it twice in the same week. The first time I made a simple chocolate icing to go on top but felt it was a little too rich to go with the already rich cake. The second time I covered the cake with fat free greek yoghurt and that worked really well as it helped to cut through the denseness of the cake. 

I'm sending this to a few blog challenges this month. Tea Time Treats hosted by Karen from Lavender and Lovage and Jane from The Hedgecombers. The theme this month is chocolate. 

Extra Veg hosted this month by Jo from Jo's Kitchen on behalf of Helen from Fuss Free Flavours and Michelle from Utterly Scrummy Food For Families. This cake is definitely a sneaky way to get extra veg into your diet!


Recipe of the week hosted by Emily from A Mummy Too.


Cook Blog Share hosted by Lucy from Supergolden Bakes.


Tasty Tuesdays guest hosted by Mel from Le Coin De Mel on behalf of  Vicki from Honest Mum.


Bake of the week hosted by Helen from Casa Costello


 baking powder, cocoa powder, ground almonds, honey, dark chocolate, eggs and aubergine. 

 cook the aubergine in the microwave then peel off the skin and puree the aubergine in a food processor. Add dark chocolate and allow to melt or  blitz gently until mixed. 

 adding the chocolate aubergine paste to the remaining ingredients

 ready to bake 

 a lovely chocolatey fudgy cake 

 with chocolate icing 


 with fat free greek yoghurt 


Recipe is from Red Velvet Chocolate Heartache by Harry Eastwood. If you click on the amazon link, you can 'look inside' the book. The recipe is available to view online. If I get permission from the publisher then I will publish the recipe here.

Wednesday, 22 April 2015

Banana, cashew butter and chocolate chip muffins


Muffins are probably one of our favourite breakfasts to eat on the go. They are so easy to put together and they freeze well so you can jut defrost one overnight for your breakfast in the morning. As usual I had a few over ripe bananas so I decided to make some banana muffins. Recently I was contacted by My Protein who are the largest online sports supplement store in Europe. As you can imagine they sell a lot of high protein products and have a very large selection of them. Initially I wondered how I would incorporate it into baking and I was pleasantly surprised as they sell a lot of nut butters, organic flours, coconut oil, dried fruit, oats and more. I decided to try out kamut flour and cashew butter and knew they would work well in a muffin recipe. 

I've never heard of Kamut flour before so I'll just explain a little in case you haven't either. It's a wheat flour made from the ancient durum wheat relative. It's high in selenium, zinc, magnesium and protein and low in saturated fat. It has a slightly nutty flavour and a very faint smell of nut/protein. The cashew butter was absolutely delicious. It had the lovely aroma of cashew nuts and you can clearly see the nuts in the butter. 

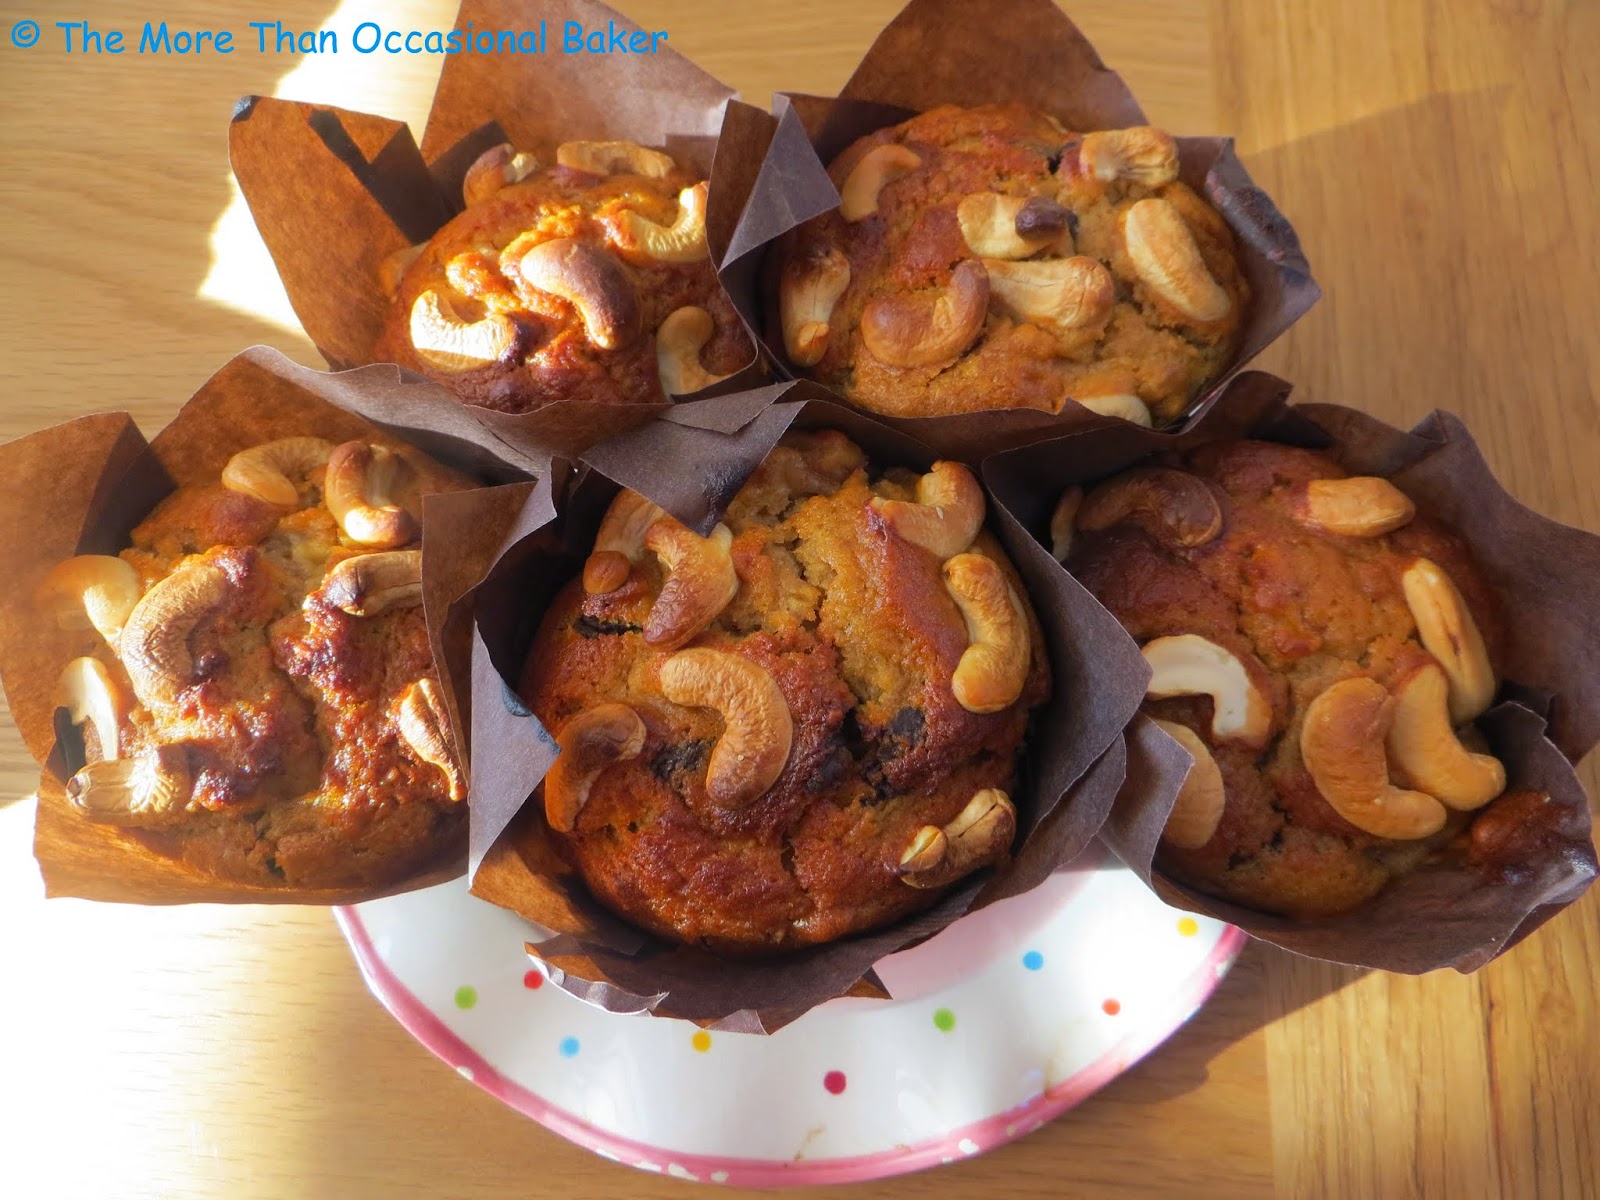
The muffins are made of banana, cashew butter, chocolate chips and kamut flour. I added a sprinkling of raw cashew nuts on top as I had some leftover from another recipe. It adds extra crunch and flavour to the muffins. The muffins were really filling and you can clearly taste the banana and cashew butter. The chocolate chips added a little hint of naughtiness rounded up the flavours nicely. I think some fresh fruit such as blueberries and maybe a little yoghurt will lighten the muffin and make it better. Looks like there's more experimenting to be had in the kitchen! 

I'm sending these to AlphaBakes hosted by Caroline from Caroline Makes and myself on alternate months. The letter ths month is B for banana.


 cashew butter and kamut flour 


 you can clearly see the nuts in the cashew butter 

 dry ingredients + wet ingredients and chocolate chips 

 adding chocolate chips 

 I added a sprinkling of raw cashew nuts on top for extra crunch and flavour 


Makes 12 muffins
250g kamut flour
100g brown sugar
1 tablespoon baking powder
3 ripe bananas, mashed
250mls milk
200g cashew butter
3 tablespoons vegetable oil
2 eggs
60g honey
100g dark chocolate chips.


  • Preheat the oven to 180C.
  • In a medium sized bowl, mix together the flour, brown sugar and baking powder and set aside.
  • In a large bowl, mix the mashed bananas, milk, vegetable oil, eggs, honey and cashew butter.
  • Pour the dry ingredients into the wet ingredients and mix until it just comes together.
  • Finally stir in the chocolate chips.
  • Bake for approximately 25-30 minutes or until golden brown and a skewer inserted into the centre comes out clean. 
Disclaimer: I was sent the my protein products for review purposes. A positive review was not required and all opinions are my own. This is not a sponsored post. 


Saturday, 11 April 2015

Banana and Berry Lemon Muffins


The sun is shining and the daffodils are blooming. Spring has definitely arrived. These muffins are perfect for spring as it's full of berries, banana and lemon. They are moist and fruity and you definitely get some of your five a day in this. I adapted a muffin recipe from BBC good Food and used up leftover fruit that I had. It was also a good chance to try out the lemon extract paste from Taylor & Colledge. They kindly sent me a range of their new flavour pastes to try. The range includes vanilla bean, lavender, lemon, coconut, almond and peppermint. They come in a handy tube and it's very easy to use with no mess. The lemon one smells really nice and lemony and the paste is a good consistency - not too thick and not too thin. These are a great way to add flavour to your bakes. 


I'm sending these muffins to AlphaBakes hosted by Caroline from Caroline Makes and myself on alternate months. The letter ths month is B for banana and blueberries.


Treat Petite hosted by Kat from The Baking Eplorer and Stuart from Cakeyboi. The theme this month is Hello Spring. 


Credit Crunch Munch guest hosted by Michelle from Utterly Scrummy. The challenge is run by Camilla from Fab Food 4 All and Helen from Fuss Free Flavours. This is quite a frugal recipe as it uses up store cupboard ingredients and leftover fruit. I didn't buy anything new for this recipe. If you don't have the lemon paste, a bit of fresh lemon juice and zest will suffice or you can omit it.


No Waste Food Challenge hosted by Elizabeth from Elizabeth's Kitchen Diary. I used up lots of leftover fruit and yellowing bananas for this recipe. 


 adding lemon paste 


 adding berries 

 sprinkle some chopped strawberries before baking


Makes 12 muffins

250g flour
115g brown sugar
1 teaspoon baking powder
1/2 teaspoon bicarbonate of soda
3 ripe bananas
125mls vegetable oil
60mls milk
60mls honey
2 eggs, lightly beaten
85g blueberries
220g strawberries - keep aside about 6 or 7 strawberries to put on top of the muffin before baking
1/2 teaspoon lemon paste


  • Preheat the oven to 180C. 
  • In a medium sized bowl, mix together the flour, sugar, baking powder and bicarbonate of soda and set aside.
  • In a large bowl, roughly mash the bananas with a fork.
  • Add the vegetable oil, milk, honey and eggs.
  • Add in the flour mixture followed by the lemon paste.
  • Stir gently until just combined - be careful not to overmix.
  • Add in the strawberries and blueberries.
  • Divide the mixture into 12 muffin cases
  • Sprinkle the tops with the reserved, chopped strawberries and bake in the oven for about 20 minutes or until golden brown and a skewer inserted into the centre comes out clean. 

Disclaimer: I was sent a range of flavour pastes from Taylor & Colledge for review purposes. A positive review was not required and all opinions expressed are my own. This is not a sponsored post. 

Tuesday, 24 February 2015

Banana, blueberry and apple muffins


As usual I had a brown banana in the kitchen begging to be baked. I also found a slightly soft apple and some blueberries so I decided to incorporate everything into a muffin. These are great for lunch boxes or breakfast on the go. We kept them in the freezer and defrosted them for breakfast during the week which was really handy. The muffins are quite dense and cake-like and it was full of blueberries! I made sure to add extra blueberries on top just before baking and as you can see they didn't sink to the bottom!

I'm sending this to the No Waste Food Challenge hosted by Elizabeth from Elizabeth's Kitchen Diary. I used up a brown banana and an apple going spare in this recipe.


 banana and grated apple mixture; milk, vegetable oil and honey mixture 

 adding in lovely blueberries 

press a few blueberries on top before baking 

 bursting with flavour 

Recipe adapted slightly from BBC Food 

250g plain flour
1 teaspoon baking powder
2 teaspoons ground cinnamon
50g caster sugar
1 ripe banana, mashed
1 ripe apple, peeled, cored and grated
250g blueberries (set aside a generous amount to place on top of the muffin before baking) 
3 tablespoons honey 
60mls vegetable oil
1 laarge egg
185mls milk
  • Preheat the oven to 180C. 
  • In a large bowl, sift the flour, baking powder and ground cinnamon. Add in the sugar. 
  • Add in the mashed banana, grated apple and about 200g of the blueberries. 
  • In a separate bowl or jug, mix the vegetable oil, milk and honey.
  • Pour the wet ingredients into the large bowl and stir gently to mix through.
  • Be careful not to overmix or to break up the blueberries. 
  • Spoon into muffin cases.
  • Place lots of fresh blueberries on top of each muffin - don't press too hard.
  • Bake for approximately 20 -25 minutes or until golden brown and a skewer inserted into the centre comes out clean.