Friday 30 March 2012

Raspberries and Cream Macarons


I've been really busy this week so I haven't had time to bake or blog. I had a bit of spare time yesterday evening and I thought I would participate in Random Recipes hosted by Dom from Belleau Kitchen.  The challenge this month was to count to book number 17 and then pick a random recipe from the book. So I went to my bookshelf and started counting and shook my head in disbelief. 


I'm pretty sure Dom and Choclette hatched a plot and secretly counted the books on my shelf when they chose the number 17!! So much for a nice, quick easy bake and an early evening. I was really hoping for a cake or a cookie.  Dom - please take note that there was definitely NO cheating involved as I would not have voluntarily picked this book at present given my recent macaron failures.  On the bright side, I've obviously never made anything from this book before and one of the great things about this challenge is making use of my ever growing stack of cookbooks so thank you :) 

It's a great little book all about macarons. There are pretty pictures and clear instructions with step by step photos. I particularly like the recipes in this book because there is no egg wastage.  The egg whites are used for the shells and the egg yolks for the filling. I would say these were a semi-success, far from perfect but I'm glad I tried them again. I particularly liked the filling - I could just eat it on it's own! I think I can now say with confidence that I've conquered my fear of macarons :)

 randomly opened to... strawberries & cream ... looks very pretty which makes me even more nervous. Plus, I've run out of strawberry jam so it's raspberries and cream for me

 I didn't have any vanilla pods either so I used a tablespoon of vanilla bean paste - smells amazing and you can see the flecks of vanilla seeds if you look closely enough

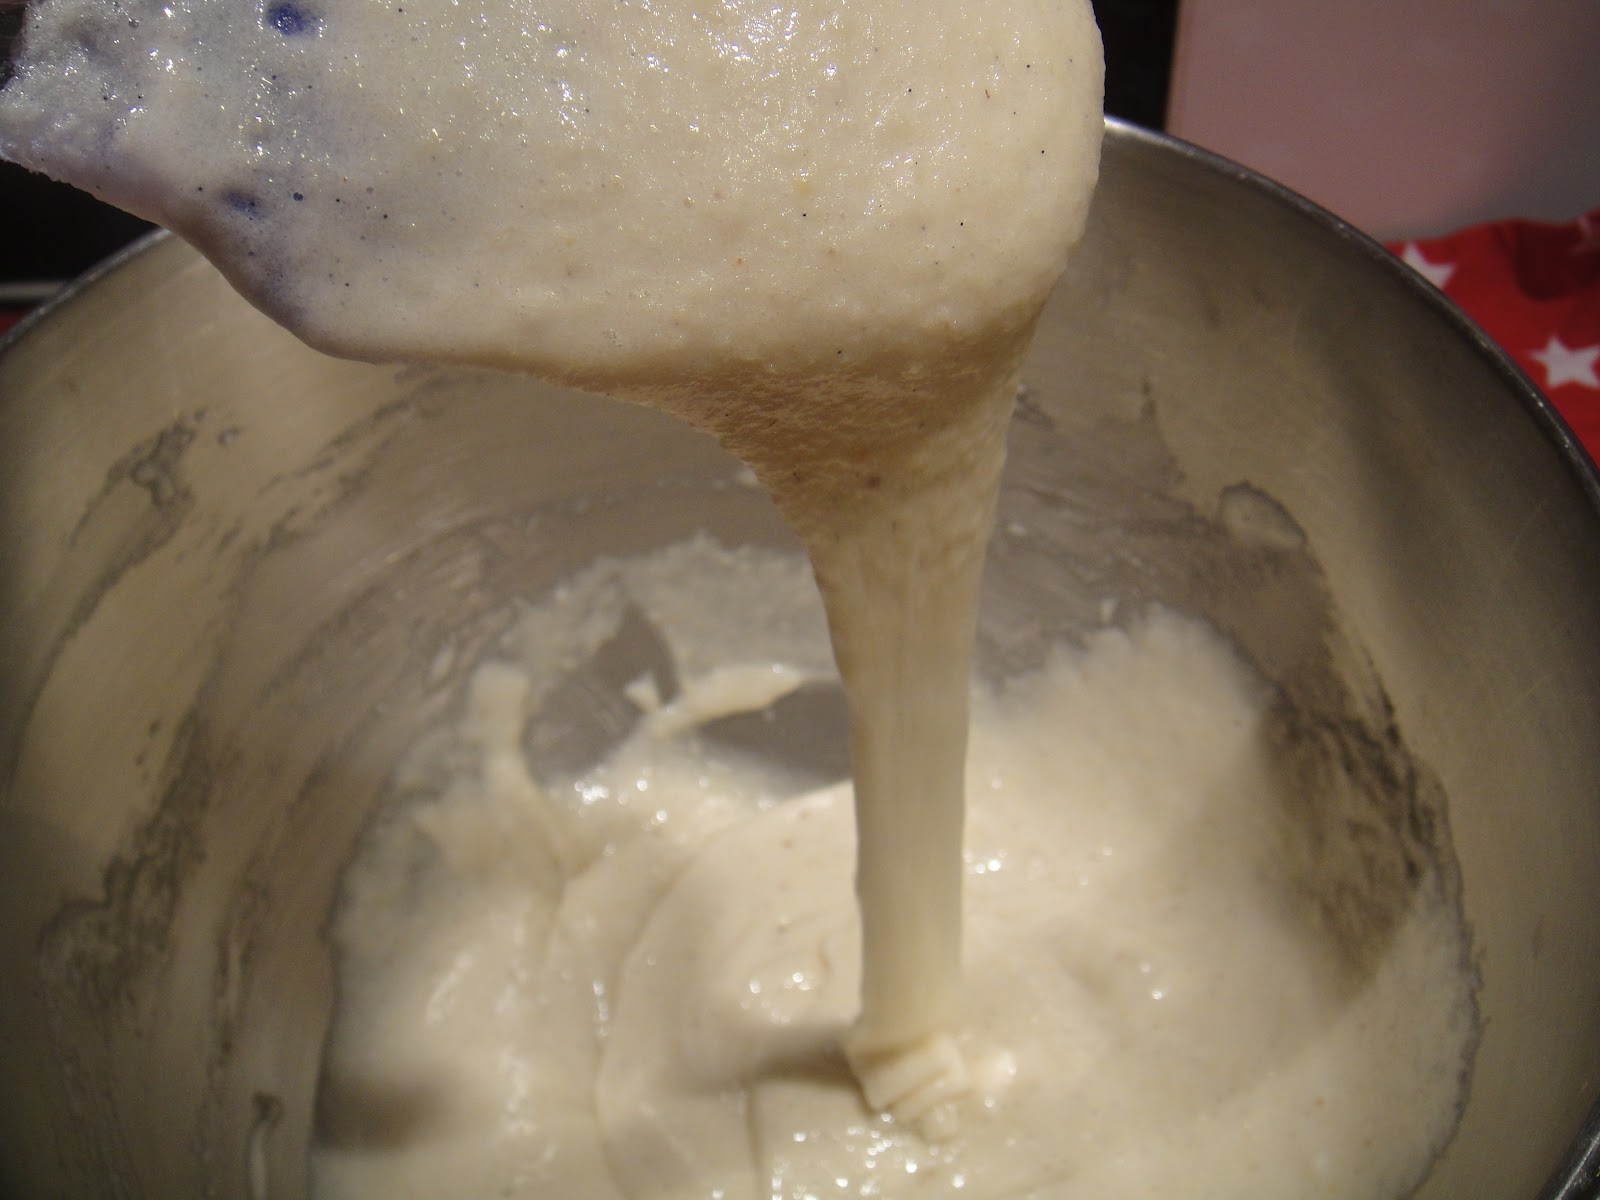
 you are supposed to mix to a ribbon like texture... so far so good.... 

 Glitter makes everything better

 A skin formed - honestly! 

 I couldn't resist peeking into the oven... looks good :) 

 ta-da! 

 look there's feet!! 


 whisking egg yolks, sugar and cornflour... 

 to make a custard like filling...

 ready for the fillings

 jam on one side, custard-cream filling on the other 


 mini macs just because everything looks better in miniature form!

 I'm so super proud of myself!! :) 


I'm also sneakily entering this to AlphaBakes even though the deadline has passed as Caroline has generously agreed to add my little macarons to the round up. What are the chances of picking a random recipe that begins with the random letter "M" that we picked for our challenge? It has to be allowed :)


 And to Sweets for a Saturday hosted by Lisa from Sweet as Sugar Cookies


Recipe from Macarons by Annie Rigg, published by Ryland Peters & Small, photography by Kate Whitaker - reproduced with kind permission from the publisher (with minor edits from me in the method section)

For the macaron shells

200g icing sugar
100g ground almonds
120 - 125g egg whites (approx 3 egg whites)
a pinch of salt
40g caster sugar
1 vanilla pod split lengthways (I used vanilla bean paste)
red edible glitter

For the filling


Raspberry jam (original recipe states strawberry jam)
3 egg yolks
75g caster sugar
1 tablespoon cornflour
250ml milk
1 vanilla pod, split lengthways (I used vanilla bean paste)
3 tablespoons unsalted butter, diced
100ml double cream


  • Blend the icing sugar and ground almonds for 30 seconds until thoroughly combined and set aside. 
  • Whisk the egg whites with a pinch of salt until they hold a stiff peak. 
  • Continue to whisk at medium speed while adding the caster sugar a teaspoonful at a time.
  • The mixture should be thick, white and glossy.
  • Using a large metal spoon, fold the ground almond and sugar mixture into the egg whits. 
  • Continue folding until a ribbon-like texture as shown above. 
  • Fill a piping bag with the mixture and pipe evenly sized rounds onto a baking sheet (I used a silicone mat which you can buy online here)
  • Tap the bottom of the baking sheets sharply, once, on the work surface to expel any large air bubbles.
  • Scatter edible glitter on top (I used a small paintbrush which I tapped gently from a height).
  • Leave the macarons to rest for about 15 minutes - 1 hour until they have set and formed a dry shell. 
  • Preheat the oven to 170C. 
  • Bake the macarons, 1 sheet at a time for about 10 minutes.
  • The tops should be crispy and the bottoms dry. 
  • Leave to cool on the baking sheet.

  • To make the filling, put the egg yolks, sugar and cornflour in a small heatproof bowl and whisk until combined. 
  • Heat the milk, along with the vanilla pod (or vanilla bean paste) in a small saucepan until it only just starts to boil.
  • Remove from the heat and pour over the egg mixture, whisking constantly until smooth. 
  • Pour the mixture back into the pan and cook gently over low heat, stirring constantly until the custard comes to a boil and thickens.
  • Strain into a clean bowl, add the butter and stir until the butter has melted. 
  • Cover with clingfilm and leave to cool before refrigerating. 
  • Whip the cream until it holds soft peaks and fold into the chilled custard. 

  • Take one half of the macaron shells and spread about 1/2 teaspoon raspberry jam onto each one. 
  • Fill a piping bag with the vanilla cream filling and pipe it onto the remaining shells. 
  • Sandwich together with the jammy macarons and leave to rest for about 30 minutes before serving. 


Monday 26 March 2012

Secret Recipe Club : Orange Cream Cheese Bundt Cake


It's Secret Recipe reveal day again for Group D. The secret recipe club was started by Amanda from Amanda's Cookin' The idea is simple - each month you are assigned a blog which you keep secret hence the name and make a recipe from that blog. Someone else will have your blog too. All posts are revealed at the same time on a set date. As Amanda says, its a fun way to discover new blogs, make new friends and step outside of our comfort zones.

This month I have been assigned Cakes and More! who describes herself as a "hardcore foodie with an incorrigible sweet tooth" You can imagine my delight when I saw the name of the blog :) I think I've mentioned previously that one of my fears is being assigned a blog with no cakes or bakes but all the bloggers are so versatile it has never happened. Back to Cakes and More!.. if you've never visited, please head on over and check out her amazing blog. It is full of beautiful pictures to accompany the detailed recipes. There were so many recipes I wanted to try on her blog but I eventually settled on this cream cheese bundt cake which sounded interesting and I love bundt cakes. Others that made my shortlist are orange yoghurt cake, citrus tuiles, mocha brownies and moist chocolate bundt cake

Back to this cream cheese bundt cake. It was the perfect opportunity to use my new miniature bundt pan from America. I added some orange blossom water, orange zest and orange juice as I thought it would complement the cream cheese.  The cake was deliciously moist and light with the right amount of citrus.  If you tasted it carefully, you can actually taste the cream cheese. I'll definitely be making this again either plain or with other flavours. 


 my new miniature bundt pan 


 I decided to add some citrus to the mix

 gorgeous orange zest 


 they turned out beautifully... 

 I had enough batter to make 2 other medium sized bundt cakes

 I also made a glaze for some of them

 delicious! 

Recipe adapted from Cakes and More!

Note: this recipe yielded 6 miniatures bundts and 2 medium sized bundts as shown. I should have made half the recipe but they were all gone as they were delicious!

340g butter
225g cream cheese
675g sugar(!! not sure if I did the conversion correctly) - I only used 300g which was fine but use 350g - 400g if you prefer a sweeter bake
6 eggs
2 teaspoon orange blossom water
375g flour
1 teaspoon salt
zest of 1 orange
1 tablespoon of fresh orange juice

Glaze (optional) 
Mix 50g icing sugar with enough orange juice to give a spreading consistency. 

  • Preheat the oven to 170C.
  • Butter and flour your bundt tins.
  • Beat the cream cheese and butter in an electric mixer until smooth.
  • Add the sugar and continue mixing.
  • Add the eggs, one at a time, mixing well after each addition.
  • Add the orange blossom water, orange juice and orange zest.
  • Finally mix in the flour and salt. 
  • Pour the mixture into the prepared tins and bake in the oven for 30-35 minutes for the miniature bundts (check after 25 minutes) and 40 minutes for the larger bundts (again check after 30 minutes). My oven temperature is wonky so these are probably over-estimations!
  • Serve with a dusting of icing sugar or orange glaze. 


Sunday 25 March 2012

Cheese Scones


I'll have to let you in on a secret... I've never made scones before even though I love them. An afternoon tea is not complete without scones and jam and cream. One of my baking resolutions this year is to try new things so when Karen from Lavender and Lovage announced that this month's tea time treats challenge is scones, there was no excuse. I did leave it a little late and therefore am not very imaginative with my scones. As it's my first time, I didn't want to start experimenting with flavours so I stuck to a simple cheese scone. I decided on savoury rather than sweet as I had cheese in the fridge that needed using up. Plus, they make great breakfast on the go food. They were really easy to make and tasted good especially when served warm with a slab of butter! I'll definitely be making all manner of scones now that I know I can make them! 

Tea Time Treats is a monthly challenge hosted on alternate months by Karen from Lavender and Lovage and Kate from What Kate Baked.  The theme this month is scones so make sure you check out Karen's blog at the end of the month for a delicious selection of scones. 


 adding grated cheese 

 cutting out the scones

 topped with more cheese 


 served warm with a slab of butter! 

Recipe adapted from McDougalls better baker's guide

Makes 11 scones of size shown (recipe book says 6) 

225g self raising flour
pinch of salt
50g butter
75g grated cheese plus extra for sprinkling on top
150mls milk plus extra for brushing on top

  • Preheat oven to 200C. 
  • Mix the flour and salt and rub in the butter until it resembles fine breadcrumbs.
  • Stir in the cheese.
  • Add the milk and mix to form a sticky dough.
  • Roll out the dough on a lightly floured surface and cut with a round cutter (or any shape you like). 
  • Brush the tops with milk and sprinkle on some extra cheese if desired.
  • Bake in the oven for approximately 13-15 minutes until golden brown. 


Saturday 24 March 2012

Tropical cake

mango, pineapple, coconut, cake

I love baking banana bread so when I saw this banana bread tin in America I knew I had to buy it.  As soon as I got home, I bought some bananas to ripen. However, I was too impatient to wait for them to ripen as I was so excited to use this tin! Plus my brother was making an unexpected visit and said if I wanted to bake a cake (he knows me so well!), he would take it with him and share it with his colleagues.  Of course I couldn't say no - I'm always looking for someone to eat my bakes and it was the perfect opportunity to try out my new tin. 

This tin inspired my cake which I made up as I went along. I wanted to use ingredients that I had and that had a tropical feel as that's what this tin says to me. Admittedly, I had to buy the mango and dessicated coconut (as I don't like coconut) but I had everything else at home. 

The cake was moist and flavourful and smelt very tropical.  It's a bit like Forrest Gump's box of chocolates - you never know what you are going to get next. Each bite of the cake had a different taste of the fruits - the first bite, I tasted banana and coconut, then pineapple and then mangoes.  I used a lot of fruit in this cake and I would recommend halving the fruit amount and increasing the flour if you prefer less 'bits' in your cake.  It also made a lot of cake as I managed to get 1 fancy cake as shown above and another medium sized bundt cake. 

I am entering these to simple and in season hosted by Ren from Fabulicious food 


and again (I know!) to my own AlphaBakes hosted by Caroline from Caroline Makes this month as the letter is M .... for mangoes!


PS apologies for the awful lighting in the photos - didn't realise until it was too late to fix!


 my brand new tin 

 banana, coconut milk, pineapple, dessicated coconut and mango 

 love the bright yellow colour and it smelt amazing! 

 adding the white ingredients - coconut milk and dessicated coconut 

 ready to go in the oven 

 hurray it came out of the tin like a dream

 love the detail :)


 'extra' batter which made a mini bundt cake 

 you can see the chunks of fruit in the cake 

An original recipe by bakingaddict 

125mls vegetable oil
200g brown sugar (increase this if you prefer a sweeter bake)
1 banana, mashed
1 mango - peeled and chopped into chunks 
260g pineapple, chopped into chunks (you can also use fresh pineapple)
3 eggs
100g dessicated coconut
250g self raising flour
165mls coconut milk

variations - you can add some spice (nutmeg or cinnamon would go well I think) or some nuts for crunch but reduce the fruit amount otherwise there will be no batter! 


  • Preheat the oven to 180C. 
  • In a large bowl, whisk the oil and sugar.
  • Whisk in the eggs, one at a time until well mixed. 
  • Mix in the yellow fruits - banana, mango and pineapple.
  • Then the white ingredients - the coconut milk and dessicated coconut and mix well.
  • Finally fold in the flour.
  • Pour into prepared cake tin and bake in the oven for approximately 45-55 minutes (large tin) or 30-35 minutes (small tin).
  • The cake should be golden brown and a skewer inserted into the centre should come out clean. 
  • Allow to cool in the tin for a few minutes before turning out to a wire rack to cool completely.