Showing posts with label buttermilk. Show all posts

Monday, 8 February 2016

Chcocolate Peanut Butter Monkey Cake


Happy Chinese New Year! Today is the first day of the lunar calendar and it's the year of the Monkey. Wishing all my readers good health, prosperity and happiness. We had a little party at the weekend to celebrate the occasion. As it's a monkey year, I decided to make a monkey cake. Unfortunately I didn't deocrate it in time for the party so J has taken it to work today to share with his colleagues. It's a chocolate cake filled with peanut butter frosting. The decoration is simple yet effective albeit a bit messy to decorate! If you have kids, they will definitely enjoy decorating this cake with you. Chinese New Year goes on for 15 days so you have plenty of time to impress your family and friends with this cake. 

I'm sending this to #FoodYearLinkUp hosted by Charlotte from Charlotte's Lively Kitchen for Chinese New Year. 


It's also going to Love Cake hosted by Ness from Jibber Jabber UK. The theme this month is The Month Of Cake as it's the anniversary of the challenge. 


Finally to Simply Eggcellent hosted by Dom from Belleau Kitchen as the theme this month is Anything Goes. There's 2 large free range eggs in this cake.


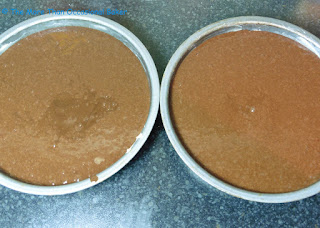
 The cake batter is very liquid - don't worry it bakes beautifully. 

 spread peanut butter frosting on top of the first layer of cake 

 Add second layer of cake. I used a cocktail stick to roughly draw an outline of a monkey face. I'm terrible at drawing!! 

 Spread the peanut butter frosting where the monkey face will be 
 
 Carefully spread the chocolate ganache over the rest of the cake including the sides

 Press chocolate rice cereal on to the chocolate ganache. I used 2 white candy melts for the eyes and piped some chocolate ganache for the eye balls, nose and mouth (which was a littlewonky!) The ears are tiny as I didn't have any ginger biscuits at home and used golden Oreo cookies instead. 

Recipe from Bird on A Cake 
I reduced the sugar amount, substituted chocolate extract for vanilla extract and used more milk in the frosting 

For the cakes 
1 cup (250mls) boiling water
350g caster sugar
220g plain flour  
85 cocoa powder, sifted
2 teaspoon bicarbonate of soda
1 teaspoon baking powder
2 large, free range eggs
1 cup (250mls) buttermilk
1/2 cup (125mls) vegetable oil
1 teaspoon chocolate extract 

Peanut butter frosting
250g smooth peanut butter
113g butter
250g icing sugar
40-50 mls milk

Chocolate Ganache
175g dark chocolate 
80mls double cream
20g butter

To decorate
2 white candy melts
2 large cookies for the ears - I used golden oreos but they are too small, recommend ginger biscuits or digestive biscuit
Choco rice cereal 

  • Preheat the oven to 180C. 
  • Sift the flour, sugar, cocoa powder, bicarbonate of soda and baking powder in a bowl.
  • Place the dry ingredients in the bowl of a stand mixer and add in the eggs, buttermilk, oil and chocolate extract.
  • Mix well.
  • Slowly pour in the water and continue mixing at a low speed until you have a smooth mixture. 
  • The batter will be very liquid, this is normal.
  • Divide the batter evenly between 2 sandwich tins and bake for approximately 30 - 35 minutes or until a skewer inserted into the centre comes out clean.
  • Allow the cakes to cool for 5 minutes in the tin before turning out to a wire rack to cool completely.
  • To make the peanut butter frosting, beat the peanut butter and butter until smooth.
  • Add in the icing sugar and continue beating.
  • Slowly add in the milk with the mixer running.
  • You  may need to add a little more or a little less of the milk depending on the consistency of your icing. You want a smooth, spreadable paste. 
  • To make the chocolate ganache, place the cream in a small saucepan and heat gently until bubbles are just visible. 
  • Add in the chocolate and whisk until smooth.
  • Remove from the heat.
  • Add in the butter and continue whisking until smooth.
  • Allow to cool and set a little before using.
  • Decorate the cake as shown above. 


Wednesday, 22 July 2015

Blueberry and white chocolate buttermilk scones


This is one of those amazing recipes that started as a bit of an experiment and ended beautifully. I have been quite busy lately and have been neglecting my blog. I do miss baking and blogging and participating in blogging challenges but sometimes life just gets in the way. I didn't get a chance to enter anything last month apart from Alphabakes so I wanted to make sure I got a few entries in this month. The inspiration for this recipe is the We Should Cocoa Challenge hosted by Choclette from Tin and Thyme. The theme this month is blueberries. I started thinking about how to pair chocolate and blueberries. Initially I thought of a blueberry sponge cupcake with white chocolate frosting but decided it was too boring. I debated about cookies but I couldn't find any dried blueberries when I went shopping. I then stumbled upon a recipe for buttermilk scones and thought aha! I don't bake scones often and I've certainly never tried baking this type of scone so I thought I'd go for it! 

I adapted a recipe slightly from Butter Baking which in turn was adapted from Tartine. I wasn't sure how to incorporate the blueberries and white chocolate but I did know that scone mixture should not be handled extensively otherwise the scones are hard and dry. I decided to tip out the scone mixture onto a silicone mat and kneaded it gently. I pressed it into a large rectangle shape then poured the white chocolate chips and blueberries on top. I then rolled the dough so the filling was in the middle. I cut large rectangles and then cut them into triangles. The scones were brushed with melted butter and sprinkled with caster sugar before baking. Every scone had ample filling of blueberries and white chocolate and the blueberries stayed in the middle. 

The scones turned out better than I expected. They look a lot better than those sold at a certain coffee chain! They have a lovely crispy edge and a soft centre. The blueberries and white chocolate work well together and the scones are not overly sweet at all. The sugar on top gives it a lovely crunch. It's best served warm with a cup of tea but it was still delicious the day after.


 add cubed butter to flour mixture  

 I spread out the dough and patted it into a rectangluar shape

 poured the fresh blueberries and white chocolate on top

 fold in half and cut into rectangles and then triangles

 brush with melted butter and sprinkle with caster sugar before baking 


 Loved the crispy bits 

 Warmed up slightly for breakfast the next day - love the oozing blueberries! 


I'm sending this to a few blog challenges this month...

We Should Cocoa hosted by Choclette from Tin and Thyme. The theme this month is blueberries.


Treat Petite hosted by Stuart from Cakeyboi and Kat from The Baking Explorer. The theme this month is Summertime Special. Berries in any form definitely spell summer for me.


Simple and in Season hosted by Ren. Blueberries are definitely in season at the moment.


Recipe of the Week hosted by Emily from A Mummy Too


Tasty Tuesdays hosted by Vicki from Honest Mum.


Recipe adapted from Butter Baking 

Makes 18 scones
For the scones
680g plain flour
100g caster sugar
1 tablespoon baking powder
1 teaspoon bicarbonate of soda
250g butter, cubed
375mls buttermilk
100g white chocolate chips
200g fresh blueberries
For the topping before baking 
30g butter, melted
30g caster sugar for sprinkling


  • Preheat the oven to 180C. 
  • Place the flour, sugar, baking powder and bicarbonte of soda in the bowl of an electric mixer.
  • Add the cubed butter (250g).
  • Mix on a low speed until the butter is incorporated into the flour mixture. 
  • Add in the buttermilk.
  • You should have a soft dough at this point.
  • Tip it out onto a lightly floured surface and knead gently. Try not to overmix or handle the dough too much.
  • Spread the rough into a large rectangle.
  • Pour the white chocolate chips and fresh blueberries on top. 
  • Fold the dough in half starting with the bottom end, folding upwards.
  • Cut into large rectangles and then cut into triangles (see photo above).
  • Place the triangles on a lined baking tray.
  • Brush with melted butter and sprinkle caster sugar on top. 
  • Bake for approximately 25-30 minutes or until golden brown and cooked through.
  • Allow to cool for 5 minutes on the tray.
  • Best served warm but will keep in an airtight container for a day or two. 


Tuesday, 26 May 2015

Banana, pecan and chocolate waffles

fresh fruit waffle

We decided to treat ourselves to waffles over the bank holiday weekend. We usually have plain waffles with maple syrup and fruit and occasionally with bacon. This time I thought I'd bake something a little different as we are trying to eat healthier so it had to be loaded with fruit. I actually ended up forgetting to add the oil (maybe it was my subconscious working overtime) and surprisingly the waffles turned out fine. It's probably because they are baked in the oven so they have a slight cake like texture but it really did not detract from the taste. I was really worried that it would be dry and unpalatable but they were actually really delicious and filling. I'm guessing that it would taste better with the oil but I've not tried it yet. In any case, the bananas and buttermilk probably saved the day. 

The initial plan for the waffles was for banana and pecans but then I decided to add in some chocolate in the form of chocolate beads from Hans Sloane. Hans Sloane sent me some rich dark drinking chocolate beads to try. They are packaged in an attractive red box and the smell of chocolate when you open the bag is heavenly. Dark chocolate is my favourite kind of chocolate and these beads really pack a proper chocolate punch. I tried quite a few on their own and had to stop eating them otherwise I wouldn't have enough to bake with! They worked well in this recipe as it provided a rich, dark chocolate taste to the waffles. The beads did not melt completely so you get lovely chunks of chocolate. I've also tried it with milk as a hot chocolate drink and it's absolutely divine. I often find that powdered hot chocolate have an artificial taste and tends not to taste chocolatey at all. This is the complete opposite as it tastes like proper melted chocolate in warm milk. I loved the stuff so much that I baked another recipe with these chocolate beads which will be on the blog very soon. 


 Hans Sloane drinking chocolate beads which won the Taste Gold Awards in 2011 and was winner of the chocolatier taste test in 2012. 

 dry ingredients on the left and wet ingredients on the right (minus the oil!) 

 adding chopped pecan nuts to the mixture with the chocolate beads on the right 

 Look at the gorgeous chocolate beads - they are really shiny

 This is my silicone waffle tray

 I love how the chocolate gives it a speckled look 

 Topped with lots of fresh fruit and maple syrup which I bought from America 


 You can see the chocolate beads better in this picture 

Makes 8 waffles

375g flour
1 tablespoon baking powder
1 teaspoon bicarbonate of soda
50g brown sugar
4 eggs 
250g buttermilk 
2 bananas, mashed
50g pecans, chopped
100g Hans Sloane chocolate beads 
80 mls vegetable oil (optional -see notes above) 

  • Preheat the oven to 180C. 
  • In a large bowl, whisk the flour, baking powder, bicarbonate of soda and brown sugar and set aside.
  • In a medium bowl, whisk the eggs, mashed bananas, buttermilk and vegetable oil (if using)
  • Pour the wet ingredients into the dry ingredients andmix gently until just mixed.
  • Stir in the chopped nuts and chocolate beads.
  • Pour the batter into a waffle mould and bake for approximately 25-30 minutes or until golden brown and a skewer inserted into the centre comes out clean.
  • Serve with fresh fruit and maple syrup or as desired. 
  • (The waffles freeze well and tastes great if you toast them in the toaster)

Disclaimer: I was sent some Hans Sloane drinking chocolate beads for review purposes to create a recipe. A positive review was not required and all opinions expressed are my own. This is not a sponsored post. 

Monday, 23 June 2014

SRC: Cranberry Cornbread


It's the fourth Monday of the month which means that it's Secret Recipe Club Group D Reveal day! I love the Secret Recipe Club and look forward to reveal day every month. The concept is simple each blog is assigned another blog in secret and the idea is that you choose a recipe to make from your secret blog and reveal it on the same day. 

My assignment this month is Fried Ice and Donut Holes written by Melissa who is a teacher by profession. She loves to cook and bake and started her blog back in 2009. The story behind the name of her blog comes from her grandpa telling them to behave or they would have fried ice and donut holes aka nothing for dinner! 

She has a lovely blog full of wonderful recipes so do head on over to say hi and to check them out. I shortlisted a few recipes to make including Citrus Kissed Honey Buttons, Peanut Butter Bars, Salted Caramel Cashew Bark and Irish Coffee Cupcakes. In the end I decided on this Cranberry Cornbread as it sounded really interesting and look really tasty. 

It's a really simple recipe and the results were amazing. I love the coarse texture of the polenta and the sweetness of the cranberries. I usually think of cornbread as savoury so it was good to try a sweet version. Everyone at work really enjoyed it as it was different to normal cake and it felt quite healthy to eat! 


 buttermilk, sugar, flour, polenta, dried cranberries, eggs, butter 

 wet ingredients and dry ingredients 

 stir in dried cranberries

 ready to bake 

 love the golden colour 


Recipe from Fried Ice and Donut Holes

70g butter, melted
250mls (1 cup) buttermilk
225g polenta or cornmeal
85g flour
110g sugar
1.5 teaspoon baking powder
1/2 teaspoon bicarbonate of soda
170g dried cranberries
  • Preheat the oven to 170C.
  • Whisk the butter, eggs and buttermilk in a bowl. 
  • Mix the polenta, flour, sugar, baking powder and bicarbonate of soda in another bowl.
  • Mix the dry ingredients with the wet ingredients.
  • Stir in the dried cranberries. 
  • Pour into a cake tin (I used a 23cm round cake tin but you can also use a square tin) and bake for approximately 25 minutes or until golden brown and a skewer inserted into the centre comes out clean. 


Wednesday, 4 June 2014

Orange Marmalade Jubilee Bundt Cake


I probably have too many cake tins but I just couldn't resist buying this Nordicware Jubilee Bundt tin to add to my collection. I've had my eye on it for a while and when it was on a special offer I decided it was a sign and I just had to buy it. I have quite a few of their Bundt tins and the cakes always turn out beautifully. The tins are well designed, solid and non stick if you spray it liberally with cake release spray before baking. 

The recipe on the back of the tin was for this orange marmalade cake so I gave it a go but added in an extra layer of marmalade in the middle of the cake. The result was an absolutely stunning cake in appearance and absolutely phenomenal in taste. It was light, bright and refreshing and the marmalade glaze was divine. I think the extra layer of marmalade in the middle of the cake added more flavour and moisture to the cake. 


 You have to rub the orange zest into the sugar which intensifies the orange flavour

 my beautiful bundt tin

 half fill the bundt tin 

 add a layer of marmalade 

 fill with the rest of the cake batter

 making the marmalade and orange glaze

 how pretty is that? 


 view from the top 


Recipe adapted from Nordicware

For the cake
375g plain flour
1 tablespoon baking powder
1 teaspoon salt
350g caster sugar
zest of 2 oranges
225g butter
1/2 cup (125ml) buttermilk
4 eggs
1/2 cup (125ml) orange juice

For the glaze 
1/2 cup marmalade
1/4 cup orange juice

  • Preheat the oven to 180C. 
  • Measure out the sugar in a large bowl and add the orange zest to the sugar. Gently rub the zest into the sugar with your fingers - this helps to release the oils and creates a more intense orange flavour. 
  • Cream the butter with the orange sugar until pale and fluffy.
  • Add the eggs one at a time, mixing well between each addition. 
  • Combine the buttermilk and orange juice in a jug.
  • Sift the dry ingredients into a bowl.
  • Alternate adding the dry and wet ingredients and mix well. 
  • Pour half the batter into the cake tin.
  • Add a layer of marmalade as shown -make sure you don't touch the edges as the marmalade will burn.
  • Cover with the remaining cake batter.
  • Bake for approximately 60 -70 minutes or until golden brown and a skewer inserted into the centre comes out clean.
  • Allow to cool in the tin for 5 minutes before turning out to a wire rack to cool completely.
  • Make the glaze by heating the marmalade and orange juice in a small saucepan over low to medium heat. Stir frequently until you get a thick, sticky glaze. 
  • Pour the glaze on the cake before serving.