Wednesday 30 November 2011

Ultimate chocolate cake


I attended the first cake club at Cakes4Fun last week where the theme was 'Glitz&Glamour' - there will be a post on this with photos of all the delicious cake I got to eat coming right up. I debated for ages about what to make to fit the theme. I had a few ideas and finally settled on Edd Kimber's ultimate chocolate cake from his book the boy who bakes. I had originally intended to make this cake for my friend's birthday but decided on a raspberry ripple cake at the last minute. So I'm glad I finally got a chance to try this cake. 
It's a really soft and moist chocolate cake which was surprisingly light. The chocolate ganache is heavenly and I could quite happily eat it all on its own! Well I did have to taste a little bit you understand - chef's tax :) I decided to 'glitz' it up by making a chocolate collar (first time with slightly disastrous results!) and add gold shimmer spray to the maltesers on top. Has anyone else tried Dr Oetker's gold shimmer spray? - AMAZING! 
The result : a giant chocolate cake wrapped in a chocolate collar (with a few cracks) and gold, glittery maltesers on top. A bit OTT perhaps but it was well worth the effort. It tasted absolutely divine and looked pretty from the 'good' side!  I had strangers stop me on my way to and back from cake club saying they like my cake which was really sweet. I was quite upset that it didn't turn out perfectly and it actually got worse on my way to cake club but more on that later. Back to the cake.... 

 3 layer chocolate sponge 

 making the chocolate collar. measure your cake (diameter and height) and cut out a strip of parchment paper that size. Lay it over a larger piece of parchment paper to avoid mess. I used milkybar giant white buttons which I randomly spread on the parchment paper using a little bit of water to stick them down. 

 Next melt chocolate in a bowl over a pan of barely simmering water. I used a combination of milk and dark chocolate here. Allow to cool slightly then spread on top of your white buttons, using a small palette knife to spread it evenly. Allow to set then wrap around the cake. Note : do not leave it until it's completely dry which is what I did as it was past 1am and I really needed to get to bed! It will then be very hard and difficult to bend resulting in cracks! 

 spread ganache between each layer of cake, down the sides and on top 

 my cakes were a little wonky (I accidentally put the top cake the wrong way up creating a gap in the middle) Ah well nothing that a bit of ganache and a chocolate collar can't fix!

 hence the collar... this is the 'good' side 

 I love gold maltesers :)

 I had some leftover chocolate ganache and chocolate from making the collar so I put them into moulds and made these. 

Recipe for the cake and chocolate ganache is from The boy who Bakes by Edd Kimber

Tuesday 29 November 2011

Chocolate Fondant Pudding


I love chocolate. No surprise. I love dessert. No surprise. Naturally, I love chocolate fondant. It is one of my favourite desserts to order if it's on the menu and will almost always order it unless there is a good lemon tart on offer.  I saw these on thelittleloaf's blog recently and immediately bookmarked it to make. Some recipes are on my bookmarked list forever and others just go straight to the top of the Q. I simply could not wait to make my own. However, it is dangerous knowing I can make my own as I ended up eating these for a whole week... well the recipe did make 4! Gu might just go out of business soon ;p 
It took a few tries to get the oven temperature correct - first one was undercooked so it collapsed when I turned it out and one of them was overcooked so there was no gooey middle. I did manage to get it right after that and they were absolutely delicious. Well worth the effort and the nervous anticipation whilst it's cooking wondering if it's going to turn out ok. Obviously in the name of research I had to keep making them until they were perfect :) 

I am also submitting this to Jac's bookmarked recipes for Dec


 first try - a gooey mess as my oven temperature was inaccurate but delicious nonetheless 

 second time - almost perfect! I would have preferred it slightly runnier 

 I love this picture :) 


Recipe from thelittleloaf which was adapted from a Jamie magazine recipe, with very minor modifications of my own.

175g dark chocolate, broken into pieces
25g salted butter, at room temperature
75g golden caster sugar
2 large eggs
1/2 teaspoon vanilla extract
25g plain flour

  • Preheat the oven to 200C. 
  • Butter 4 ramekin dishes and dust with cocoa powder. Shake off the excess powder. 
  • Melt the chocolate in a bowl placed over a pan of barely simmering water. 
  • Set aside to cool slightly.
  • Cream the butter and sugar until pale and fluffy.
  • Beat in the eggs, one at a time and then add the vanilla extract. 
  • Stir in the flour until just combined and then gently mix in the melted chocolate. 
  • Pour into the ramekins in equal portions. 
  • Bake for approximately 8-10 minutes (it will depend on your oven).
  • It should be set around the edges but still soft in the center. 
  • Note: the uncooked batter keeps well in the fridge, just remember to increase cooking time by a few minutes if cooking from chilled. 


Monday 28 November 2011

Secret recipe club - Peanut butter chip pillows


I'm very excited to present to you my first secret recipe post. The secret recipe club was started by Amanda from Amanda's Cookin' Essentially the idea is that you get assigned a blog which you keep secret hence the name and make a recipe from that blog. Someone else will have your blog too. All posts are revealed at the same time on a set date.  As Amanda says, its a fun way to discover new blogs, make new friends and step outside of our comfort zones.
I have been assigned bakingbad as my secret blog. It's a great blog with a variety of foods and bakes which are very helpfully listed in the recipe index. Please do hop over and visit if you haven't already.  I spent a few happy hours perusing her blog and bookmarked a few recipes to try. However, I went back again and saw these mint chocolate chip pillows which were posted recently.  I have been wanting to try something similar but never got round to it so this is as good a chance as any.
I've substituted peanut butter chips for mint chips as if you know me or read my blog enough you will know that I love peanut butter. This is a great gluten free recipe. It's a baked meringue with chocolate and peanut butter flavours. Mine are probably slightly underdone as I like it soft and chewy but with a crisp exterior. You can definitely taste the chocolate and peanut butter combination. They are so light and airy, you can easily eat the whole lot in one go (no I have not, honest!) I can see why they are aptly named pillows. 


 light fluffy chocolate meringue

 adding the chocolate chips and peanut butter chips

 ready to go in the oven 


 yummy 'pillows' 

 you can see the peanut butter chip and the soft, chewy interior


Secret Recipe Club


Recipe adapted from bakingbad

4 egg whites
1/8 teaspoon cream of tartar
95g sugar
1 teaspoon vanilla extract
2 tablespoons cocoa powder
100g dark chocolate chips
100g peanut butter chips 


  • Preheat oven to 150C/300F. 
  • Line 2 baking sheets with parchment paper.
  • Beat the egg whites and cream of tartar until stiff peaks form.
  • Continue beating whilst adding in the sugar a little at a time.
  • Add in the vanilla extract.
  • Then add the sifted cocoa powder and finally fold in the chips (you can subsitute for any flavour you like - chocolate, mint, butterscotch etc)
  • Using a small ice cream scoop, place  heaped scoops of batter on the tray spaced apart. 
  • Bake for 35-45 minutes until they are dry.
  • Allow to cool slightly on the tray before transferring to a wire rack to cool completely.
  • Store in a an airtight container at room temperature. Should keep for a week but I won't know as mine will all be gone before then! 


Sunday 27 November 2011

Food Bloggers Unplugged


I have been reading this on a lot of blogs recently so was really touched to be tagged by Janice from Farmersgirl Kitchen. Susan from a little bit of heaven on a plate started this fun, online tag which helps us get to know the person behind the blog. I have to admit I was feeling quite shy and unsure. I'm quite a private person and have kept personal details to a minimum on this blog. However, I am nosey and love learning about others. I guess it's only fair so I will try my best.... 


1. What, or who inspired you to start a blog?

It was a sort of new year resolution although I don't tend to make resolutions. I had baked like mad over festive xmas season 2009 and wanted somewhere to share my bakes. I wanted to do something different that year and focus more on my baking. A friend of mine suggested a blog and the rest as they say is history. I'm slightly technically challenged but it seems to have worked well. I can't make it look too pretty as I don't know how. Hoping to get a facelift for my blog next year. 

2. Who is your foodie inspiration?

I'm sure almost everyone has said their mum but it's true. My mum is an amazing cook and baker and I remember when we were younger, after eating at a restaurant, mum would say I can cook that and she would! Often it would be a better version. I get inspiration from reading other food blogs, online recipes, cookbooks and talking to other cooks/bakers. 

3. Your greasiest, batter - splattered food/drink book is?

I don't actually have one. I don't really cook much, I really just tend to bake. If I do cook, I'll probably get a recipe online or from my mum. I do have a rapidly growing collection of baking related books. My most frequently used ones are Cupcakes from the Primrose Bakery, The Love Bakery and the Hummingbird Bakery. 

4. Tell us all about the best thing you have ever eaten in another country, where was it, what was it?

It is so difficult to choose as I've been fortunate enough to have travelled to many different places and eaten lots of different, delicious foods. It would probably take forever to tell you about them. I'll go with recent food memories but as pictures speak louder than words .... 
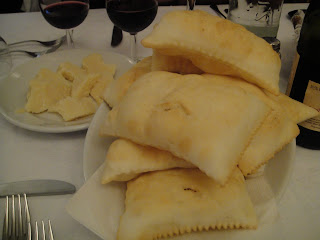
 amazing little bread/pastry thing in Italy - I cant remember what its called. Great with ham and cheese 

 Delicious, fresh grilled seafood in Ghent, Brussels. 


5. Another food bloggers table you'd like to eat at is?

Probably every food blogger I've visited! I'd like to mention 2 in particular:  Not Quite Nigella, a food blogger from Sydney as I drool everytime I visit her site and Joy the Baker - absolutely amazing blog. 

6. What is the one kitchen gadget you would ask Santa for this year (money no object of course)?

Ooh this is a tough one. Maybe a glass bowl for my KitchenAid as I keep seeing it on TV and cooking demonstrations. Plus it would be helpful when having to beat egg whites for the recipe as I don't have to wash and dry in between! 

7. Who taught you how to cook?

I'm not sure as I can't cook very well. By osmosis from mum I guess but it's mostly been self taught. 

8. I'm coming to you for dinner what's your signature dish?

See above - I guess it would be a 3 course dessert dinner! How about cake, cheesecake and pudding? If you insist on something savoury, maybe a vegetable curry or roast pork (which I've made only once for Xmas)

9. What is your guilty food pleasure? 

It would have to be KFC! 

10. Reveal something about yourself that others would be surprised to learn?

I don't really cook much at all. In fact I probably know how to cook about 5 things, ok maybe a little more. Everyone always asks if I cook great food as the assumption is that if you can bake then you can cook. I also have many weird food dislikes (which most people love) such as peas, lamb, celery, ginger, coconut, marzipan.... I think I better stop here! 

Finally...tag 5 other food bloggers with these questions...like a hot baked potato...pass it on!

3. Gem from Cupcakecrazygem
4. Jacqueline from Tinned Tomatoes 
5. Laura from lauralovescakes 

If you have been tagged, please link up your entry here and if you tweet, use #foodbloggersunplugged on twitter. 

Enjoy! 


Tuesday 22 November 2011

Banana, pecan and chocolate loaf


Another banana recipe! This time with nuts and chocolate for a change. I love making banana bread as it's so simple to make and always tastes good. The bananas guarantee the moistness and you can add pretty much anything to it - fruit, nuts, honey, chocolate.  If I've labelled my blog correctly, this is the 17th recipe with bananas that I've posted! I will have even more exciting banana posts as I have a very exciting, new cookbook which I will tell you about in due course.  I'll let you in on a little secret - I actually buy bananas to ripen at home so I can bake with them. Please tell me I'm not the only one! :)


3 ripe bananas, mashed
170g caster sugar
185g self-raising flour
2 eggs, lightly beaten
3 tablespoons vegetable oil
3 tablespoons milk
100g dark chocolate chips
90g pecans, chopped (you can also use walnuts)

  • Preheat the oven to 180C.
  • Grease and line a loaf tin. 
  • Mix the mashed bananas and sugar in a large bowl until combined.
  • Add the flour, eggs, oil and milk. 
  • Stir until combined.
  • Fold in the chocolate chips and nuts. 
  • Pour into the tin and bake for 50 - 55 minutes or until a skewer inserted into the centre come out clean.
  • Allow to cool for a few minutes in the tin before turning out to a wire rack to cool completely.  

Sunday 20 November 2011

Apple and Sultana Crumble Bars


This is my second entry for Tea Time Treats hosted on alternate months by Karen from Lavender and Lovage and Kate from What Kate Baked. The theme for November is Ginger and Bonfire Treats, hosted by Karen.  I was leafing through my Hummingbird bakery cake days book and came across this recipe which is in the 'Halloween and Bonfire Night' section. It's a lovely recipe which is relatively simple to prepare. I love the spices mixed with the apples and sultanas. I'm sure I've mentioned previously that I'm not a fan of ginger but you can barely taste it in this recipe which is perfect for me. The crumble is buttery and soft with the chewiness of the oats, plus it makes it seem slightly healthier! 

 making the base 

 add the spiced apples

 sprinkle sultanas on top 

 finish with more crumble - I didnt have enough to cover the whole top so some of the sultanas were burnt!

 fresh from the oven 


Recipe from the hummingbird bakery cake days

200g plain flour
1 teaspoon baking powder
1/4 teaspoon salt
200g unsalted butter, softened
250g light brown sugar
120g rolled oats
300g granny smith apples (approximately 2.5-3 apples peeled, cored and chopped)
4 tablespoons cornflour
3 teaspoons ground cinnamon
1 teaspoon ground nutmeg
1 teaspoon ground ginger
175g sultanas

  • Preheat the oven to 170C.
  • Sift the flour, baking powder and salt into a large bowl. 
  • Add the butter and rub together until they resemble breadcrumbs. 
  • Stir in the sugar and rolled oats.
  • Press half of this oat mixture into a greased and lined tray (approx 22cm x 31cm). 
  • Peel and core the apples, then cut into small chunks. 
  • Mix the apples with the cornflour and ground spices. 
  • Place the spice-coated apples on top of the oat mixture then sprinkle over the sultanas. 
  • Spoon the remaining oat mixture on top and press down gently. 
  • Bake for 30-40 minutes or until the mixture is golden brown.
  • Allow to cool completely in the baking tray before slicing and serving. 

Thursday 17 November 2011

Rainbow Pudsey Cupcakes and Smarties Cookies for BBC Children in Need


Tomorrow November 18th 2011 is the BBC Children in Need Appeal.  It first started in 1927 as a five minute radio broadcast and has now grown to a huge annual fund-raising event raising over  £600 million. Pudsey Bear made his television debut in 1985 when Terry introduced the new, brown cuddly mascot to the audience.  He was designed by Joanna Ball, a BBC graphics designer, who named him after the West Yorkshire town where she was born. He proved very popular and returned as BBC Children in Need's official logo the following year with his design amended to that of a yellow bear with a red spotted bandage.

I was asked by BakingMad to make a Pudsey Bear Dessert for their Children in Need campaign. I wanted to do something slightly different from the standard vanilla cupcakes so I decided to make it a rainbow vanilla cupcake. It's really fun and simple to do and would be a great project with the kids if you have any. I used my standard vanilla cupcake recipe and divided it into 4 equal portions. I used ziplock bags to save on washing up and it also helped to fill the cupcake cases neatly. I ordered some colourful Pudsey cupcake toppers online but sadly they have not arrived so I decorated them as suggested on the bakingmad website. Do check out all the other fantastic cupcake recipes there. 


If you like this recipe, please click here http://www.bakingmad.com/recipes/cupcakes/pudsey-rainbow-cupcakes and support my recipe as BakingMad are offering a prize to the recipe with the most page views. Thanks! 

I also made some smarties cookies to go with the cupcakes as they fit the theme. I didn't have time to buy the Pudsey bear cookie cutters - perhaps something for next year.  I hope they will raise some money tomorrow for this great cause.  If you want to donate, you can do so by visiting http://www.bbc.co.uk/pudsey/


UPDATE : I've raised £46.10 at work today! 

 what you need to make rainbow pudsey cupcakes - cupcake batter, cupcake cases, food colouring, coloured choco beans, black writing icing and some ziplock bags

 I overfilled the bags so only got 4 colours but I love all of them! It's easy to mix the colours in the bags and then to pipe into the cupcake cases

 layer the batter in the cupcake cases. I've started here with blue followed by red... 

...and then purple... 

... and finally yellow 

 fresh from the oven - I had to trim the tops a little as they were slightly domed (note to self no need to add baking powder for this recipe)

 decorate with vanilla frosting, coloured choco beans and writing icing.

 isn't he cute? 

 cross section to see the beautiful rainbow effect

 add some cookies to the mix 


For the vanilla cupcake

250g unsalted butter
250g caster sugar
250g self-raising flour
2 teaspoons vanilla extract
1 teaspoon vanilla bean paste (I used Nielsen-Massey)
4 eggs
6 tablespoons milk
Food colouring

For the vanilla frosting

125g unsalted butter, softened
250g icing sugar, sifted
1/2 teaspoon vanilla bean paste
1 tablespoon milk
Yellow food colouring 

To decorate

Black writing icing (I used Silverspoon)
Coloured choco beans (I used Silverspoon)


  • Preheat the oven to 180C.
  • Line a 12-hole muffin tin with cupcake cases. 
  • Beat the butter and sugar together until light and fluffy.
  • Add the eggs one by one, beating well after each addition.
  • Add the milk and vanilla extract and vanilla bean paste.
  • Finally add the sifted flour.
  • Divide the batter evenly into required number of colours - I used 4 here. 
  • Add a little bit of food colouring to each portion and mix evenly. 
  • Pipe a layer of the first coloured batter into the cupcake cases, followed by the second coloured batter and repeat until all the batter has been used. 
  • Bake in the preheated oven for approximately 18-22 minutes until they spring back to touch and a skewer inserted into the centre comes out clean. 
  • Cool completely on a wire rack. 
  • Prepare the vanilla frosting by mixing all the ingredients together (add the colouring last) until smooth (preferably in an electric mixer). 
  • Spread the frosting on top of each cupcake. 
  • Place choco-beans on 1 side to resemble Pudsey's bandage and draw the eyes, nose and mouth with the writing icing. 


For the smarties cookies 


  • 250g butter
    250g caster sugar
    1 egg, beaten
    1 teaspoon vanilla extract
    350g plain flour
    1 teaspoon baking powder
    1 teaspoon bicarbonate of soda
    240g Smarties 

    • Preheat oven to 180C.
    • Line baking sheets with parchment paper.
    • Cream butter and sugar until pale and fluffy. 
    • Beat in the egg and vanilla extract. 
    • Gradually beat in the sifted dry ingredients to form a stiff dough.
    • Finally stir in the smarties by hand.
    • Using a small ice cream scoop, scoop cookie dough onto the baking sheets, spaced well apart. (These cookies expand in the oven)
    • Bake for 12-15 minutes until pale golden brown.
    • Allow to cool on the baking sheets for a few minutes before transferring to a wire rack to cool completely. 


Wednesday 16 November 2011

Oat and Cranberry cookie


I saw this recipe on one of my favourite blogs, Lavender and Lovage. She made them as a secret recipe club challenge where the original recipe came from Patti's Comfy Cuisine. I love cookies and couldn't wait to try them out after the glowing review from both bloggers. I've made a similar version with pecan nuts and white chocolate chips, in fact one of my first few posts on this blog. I may have to make those again for a comparison taste test!  Regardless, I really like this version as it's simple and tasty. It's quick to put together and you can make various variations with this recipe. I modified the recipe very slightly (just reduced the sugar amounts) and managed to get 48 cookies of the size shown! 


Makes approx 48 cookies of size shown 
225g butter
150g brown sugar
75g caster sugar
2 eggs
1 teaspoon vanilla extract
185g flour
1 teaspoon baking powder
1 teaspoon ground cinnamon
1/2 teaspoon salt
370g rolled oats
145g dried cranberries

  • Preheat the oven to 180C.
  • Beat butter and sugars together until light and fluffy.
  • Add flour, baking powder, cinnamon and salt and mix well. 
  • Stir in the oats and dried cranberries.
  • Using a small ice cream scoop, scoop out cookie dough spaced well apart on a lined baking sheet. 
  • Bake for approximately 10 -12 minutes until golden brown. 
  • Allow to cool for a few minutes on the baking sheet before transferring to a wire rack to cool completely. 

Monday 14 November 2011

Apple, chocolate and nut bundt cake


This month's we should cocoa is hosted by Chele from Chocolate Teapot and she chose apples as the special ingredient. I have been baking quite a lot with apples recently as it's in season but I have never baked them with chocolate so this truly was a challenge for me. It took a while before the idea fully formed in my head. I leafed through some of my cookbooks to get inspiration and came across this nutty apple loaf from the hummingbird bakery cookbook which has chocolate in it. Excellent! I then thought maybe I could make it in my new bundt pan which I have been dying to use. I am so glad that it turned out well and looks really pretty. 
As it's a small tin, I got to make some mini loaves as well. The cake itself was moist due to the apples and the nuts gave it a lovely crunch and texture. The chocolate complemented the flavours but did not overpower. I am definitely making this recipe again and again. 
In case you didn't know, tomorrow November 15th is National Bundt Day. Mary from The Food librarian makes 30 bundt cakes in the month leading up to tomorrow. She has an impressive collection of bundt pans and a vast collection of bundt cake recipes some of which I have tried with good results. I am adding this recipe to her round up for 2011. 

 my new bundt pan 

 mix ingredients together for the cake 

 add chopped apple, chocolate and mixed nuts. 

 filling the bundt pan 

 perhaps a little overdone!

 I love the way it looks :) 

 sprinkling of icing sugar on top 

 you can see the apples and chocolate
 
 mini loaves with the extra batter 


Recipe from the hummingbird bakery cookbook
175g unsalted butter
140g soft light brown sugar
2 tablespoons strawberry jam
2 eggs
140g plain flour
1 tablespoon baking powder
1 teaspoon ground cinnamon
100g shelled mixed nuts, chopped
50g dark chocolate, chopped
2 eating apples, cored and roughly chopped


  • Put the butter, sugar and strawberry jam in a freestanding electric mixer with a paddle attachment and cream until light and fluffy. 
  • Add the eggs one at a time. 
  • Sift the flour, baking powder and cinnamon in a separate bowl and then beat into the butter mixture. 
  • Stir the nuts, chocolate and apples into the mixture by hand. 
  • Cover and chill for a few hours or overnight. 
  • Preheat the oven to 170C.
  • Pour the mixture into a bundt pan (or loaf tin) and bake for about 45-50 minutes. (My small bundt pan only required about 35 minutes to cook)
  • A skewer inserted into the centre should come out clean and the sponge should feel firm to touch. 
  • Leave to cool slightly in the tin before turning out to a wire rack to cool completely. 
  • Dust with icing sugar if required.