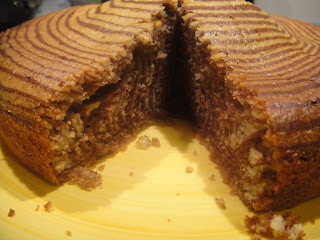
It looked simple yet impressive which was exactly what I was aiming for. I was intrigued as to the method of creating the zebra stripes. I felt nervous trying it out and was convinced it wouldn't turn out and I'd have to make a marble cake instead. Fortunately, it worked out well (apart from me using the wrong sized tin). Apologies for the photos as my camera battery died and I had to use the camera on my phone. I need to take a crash course on food photography anyway.
To digress a little, Lorraine@Not Quite Nigella blogged about 10 more things you should know about food bloggers. Maybe this is just me but I wonder if this should go on the list - cutting a slice of cake (made for someone else) so it can be photographed for your blog! I reassembled the cake before giving it away!
Ingredients
4 eggs
1 cup sugar
1 cup milk
1 cup sunflower oil
2 cups flour
1 tablespoon baking powder
1 teaspoon vanilla extract
1 tablespoon baking powder
2 tablespoons cocoa powder
- Preheat oven to 180C.
- Grease a 23cm round cake tin and ideally line with parchment paper.
- Beat eggs and sugar together until light and creamy.
- Add milk, sunflower oil and vanilla extract. (Another recipe I read only added vanilla extract to the plain batter but I added mine at this point)
- Add the sifted dry ingredients (flour, baking powder) and mix well.
- Divide the batter into 2 equal halves.
- Add cocoa powder to 1 half and leave the other plain.
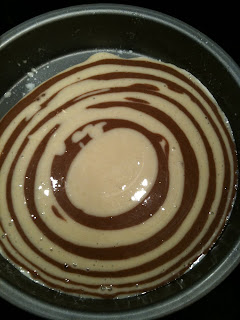
- Put 3 tbsp of the plain batter in the centre of the pan and let it spread on its own.
- Put 3 tbsp of chocolate batter in the center of the vanilla. It will push out the other batter and, as it sits for a moment, will also spread itself.
- This is important - do NOT tilt the pan or put less batter subsequently or 'help' the batter spread which I was tempted to do as I wasn't sure if it would turn out. It really does work on its own.
- Continue alternating the batter until all the batter has been used up (refer to pictures)
- Bake in the pre-heated oven for 40 mins until a skewer inserted into the centre of the cake comes out clean.
- Allow to cool in the tin for 10 minutes before turning out to cool completely on a wire rack.


Wow! What a gorgeous effect! Thanks so much for sharing.
ReplyDeletedude that is awesome! you may not have a green thumb in the garden but you have the golden glove in the kitchen my dear! I am so envious!
ReplyDeleteI am glad your back missed ya!
xoxo
KC
Haha how funny, great minds really do think alike! Your Zebra cake looks fantastic and thankyou for the shoutout about 10 things about food bloggers! :D
ReplyDeleteThe cake is really neat, I love the technique, simple and impressive! Hooray on your kitchen aid!!!! Are you beyond excited? You should be :) As far as what to christen it with I recommend bread or some other thick batter/dough that's hard to do in a subpar machine :) Put that work horse to work!
ReplyDeleteYour cake is gorgeous and I love the step by step photos. I've always wondered how to make one of these, so may try it with my next marble cake.
ReplyDelete:)
Definitely a gorgeous cake. Hope the KitchenAid arrives soon - you won't regret it.
ReplyDeleteWhat a pretty cake! I love the patterns!
ReplyDeleteCheers,
Rosa
The finished product is just stunning. I've got to try this one of these days, its a desert thats sure to impress!
ReplyDeleteI love this idea!
ReplyDeleteI'm loving the zebra cakes. I'm going to have to find a reason to whip one up. They're just so fun.
ReplyDeleteThis is a great and beautiful cake, an impressive give-away!
ReplyDeleteSawadee from Bangkok,
Kris
Hi, found your blog through Heavenly Housewife. The two color swirls worked really nice on this cake!
ReplyDeleteThat is a fabulous cake! Can't wait to make one and astonish the goddaughter!
ReplyDelete