Showing posts with label bread. Show all posts

Monday, 20 April 2015

Quick and Easy Pizza Dough


I love how you can connect with others on social media particularly on twitter. A recent follower on my twitter account is David from Old Fat Guy (@DiscoDavid9)  He lives in Canada and likes to cook. He has lots of great recipes on his site but the one that caught my eye recently was this recipe for Quick Pizza. I'm not a huge lover of pizza and will almost always choose pasta over pizza if we eat at an Italian restaurant. Over the Easter weekend, we did a lot of work around the house and wanted something quick and simple for dinner. Instead of ordering a takeaway pizza, I decided to give David's recipe a try as it seemed so quick and simple. 

It was also a good chance to make use of ingredients in the fridge to use as pizza toppings. I was terrible at shaping the pizza so mine looks quite 'rustic'. Let's just say that was how I intended it to look in the first place :) I rolled out the dough quite thinly as I prefer a thin base pizza and made 2 different ones. The first had a tomato and pepper pesto as a base and was topped with pepperoni, mushrooms, tomatoes, grated cheese and mozarella cheese. The second one had a bbq sauce base and was topped with ham, cheese and tomato. I baked them on my pizza stone and they tasted absolutely delicious! The pizzas were ready in about 35 minutes from start to finish! That's quicker than some pizza deliveries particularly on a busy weekend. This is definitely going on the regular menu plan and it would be great for parties or when I have guests round. 

I'm sending this to Bready, Steady, Go! hosted by Jen from Jen's Food and Michelle from Utterly Scrummy Food For Families. Both Jen and Michelle are keen bread bakers so they've decided to host this challenge together. 


I'm also sending it to Bookmarked Recipes hosted by Jacqueline from Tinned Tomatoes. I bookmarked this and a few other recipes whilst going through David's blog.


It's also perfect for Credit Crunch Munch guest hosted by Michelle from Utterly Scrummy. The challenge is run by Camilla from Fab Food 4 All and Helen from Fuss Free Flavours. Making your own pizza is definitely more cost effective than ordering one for delivery even if you bought all the ingredients from scratch. Hopefully you will have some of these ingredients at home. The bonus is you can custom make your own pizza and not have to pay extra! As mentioned I used up leftovers from the fridge for toppings. 


 mix until the dough starts to clump on the hook

 almost ready - you can see that the dough is smoother and sticks to the dough hook 

 my 'rustic' pizza 

 spread base of pizza on dough 

 add your toppings and bake 

 first pizza - tomato and pepper base with pepperoni,mushroom, tomato and cheese 


  second pizza - bbq sauce base with ham, tomato, mushroom and cheese 

Recipe adapted slightly from Old Fat Guy
I used bread flour instead of plain flour as I'd run out of plain flour (shocking but true) 
My pizzas only needed 8-9 minutes to cook as the dough was very thin and I used a pizza stone. 

240g bread flour (or plain flour), divided into 120g x 2
2.25 teaspoon easy bake yeast 
1 teaspoon sugar
3/4 teaspoon salt
160ml very warm water
3 tablespoons vegetable oil
Pizza toppings of your choice 

  • Place a cold pizza stone in the oven and pre heat the oven to 220C or as high as your oven will go.  
  • Mix 120g flour, yeast, sugar and salt in the bowl of a stand mixer.
  • Add the water and oil to the mixture. 
  • Give it a quick stir then add the remaining 120g flour and place on the stand mixer with a dough hook.
  • Mix until the dough starts to clump on the hook and continue mixing for another 7 minutes. Set a timer and let the mixer do all the work! 
  • Leave the dough to rest for 10 minutes. 
  • Roll out the dough in a circle and toss the pizza if you know how! Otherwise, roll it out thinly into a rustic shape like mine.
  • Transfer the pizza to the hot pizza stone and spread pesto sauce, bbq sauce or pizza base on top of the dough then add the toppings. I found it easier than transferring a ready made pizza to the hot pizza stone. Alternatively you can use a cake lifter or pizza paddle to transfer the ready made pizza to the hot pizza stone. 
  • Bake for about 8-9 minutes or until the cheese is bubbling and the dough is brown on the edges. You may need to bake it longer if your dough is thicker. 
  • Slice and enjoy! 
  • Note: If you don't have a pizza stone, you can bake this on a pizza pan which has perforations to ensure a crispy base.

Wednesday, 15 April 2015

Hot Cross Buns


If you read my blog regularly you will see that I love baking cakes, cupcakes and cookies. I've started to bake more with pastry recently which includes trying different types of pastry and I even had a go at hot water pastry but that's for another post. Bread baking is a different matter and I've tended to stray away from baking bread or dough.  

J has been asking for hot cross buns since before Easter. It's traditionally eaten on Good Friday in the UK and in many other countries. Unfortunately I didn't get round to baking it and Easter flew by in the blink of an eye.  A week after Easter and J was still asking for his hot cross buns so I decided to give it a go. 

I used a Paul Hollywood recipe from BBC Good Food and followed it exactly. As it's my first time baking hot cross buns I decided not to stray from the recipe. The dough needed to prove 3 times and by the time I finished baking this it was almost dinnertime! Luckily we had a busy day doing some home improvements and did not have a chance to have lunch so these were a welcome treat with a cup of tea. I also gave some to our lovely neighbours next door and to our new neighbours who moved in a few weeks ago. 

They were very impressed with the homemade hot cross buns and so were we. The buns were soft and fruity and tasted so much better than the shop bought ones. We had them warm from the oven with lashings of butter and they tasted heavenly. We also had them toasted the next day with some homemade marmalade (from a friend) and it tasted just as good. 

I'm sending this to Bready, Steady, Go! hosted by Jen from Jen's Food and Michelle from Utterly Scrummy Food For Families.  Both Jen and Michelle are keen bread bakers so they've decided to host this challenge together. I think it has a great challenge name which was chosen by one of Michelle's daughters. 


It's also going to Treat Petite hosted by Kat from The Baking Eplorer and Stuart from Cakeyboi. The theme this month is Hello Spring. 


Food Year Link Up hosted by Charlotte from My Recipe Book. These are of course for Easter.


Finally to Let's Cook for Easter hosted by Nayna from Simply Food.


 bread flour with salt, yeast and sugar 

 the dough is soft and crumbly...

 ...but becomes smooth and glossy after kneading 

 adding in the fruit after allowing the dough to prove 

 looks delicious!

 I weighed each bun as suggested to ensure even cooking 

 The cross is made from a flour and water paste 

 The glaze gives it a really nice shine 

 Lashings of butter! 

Recipe from BBC Good Food 

Friday, 21 November 2014

Cheddar, Cranberry and Honey Beer Bread


Recently I was invited to the BBC Good Food Show by Barber's Cheesemakers. I had the opportunity to meet with Charlie Barber where he told us about the history of Barber's cheese, how to judge a cheese award and anything you want to know about cheese but were too afraid to ask! 


The Barber family have been farming and making cheese at Maryland Farm in Ditcheat, Somerset since 1833. AJ & RG Barber is run by cousins Anthony, Chris, Charlie and Giles Barber, the sixth generation of the Barber family, and many other family members are still involved. Today the Barber farms comprise 2500 acres of prime Somerset dairy land and are home to some 2,000 dairy cows.

Charlie told us how they created their own specialist laboratory with their own microbiologist to grow their own natural starter cultures. These cultures are the friendly bacteria added to the milk to start the cheesemaking process and are the most important ingredient in creating the flavour and character of the finished cheese. Most cheesemakers nowadays use freeze dried starters and they are the only cheesemakers that currently make their own natural starters. They also supply the starters to artisan cheesemakers. They believe that it's the natural cultures that give their cheese a unique complexity of flavours and it's honourable that they are keeping this tradition alive.

We got to taste their signature cheddar cheese, cave aged cheddar, smoked cheese and goat's cheese. We were also introduced to his cousin who gave us a sample of Black Cow Vodka - vodka made from milk of their cows. It has a clean taste at the front and a subtle dairy taste at the end.


cheese awards 


 supergolden cheese awards table - one of their cheeses made it to this table! 

Before I tell you about my recipe, I'd also like to mention a honey beer that I tasted at the BBC Good Food Show. It's made by Hiver who source raw honey from independent British Beekeepers. I'm not a huge fan of beer but this is aboslutely delicious! Don't just take my word for it, try it for yourself and tell me what you think. At present, it's only available through Ocado.


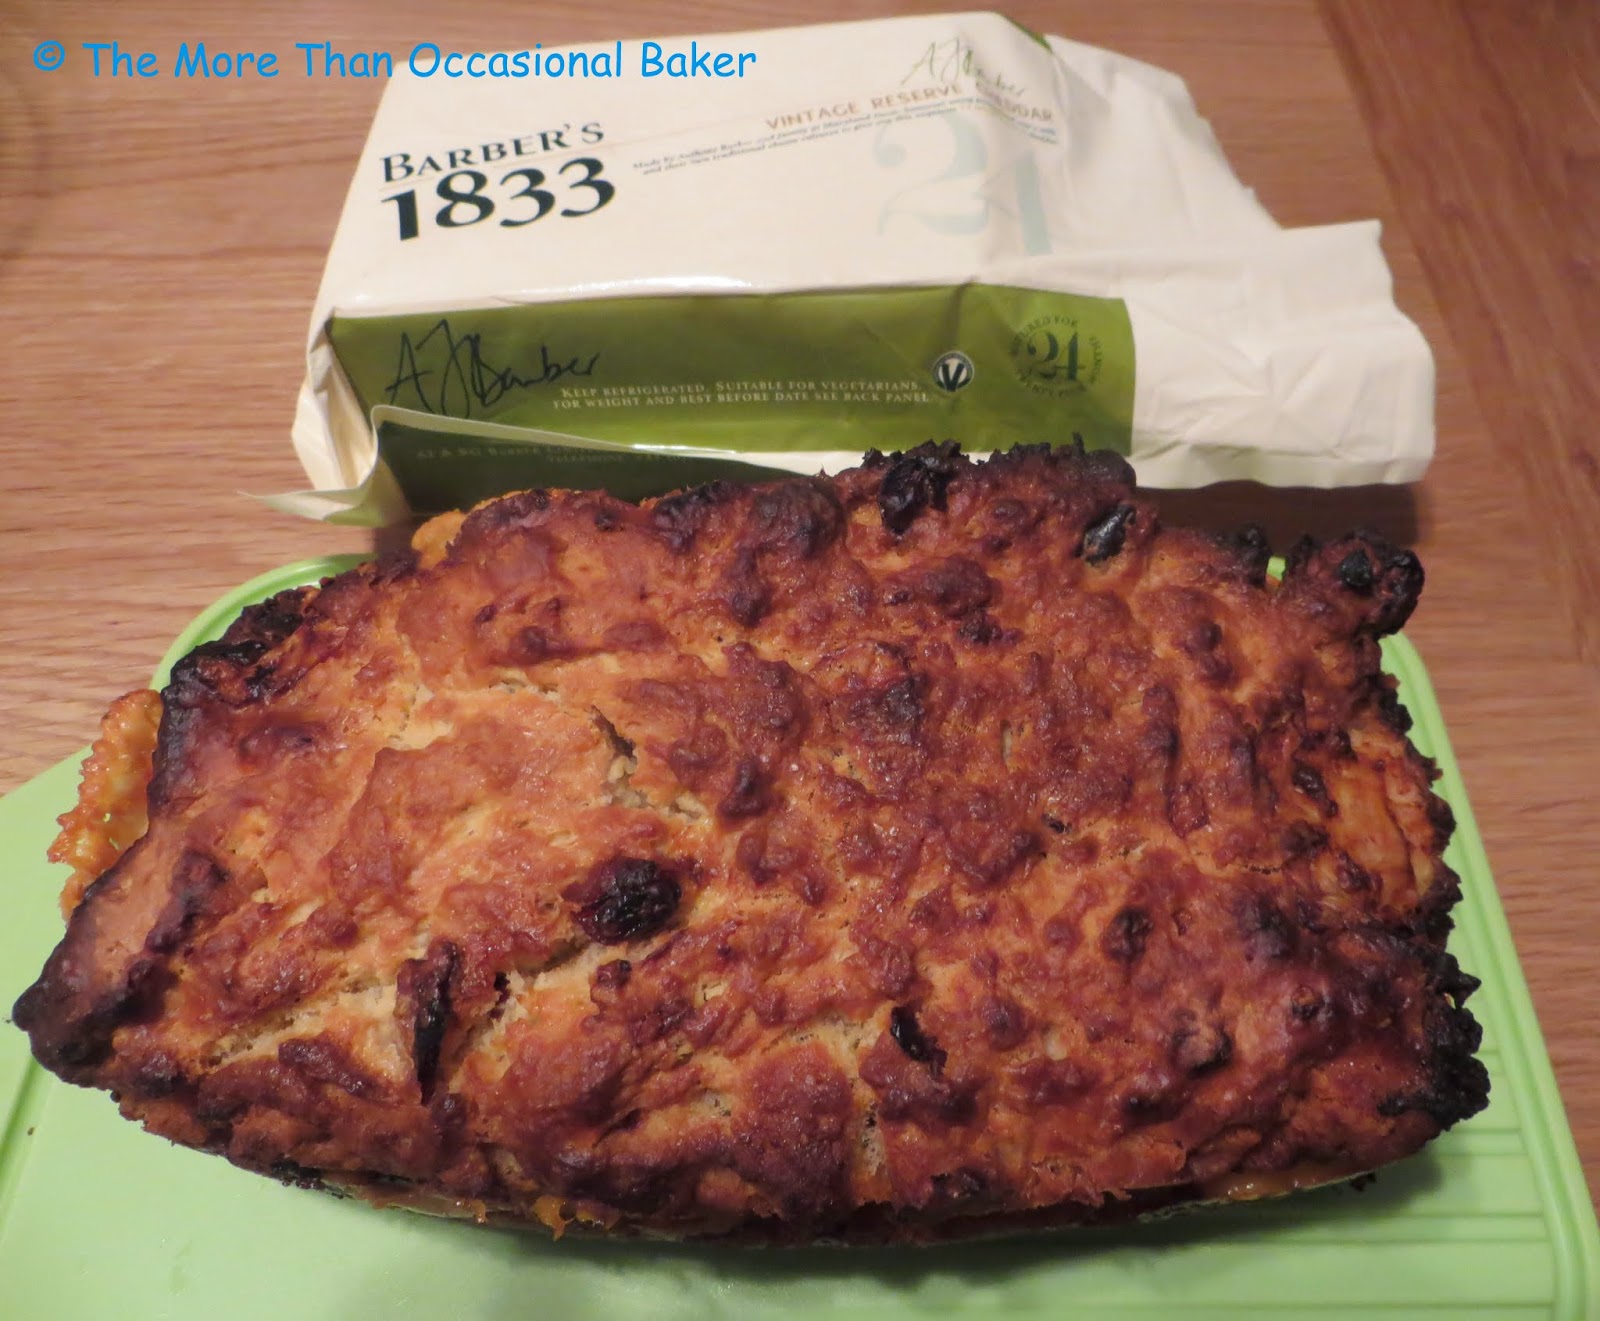
Barber's gave me a block of their vintage cheddar to sample and to create a recipe with. I had a few ideas to start with and after tasting the honey beer, I decided to make a Cheddar and Honey Beer Bread. As it's approaching Christmas, I decided to throw in some cranberries for a festive touch. I based it on an old recipe that has been passed on from a friend who got it from another friend and so on. I've not used this recipe in many years and had to hunt for it! It's a very simple mix all in one recipe. No need for a yeasted dough, kneading or fancy equipment. I added in dried cranberries and chunks of cheddar cheese. 

This bread is best eaten fresh on the day it's baked. The crust was my favourite part and I could have eaten the whole crust in one go! You can definitely taste the beer in the bread but the honey notes were subtle. You can clearly taste the cheese as it has a rich and strong flavour which is not masked by the honey or bread. It also adds a lovely saltiness to the bread and the cranberries add a burst of sweetness and texture. You also get bits of crusty melted cheese on the outside. We couldn't finish the whole loaf between us in one sitting so I toasted a few slices 2 days later and it was still very good. In fact, I think I prefer the toasted version as you get lots of crispy bits. Make sure you turn your toaster on a low setting as you don't want to burn the cheese!  


 Barber's Vintage reserve Cheddar


 Pour beer into the batter in one go 

 add dried cranberries and chunks of cheddar 

add melted butter before baking 

 fresh from the oven 


 serve warm with butter 

An original recipe by bakingaddict

470g plain flour
2 tablespoons light brown sugar
1 tablespoon honey (you can add another tablespoon if you want a sweeter bake) 
1 tablespoon baking powder
1 teaspoon salt
1 bottle Honey Beer, unopened and at room temperature
60g melted butter
60g dried cranberries (could add a bit more)
180g Barber's Vintage cheddar cheese, roughly cut into chunks
  • Preheat the oven to 190C.
  • In a large bowl, mix the flour, brown sugar, baking powder and salt. 
  • Add in the honey.
  • Open the beer and all it all at once to the batter - it will foam up.
  • Stir briskly until just combined - be careful not to overmix.
  • Add in the dried cranberries and cheddar chunks and stir a few more times to incorpate it.
  • Pour into a loaf tin and drizzle with the melted butter.
  • Bake for 35-40 minutes until golden brown and a skewer inserted into the centre comes out clean. 
  • Allow to rest in the pan for 5 minutes before serving.
  • Best served warm with butter. 

Disclaimer: I was invited to the Cheese Awards by Barber's Cheese at BBC Good Food Show. I was not required to write a positive review and all opinions are my own. This is not a sponsored post.

Tuesday, 28 October 2014

Pumpkin Pecan Roll with Maple Cinnamon Glaze


This is one of  my rare forays into bread baking. Possibly inspired by the Great British Bake off but mainly inspired by a jar of Pecan Pumpkin Butter I bought from America. I debated about what recipe to use it in and came up with pumpkin pie, pumpkin cookies or pumpkin cake but in the end I decided to make a version of cinnamon rolls using pumpkin, pecan and maple syrup. I have to admit that I threw the first lot of dough away as I was not happy with it and it just wouldn't come together. I made it the second time with the same ingredients and it worked beautifully. It definitely takes a little time to make your own dough but it's absolutely, totally worth it. The bread was so soft and light it felt like cotton wool on the inside. The pumpkin pecan filling was absolutely delicious and you can clearly taste the pumpkin with a hint of apple and spice. The maple cinnamon glaze complemented the flavours and my kitchen smelt heavenly whilst baking this. This is my first time trying the Clarks Pure Canadian No1 Light Maple Syrup. It comes in a lovely glass flask and tastes better than the regular maple syrup. The taste is purer and it smells divine! 

These rolls are perfect for a weekend breakfast or even at a Halloween party as it has very autumnal flavours. You can easily add some Halloween sprinkles or make an orange glaze (with orange colouring) for a more Halloween feel.  This success has now inspired me to try making more of my own bread so look out for more bread recipes in the future. 

I'm entering this to Treat Petite hosted by Kat from the Baking Explorer and Stuart from Cakeyboi. The theme this month is Trick or Treat. The deadline has past but Kat has kindly agreed to include this in the round up - thank you. 


I am also entering it to Let's Cook for Halloween hosted by Nayna from Simply Food.


 my lovely jar of pecan pumpkin butter

 I used my new (ish) Lekue bread maker which I bought from Lakeland - it's silicone and you can weigh and mix the ingredients in there and knead the dough...

 ... then close it up and leave it to prove! 

 it more than doubled in size yay! 

 roll out the dough

 add chopped, roasted pecans to the pecan pumpkin butter


 spread mixture evenly all over the dough

 roll up the dough like a swiss roll and slice 

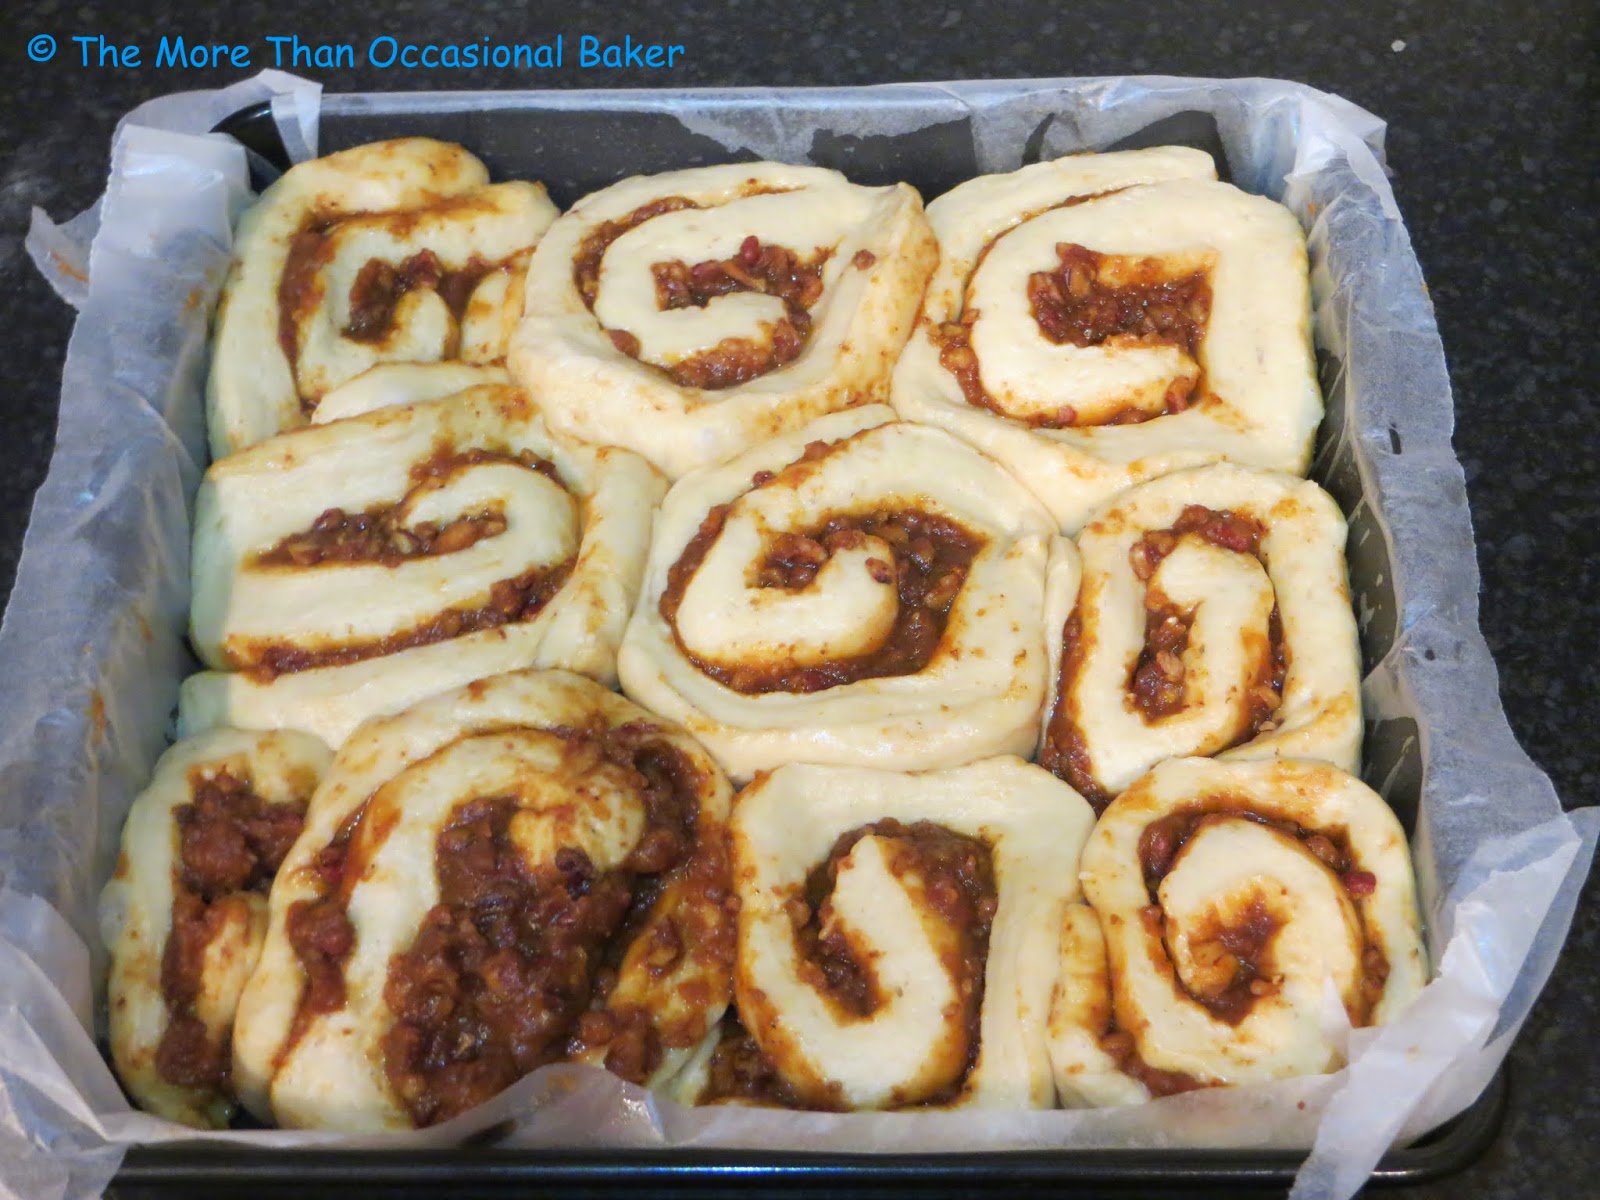
 arrange in a tin leaving a small gap between each roll. Cover with a damp tea towel and leave it for another 30 minutes or so 

 
 you can see that the dough has expanded further to fill all the gaps. Brush with a beaten egg before baking

 drizzle maple cinnamon glaze on top 


  yum! 

 The bread is really soft and delicious and the filling is very tasty! 

Bread recipe from BBC Food

For the dough
500g strong white bread flour
1 teaspoon salt
50g brown sugar
1.5 teaspoon dried yeast
75g butter
200ml milk
1 egg

For the filling
1 jar of pecan pumpkin butter
100g pecans - lightly roasted and roughly chopped

1 beaten egg to brush on top of the the dough before baking

For the maple cinnamon glaze
60mls maple syrup
1-2 teaspoons ground cinnamon (adjust to taste) 
250g icing sugar
few tablespoons of milk (optional) 

  • Start by making the dough - place the flour, salt and sugar in a bowl and mix. Add in the yeast and then rub the butter into the flour mixture until it resembles breadcrumbs. 
  • Make a well in the centre and pour in the milk and crack in the egg.
  • Mix together with your hands - don't worry if it's sticky, be patient and it will come together.
  • Turn the dough out onto a clean surface ( I used a silicone mat) and knead the dough until it is smooth and elastic. This can take up to 10 minutes! 
  • To test if it's ready, take a small piece of dough and stretch it as then as possible - you should be able to see the light through it and it should not break easily.
  • Place the dough in a lightly oiled bowl or in a silicone bread maker if you have one. Cover and leave to prove for about 90 minutes. 
  • Prepare the filling by lightly roasting the nuts and then roughly chopping them.
  • Scoop out the pecan pumpkin butter and add the prepared nuts. 
  • When the dough is ready, punch it a few times with your knuckles to knock the air out 
  • Roll the dough out to a rectangle as shown.
  • Spread the filling evenly making sure to go right to the edge.
  • Starting with the long side, roll the dough up into a sausage shape as you would a swiss roll.
  • Cut into 12 equal slices.
  • Place the slices with the spiral facing up in a lined square tin.
  • Cover with a damp tea towel and leave to prove for a further 45-60 minutes.
  • Preheat the oven to 200C.
  • The buns should have expanded and will feel springy to the touch.
  • Beat an egg in a bowl and brush the tops of the buns.
  • Bake at 200C for 10 minutes and then lower the temperature to 180C and bake for a further 15-20 minutes. 
  • Make the maple cinnamon glaze by mixing the icing sugar with the ground cinnamon. Pour in the maple syrup and mix until smooth. 
  • Add a few drops of milk if required. 
  • Once the buns are ready, remove from the oven and drizzle the glaze on top.
  • Best served warm but it kept well for a few days in an airtight container. 
Disclaimer: I was sent some Clarks maple syrup for review purposes including this Clarks Pure Canadian No1 Light Maple Syrup. This is not a sponsored post and all opinions expressed are my own.