Showing posts with label chinese new year. Show all posts

Monday, 8 February 2016

Chcocolate Peanut Butter Monkey Cake


Happy Chinese New Year! Today is the first day of the lunar calendar and it's the year of the Monkey. Wishing all my readers good health, prosperity and happiness. We had a little party at the weekend to celebrate the occasion. As it's a monkey year, I decided to make a monkey cake. Unfortunately I didn't deocrate it in time for the party so J has taken it to work today to share with his colleagues. It's a chocolate cake filled with peanut butter frosting. The decoration is simple yet effective albeit a bit messy to decorate! If you have kids, they will definitely enjoy decorating this cake with you. Chinese New Year goes on for 15 days so you have plenty of time to impress your family and friends with this cake. 

I'm sending this to #FoodYearLinkUp hosted by Charlotte from Charlotte's Lively Kitchen for Chinese New Year. 


It's also going to Love Cake hosted by Ness from Jibber Jabber UK. The theme this month is The Month Of Cake as it's the anniversary of the challenge. 


Finally to Simply Eggcellent hosted by Dom from Belleau Kitchen as the theme this month is Anything Goes. There's 2 large free range eggs in this cake.


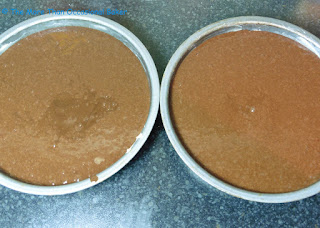
 The cake batter is very liquid - don't worry it bakes beautifully. 

 spread peanut butter frosting on top of the first layer of cake 

 Add second layer of cake. I used a cocktail stick to roughly draw an outline of a monkey face. I'm terrible at drawing!! 

 Spread the peanut butter frosting where the monkey face will be 
 
 Carefully spread the chocolate ganache over the rest of the cake including the sides

 Press chocolate rice cereal on to the chocolate ganache. I used 2 white candy melts for the eyes and piped some chocolate ganache for the eye balls, nose and mouth (which was a littlewonky!) The ears are tiny as I didn't have any ginger biscuits at home and used golden Oreo cookies instead. 

Recipe from Bird on A Cake 
I reduced the sugar amount, substituted chocolate extract for vanilla extract and used more milk in the frosting 

For the cakes 
1 cup (250mls) boiling water
350g caster sugar
220g plain flour  
85 cocoa powder, sifted
2 teaspoon bicarbonate of soda
1 teaspoon baking powder
2 large, free range eggs
1 cup (250mls) buttermilk
1/2 cup (125mls) vegetable oil
1 teaspoon chocolate extract 

Peanut butter frosting
250g smooth peanut butter
113g butter
250g icing sugar
40-50 mls milk

Chocolate Ganache
175g dark chocolate 
80mls double cream
20g butter

To decorate
2 white candy melts
2 large cookies for the ears - I used golden oreos but they are too small, recommend ginger biscuits or digestive biscuit
Choco rice cereal 

  • Preheat the oven to 180C. 
  • Sift the flour, sugar, cocoa powder, bicarbonate of soda and baking powder in a bowl.
  • Place the dry ingredients in the bowl of a stand mixer and add in the eggs, buttermilk, oil and chocolate extract.
  • Mix well.
  • Slowly pour in the water and continue mixing at a low speed until you have a smooth mixture. 
  • The batter will be very liquid, this is normal.
  • Divide the batter evenly between 2 sandwich tins and bake for approximately 30 - 35 minutes or until a skewer inserted into the centre comes out clean.
  • Allow the cakes to cool for 5 minutes in the tin before turning out to a wire rack to cool completely.
  • To make the peanut butter frosting, beat the peanut butter and butter until smooth.
  • Add in the icing sugar and continue beating.
  • Slowly add in the milk with the mixer running.
  • You  may need to add a little more or a little less of the milk depending on the consistency of your icing. You want a smooth, spreadable paste. 
  • To make the chocolate ganache, place the cream in a small saucepan and heat gently until bubbles are just visible. 
  • Add in the chocolate and whisk until smooth.
  • Remove from the heat.
  • Add in the butter and continue whisking until smooth.
  • Allow to cool and set a little before using.
  • Decorate the cake as shown above. 


Thursday, 19 February 2015

Matcha and Pistachio Cookies


Today February 19 is Chinese New Year. Happy New Year to all my readers who are celebrating. May this year of the Goat or Sheep bring you lots of happiness, health and prosperity. I decided to make some cookies for the occasion as I am going out for a celebratory meal with some friends so I wanted to make little gift bags. These are not traditional chinese new year cookies but I thought they would suit the occasion. It's a recipe that I saw online and I was intrigued by the flavour combination of matcha and pistachio. I also wanted something that was easy to transport and give as gifts. 

I love this recipe as it's so quick and easy to make and the results are fantastic. It's a mix all in one recipe (with a food processor) and you can keep the dough in the fridge until you are ready to bake. You can also freeze the dough and bake cookies when needed. I added a sprinkling of sesame seeds for aesthetic reasons and was really pleased with how it turned out. I also experimented with chia seeds but the sesame seeds looked better. 

The cookies are really buttery and crunchy and the predominant flavour is of the matcha powder. The pistachio complements the green tea flavour well and added a layer of texture to the cookie. The cookies are not sweet at all which helps the green tea flavour shine through. 

I'm sending this to Foodie Friday hosted by Helen from Casa Costello.


#FoodYearLinkup hosted by Charlotte from My Recipe Book. The link up is open to any foodie posts related to events in the Food Bloggers Calendar for February. These are for Chinese New Year. 


 plain flour, icing sugar, matcha powder , pistachips, butter, egg 

 dough wrapped in cling film. It should be a square shape but mine is quite uneven! 

 Optional toppings - sesame seeds or chia seeds 

 I love the vibrant green colour of the dough 

 I love how the sesame seeds look 

 little gift bags 


Makes 40-45 cookies depending on the size of your cookies

350g plain flour
15g Japanese matcha powder
250g unsalted butter, cut in cubes
150g icing sugar, sifted
1 egg, lightly beaten
50g pistachios nuts, lighty toasted - I'd suggest increasing the amount if you want a nuttier bake
Optional - sesame seeds or chia seeds 

  • In a food processor, mix the flour, matcha powder, icing sugar and butter until it resembles fine breadcrumbs. 
  • Add in the egg slowly and continue mixing. 
  • Finally add in the pistachio nuts and blitx until a smooth dough forms.
  • Roll the dough in a log or square shape and wrap in cling film.
  • Refrigerate for a few hours or preferably overnight to allow the flavours to develop. 
  • When you are ready to bake, preheat the oven to 200C.
  • Slice the dough and arrange on a lined baking tray.
  • Sprinkle with sesame seeds if using.
  • Bake for approximately 13-15 minutes or until just brown.
  • Allow to cool on the tray for a few minutes before transferring to a wire rack to cool completely. 


Monday, 23 January 2012

Nigella's Clementine Cake for Chinese New Year


In case you didn't know, today Jan 23rd is Chinese New Year/Lunar New Year. It is the year of the dragon  which symbolises power, strength and good luck. The following excerpt is taken from the daily mail (click on the link to see lots of pretty pictures!)

"Often regarded as one of the most important signs in the zodiac, Chinese tradition dictates that those born in Dragon years tend to be brave, innovative and highly driven, regularly making it to the top of their profession.  Famous people born in Dragon years include former U.S. president Bill Clinton, actress Reese Witherspoon and artist Salvador Dali.  Those celebrating Chinese New Year mark the occasion by buying presents, clothing, food and decorations embracing popular themes such as wealth, happiness and good fortune. "

Oranges are symbolic in chinese culture as a wish for good fortune. Tangerines and oranges sound like luck and wealth in the chinese language and hence are given freely during the festive period. (ps google is amazing!)

So to celebrate chinese new year, I decided to make a clementine cake from Nigella which was actually recommended by my mum - thanks mum! It's a really easy cake to make, Nigella says "It's the easiest cake I know" The added bonus is that it's gluten free. Everyone really enjoyed this cake. It was really moist and aromatic and I was impressed with the height considering that it's flourless. I've made a similar orange polenta cake but this is much better in my opinion!

As it's a Nigella recipe, I'm entering it to Forever Nigella hosted by Sarah from Maison Cupcake


And also to Simple and in Season hosted by Ren from Fabulicious Food 


 boil clementines for 2 hours

 then blitz

 mix all ingredients together and bake


Recipe is from Nigella's website 

Monday, 21 February 2011

Panda Cupcakes


I made these panda cupcakes for a friend's Chinese New Year Party.  They were fairly easy to make compared to the penguin and duck cupcakes.  I made a plain vanilla sponge and vanilla buttercream frosting but might try a cookies and cream cupcake next time. 
I made these in a bit of a hurry so only managed to make 4 complete pandas. I made the panda faces with the rest of the cupcakes. I now have a mountain of crushed oreos so I feel some oreo cupcakes coming on :) 


 getting ingredients ready - crushed oreos (body), chocolate raisins (nose), chocolate chips (eyes), weetos (ears), black and white frosting 

 place mini marshmallow on the lower third of the cupcake (I didnt have any so I cut up some regular sized ones)

 Spread frosting on top, covering the marshmallow to make the muzzle

 pipe a mouth just below the muzzle with a small vertical line up to the top of the muzzle.

 pipe eye patches above and to either side of the muzzle.

 add 2 chocolate chips, pointed side in for the eyes

 and a chocolate raisin for the nose (the book suggested chocolate coated sunflower seeds)  

 press 2 weetos into the frosting on either side of the top edge to make the ears 


 spread frosting on top of the larger cupcake and  create a mound. Roll in crushed oreos to make the black belly fur. 


 place the mini cupcake heads on their sides on top of the standard cupcakes, lining the faces up with the fur bodies. Add 1/2 and oreo cookie cut side in on either side of the cupcake to make the arms. Pipe 3 small lines of frosting on the arms to make the claws. Pipe a small white highlight in each eye. 


Sunday, 13 February 2011

Horlicks Cookies


In case you didn't know, it was Chinese New Year on the 3rd of February 2011.  It's the year of the Rabbit but I don't know how to make rabbit shaped cookies so I made these instead. They were supposed to be puppies but I think they look more like bears.  I also tried some with 'cornflake ears' to give it a slightly more doll like appearance.  The cookies themselves are extremely more-ish.  The Horlicks flavour brings back childhood memories. They smell amazing too! I love how they each have their own character. It was time consuming to make but really good fun and everyone definitely enjoyed eating them.


 definitely a bear I think 


 A doll? 


 mama bear 

 papa bear 

Makes ~ 40
180g butter
100g Horlicks
200g flour
25g cornflour
50g sugar

Decoration
Weetos cereal or cornflakes
Chocolate chips
Chocolate strands


  • Preheat oven to 140C.
  • Cream the butter and Horlicks for about 3 minutes at a low speed with an electric mixer. 
  • Add in the flour, cornflour and sugar and beat for a further minute.
  • Divide the dough into balls. 
  • Insert 2 pieces of Weetos for the ears, chocolate strands for the eyes and a chocolate chip for the nose.
  • Bake for about 25 minutes. 

Tuesday, 2 March 2010

Dragon Cookies

Another treat for chinese new year this year.... dragon cookies. I actually made these a few weeks ago but haven't had time to add them to my blog. As with all the chinese new year treats I've baked this year (pineapple tarts, dragon cookies and peanut cookies) this is my first attempt. I got the recipe from here and made a few minor modifications. My dough was a little sticky which made it difficult to pipe. I couldn't quite get the right shape so ended up with shapes that looked like snakes, tadpoles and possibly dragons. Oh well at least they all tasted the same :)

I was told these were too 'curly' so I tried again...Now they look more like tadpoles? Final result - lovely milky, crumbly taste :)

Recipe (adapted from Che-Cheh.com)
150g margarine
100g icicng sugar
2 egg yolks
1 egg white
1/2 teaspoon vanilla extract
320g cornflour, sifted
60g milk powder, sifted
60g plain flour, sifted

  • Beat margarine, icing sugar, egg yolks, egg white and vanilla extract until creamy.
  • Slowly sitr in cornflour, milk powder and plain flour and mix well.
  • Fill batter into a pastry bag and pipe 'S' shaped patterns on a baking tray.
  • Bake at 160C for 15 minutes