Showing posts with label cake. Show all posts

Wednesday, 25 May 2016

Chocolate Fudge Cake


Hi everyone! Sorry for the long absence. Life has just been crazy lately and I've also lost my baking mojo :( I hope it will come back soon as I do enjoy baking and everyone keeps asking me where's the cake? I will however have to step back from blogging for the time being but I hope to come back to it in full swing at a later date.

This is a really simple recipe from the Queen of baking, Mary Berry. The letter for this month's AlphaBakes is F so I decided to bake a simple chocolate fudge cake. Looking back on my blog, I can't believe I've not baked one before! This is a really quick and simple recipe with great results. The cake was light, moist and chocolatey and the ganache was divine. It went down really well at J's office and I'm sure I'll be baking this again in the future. 

I'm sending this to AlphaBakes hosted by myself this month and co-hosted by Caroline from Caroline Makes. The letter this month is F for Fudge cake. 


 mix cocoa powder with boiling water 

 mix all the ingredients together and you're done! 


I decorated mine with white chocolate stars 


I used this recipe which I found online so I won't reproduce it here.

Thursday, 21 April 2016

Chocolate Sweet Shop Cake

Kit Kat, candy cake

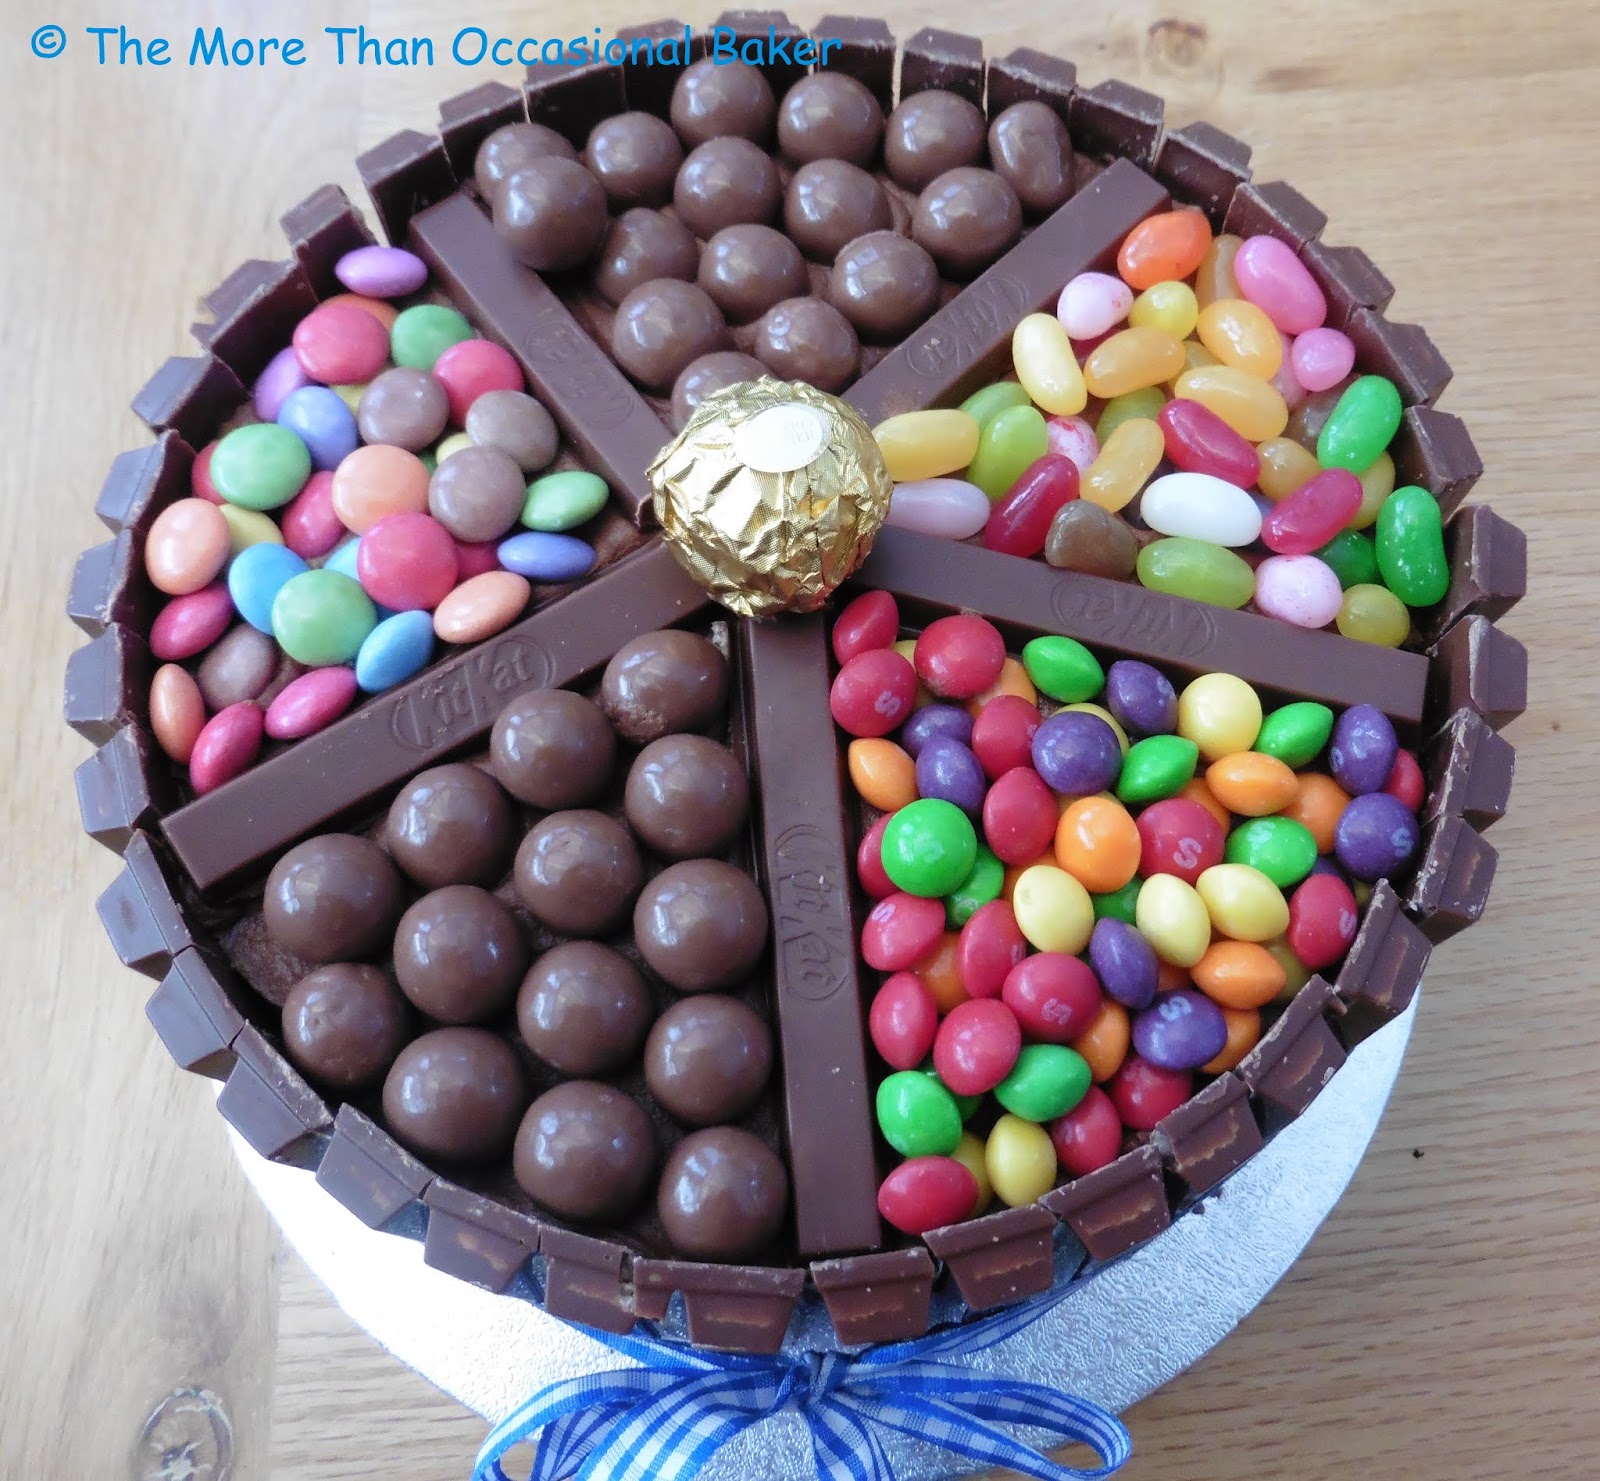
A really quick post today as I'm currently on holidays and will be travelling for the next few weeks. I made this for a colleague's son's birthday. Looking back, I've made his birthday cake for the past 3 years (Bin Weevils, Trash Pack, Football Pinata Cake) and they've always been a huge success.  He told his mum that he didn't want a shop bought cake, only a Ros cake! Well how could I disappoint? He initially asked for a playstation 4 cake but my cake decorating skills do not extend that far and I was really pressed for time. Instead I made this chocolate cake and decorated it with Kit Kat fingers, Maltesers, Jelly beans, Smarties and Skittles. He was absolutely delighted with the cake and wrote me a really sweet thank you note which you can see below. 


The cake and buttercream is the same as the Chocolate Easter Cake I made earlier this year and the decorations are as simple as they look here. A short blog holiday for now, see you back in mid-May!

Kit Kat, candy cake

Kit Kat, candy cake

Sunday, 20 March 2016

Chocolate Easter Cake


Can you believe it's a week till Easter? I know it's early this year but it still seems to have come out of nowhere. I have great plans for Easter baking but I'm not sure if I'll get round to all of it! Thankfully I have an Easter themed cake to share with you today and will definitely be baking a few more in the next week! This cake is a chocaholic's dream and is sure to impress both adults and children. It has a light chocolate sponge sandwiched with chocolate buttercream, surrounded by Kit Kats and is topped with mini eggs and a chocolate bunny and a chocolate duck made from Belgian chocolate. I bought the chocolate figures from my recent trip to Belgium and they taste as good as they look. For my cakes next week I'm going to use Lindt chocolate bunnies, Cabdury milk bunny and a Cadbury Chick. 

I'm sending this to several blog challenges this month.

AlphaBakes hosted by myself and Caroline from Caroline Makes. The letter this month is C for Chocolate. 


We Should Cocoa guest hosted by Linzi from Lancashire Food on behalf of Choclette from Tin and Thyme. The theme this month is eggs. There's real eggs in the cake and chocolate mini eggs in the decoration! 


Simply Eggcellent hosted by Dom from Belleau Kitchen. As mentioned there are real eggs in the cake and lots of mini eggs on top! 


Tea Time Treats hosted by Janie from The Hedgecombers and Karen from Lavender and Lovage. The theme this month is Easter.


#FoodYearLinkUp hosted by Charlotte from Charlotte's Lively Kitchen. This cake is definitely for Easter!


  Chocolate cakes, chocolate frosting, Kit Kats, mini eggs and chocolate figures 


 Spread a thick layer of frosting on top of the cake 

 Add another layer of cake on top and cover the cake - top and sides with frosting. Don't worry if it look messy as it will all be covered in chocolate candy. 

 I love these Chocolate figures I bought from Belgium - so cute! 

 Add Kit Kat Bars around the edge to form a fence. Place the chocolate figures in the centre then scatter mini eggs on top making sure to cover all the gaps and finish with a ribbon round the cake! 


 delicious! 

For the cake
220g plain flour
300g caster sugar
85g cocoa powder
1.5 teaspoon baking powder
1.5 teaspoon bicarbonate of soda
2 eggs
1 cup/250mls milk
1/2 cup/ 125mls vegetable oil 
2 teaspoon vanilla extract
1 cup boiling water, slightly cooled 

For the icing
150g butter
160g icing sugar
25g cocoa powder
1 teaspoon vanilla extract
115g dark chocolate, melted
2 tablespoons double cream (optional)

For the decorations
Approximately 38 Kit Kat fingers
250g mini eggs
Chocolate figures


  • Preheat the oven to 180C.
  • Grease and line 2 x 18cm sandwich tins. 
  • Mix all thedry ingeredients for the cake in an electric mixer. 
  • Add in the eggs, milk, vegetable oil and vanilla extract.
  • Beat well then add in the boiled water. The batter will be very liquid - don't worry!
  • Divide the batter evenly between the 2 cake tins and bake in the pre heated oven for 30-35 minutes or until a skewer inserted into the centre comes out clean. 
  • Allow to cool for 5 mins in the tin before turning out to a wire rack to cool completely.
  • To make the frosting, beat the butter and icing sugar until smooth. 
  • Add the cocoa powder and mix well.
  • Add vanilla extract and melted chocolate and beat until smooth.
  • Finally add in the cream if using. 
  • To decorate the cake, place a small dab of frosting in the centre of a cake board.
  • Place one cake bottom side up on the cake board.
  • Spread a generous layer of frosting and even the top with a palette knife.
  • Place the second cake on top and spread frosting on the top and sides of the cake.
  • Don't worry if its a little messy and you get cake crumbs in the frosting.
  • Use the Kit Kats to create a fence around the cake as shown. 
  • Place the chocolate figures in the centre or wherever your choose and press down gently.
  • Scatter the mini eggs on top, pressing lightly to secure them to the cake. 
  • Finish the look by tying a large ribbon around the cake. 


Thursday, 11 February 2016

Plum and Blueberry Yoghurt Cake


When Caroline announced that this month's AlphaBakes letter is 'Y',I immediately thought of yoghurt. I love baking with yoghurt and tend to use it in muffins and banana bread. I found this great recipe online for a Peach and Blueberry Greek Yoghurt Cake so I decided to give it a go. Plums were on sale in the supermarket so I used plums instead of peaches and it worked beautifully. I'm sure nectarines or even pears would work well too. The cake is really colourful and visually appealing. The sponge is light and the added fruit on top makes it feel almost healthy. 

I'm sending this to AlphaBakes hosted by Caroline from Caroline Makes this month and myself on alternate months. The letter is Y for yoghurt. 


It's also going to Recipe of the Week hosted by Emily from A Mummy Too


 sponge base 

 adding lovely fresh fruit on top 


 look at all the lovely colours 


Recipe from Julia's Album
The only changes I made was to reduce the amount of sugar, replace the peaches with plums and adding in some brown sugar before baking.

185g flour
1 tsp baking powder
1/2 tsp bicarbonate of soda
56g butter, softened
180g caster sugar
2 eggs
1 tsp vanilla extract
125mls Greek yogurt
4 plum, sliced
170g blueberries
3-4 teaspoons light brown sugar (optional) 

  • Preheat oven to 180C. 
  • Grease and line a 23cm diameter springform tin.
  • Sift the flour, baking powder and bicarbonate of soda in a bowl. 
  • In the bowl of a mixer, beat the butter and sugar together for a few minutes.
  • Add in the eggs, one at a time and mix well.
  • Add in the yoghurt and vanilla extract.
  • Stir in the flour mixture and continue mixing. 
  • Pour the batter into the prepared cake tin.
  • Arrange the plum slices in a circular fashion on top.
  • Sprinkle the bluberries on top.
  • If using, sprinkle a few teaspoons of light brown sugar on top before baking. 
  • Bake for approximately 45 - 50 minutes until golden brown and a skewer inserted into the centre comes out clean. 
  • Allow to cool completely in the tin before releasing and serving. 


Saturday, 23 January 2016

Golden Syrup Cake


Happy New Year! I'm back from a long break and it's quite difficult to get back into the swing of things. I've not actually felt like baking which does happen from time to time. However, I wanted to bake something for our AlphaBakes challenge this month so I chose a simple recipe from BBC Good Food. It's a golden syrup cake which is really simple to make and tastes absolutely delicious! I've had it on its own, with creme fraiche and with ice cream and they are all equally good. My colleagues were extremely happy as they've been without cake for quite a few weeks! The cake smells of golden syrup and you can really taste it in the cake as it's the main ingredient. It's a lovely moist cake with a crispy topping. A definite winner! 

I'm sending this to AlphaBakes hosted by myself this month and Caroline from Caroline Makes on alternate months. The letter this month is G for Golden syrup.


 cooking the golden syrup, butter and sugar 

 ready to go in the oven - my batter was still a bit lumpy but it turned out ok in the end! 


 delicious moist cake with a crispy top 

Recipe from BBC Good Food

Monday, 24 August 2015

Chocolate Cake with Oreo and Cream Cheese Filling


Are you ready for a serious chocolate overload? This is cake is so good I've made it 3 times in the space of two weeks and will be baking it again later this week. It's a simple cake that looks impressive and everyone will think you've spent hours on this creation! I adapted a recipe I found online. It's a really nice, moist chocolate cake with a cookies and cream filling topped with chocolate ganache and more Oreos. I took this to my work and J took one to his work as well. Here are the comments received...

This is the best chocolate cake.... EVER!

‘Okay, so that cake seriously competes with the after eight mint cupcakes... It's AMAZING!’

‘OMG....that cake was amazeballs!! My compliments to the chef ;)’

I think I've died and gone to cake heaven!


You really have to try this cake for yourself especially if you like chocolate and Oreos. I used chocolate creme Oreos the first time round as the supermarket had sold out of normal Oreos (gasp!). I do think it looks better with the regular Oreos as you get a bit of colour contrast. As I said, I've made this a few times so I've varied the decoration a little. I quite like the one with the whole Oreo in the centre rather than crushed up Oreos. 

I'm sending this to We Should Cocoa hosted by Choclette from Tin and Thyme. The theme this month is anything goes so here's my chocolate overload entry. 


 use strips of parchment paper around the cake board to catch any spillages. 

 Place one cake bottom side up on the cake board 

 Add the Oreo and cream cheese filling 

 With chocolate Creme Oreos

 With regular Oreos

Makes 1 large cake

For the cake 
350g caster sugar
220g plain flour
85g cocoa powder
1.5 teaspoon baking powder
1.5 teaspoon bicarbonate of soda
2 eggs
250mls milk
125mls vegetable oil
1 teaspoon chocolate extract (or use vanilla extract)
250mls boiling water, cooled for a few minutes

For the filling
400mls double cream
225g cream cheese
85g icing sugar
14 Oreo cookies, crushed

For the ganache
200mls double cream
200g dark chocolate 

  • Preheat the oven to 180C.
  • Grease and line 2 x 18cm round tins. 
  • Place the sugar, flour, baking powder, bicarbonate of soda and cocoa powder in the bowl of an electric mixer and mix briefly.
  • Add in the milk, oil, eggs, chocolate extract and finally the slightly cooled boiling water.
  • Mix until smooth.
  • Divide the batter between the 2 cake tins and bake for approximately 30-35 minutes or until a skewer inserted into the centre comes out clean. 
  • Allow to cool completely on a wire rack before decorating.
  • To make the filling, whip the cream until stiff then set aside. 
  • Beat the cream cheese with the icing sugar until smooth.
  • Stir in the whipped cream and crushed oreos. 
  • Chill in the fridge if not using immediately.
  • To make the ganache, heat the cream gently until it's just starting to bubble - don't let it overboil.
  • Add in the chocolate in small pieces whilst stirring.
  • Whisk for a few minutes until it's smooth.
  • Allow to cool for 5-10minutes before using.
  • To assemble the cake, cut 4 strips of parchment paper and lay them on each side of the cake board (see picture above)
  • Place one cake upside down on the cake board. 
  • Spread the cream cheese filling evenly on the cake, smoothing out the edges as you go. 
  • Add the second cake on top.
  • Pour the ganache from a height on to the centre of the cake and allow it to spread out until it's dripping down the edges of the cake. 
  • Decorate with piped rosettes of cream and half an Oreo Cookie as shown. I also added more crumbles Oreos as you just can't have too many! 
  • Remove the parchment paper and you should have a clean cake board. 


Sunday, 9 August 2015

Madeira Loaf Cake


The Great British Bake Off is back! Wednesday nights are now strictly reserved for watching the Bake Off. I've always wanted to bake along with the bake off but never really found the time. I will try my best this year but I will probably only manage cake and biscuits! Sadly, my oven has died so I'm not even sure if I can bake biscuits next week. I do have a top oven/grill but it's nowhere as good as my regular oven. Anyway this loaf is inspired by the first episode of the Bake Off. Can you believe this is only the second time in my life that I've baked a madeira cake? I used a Mary Berry recipe (of course) and the cake turned out beautifully. It has two cracks and a dome! Hurrah! However, I didn't have time to make a glaze or any fancy decorations but the cake held it's own. It had a light, lovely crumb and the hint of lemon really lifts the cake. 

 ready to go in the oven 

 two cracks and a dome!


175g butter
175g caster sugar
225g self raising flour
3 eggs
finely grated rind of 1 lemon


  • Preheat the oven to 180C.
  • Mix all the ingredients in a bowl until smooth.
  • Pour into a large loaf tin and level the top.
  • Bake in the pre heated oven for about an hour. The cake is done when a skewer inserted into the centre comes out clean.