Wednesday, 31 October 2012

Halloween Cupcakes 2012


I love Halloween baking and really went all out last year. I was planning a few different things this year but time ran away from me so here's my last minute attempt. Red Velvet Eyeball Cupcakes and Chocolate Pumpkin Patch with Wriggly Worms. It's late and I'm too tired to think of cool names! 

The cupcakes were fairly easy to make and you don't need a lot of specialist equipment. I made a batch of red velvet cupcakes (12) and a batch of chocolate cupcakes (18). The frosting was enough to frost all 30 cupcakes! (Click on the links for the recipe).  The frosting was from the red velvet cupcake recipe - I frosted the red velvet cupcakes first and then added 50g melted chocolate to the remaining frosting for the chocolate cupcakes. 

As these are for Halloween, I'm entering them to Calendar Cakes hosted by Rachel from Dolly Bakes and co-hosted by Laura from Laura Loves Cakes


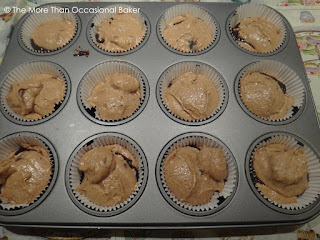
 red velvet cupcakes - nice and red but bits of batter that I didn't mix properly -oops! 

 covered with cream cheese frosting 

 pipe a small circle of green frosting then fill with an M&M for the eyes

 I bought a tube of Wilton red decorating gel 


 to create bloody eyeballs.. spooky! 

 chocolate cupcakes 

 covered in chocolate cream cheese frosting 

 crushed oreo cookie crumbs and Jelly worms for decoration 


 I also decided to make some little pumpkins from ready rolled orange icing and a green tic tac. I used a toothpick to make the indentations on the side. 


Happy Halloween Everyone! 

Monday, 29 October 2012

Secret Recipe Club: Lemon Poppyseed Tea Cakes


It's time for another Secret Recipe Reveal Day! I love being a member of the Secret Recipe Club. Each month, we are assigned a blog (in secret) and we have to choose and make a recipe from that blog and reveal our chosen recipes on the same day. The club has grown so big that we are now divided into groups and I believe there is a waiting list to join. 

My assigned blog this month is The Saucy Gourmet. Shari is a food blogger and food photographer who loves food! Her blog is full of delicious recipes but of course I headed straight for the dessert section. What a wonderful range of choices for me. I narrowed it down to chocolate and peanut butter trifles, chocolate mint squares, red velvet towers and inside out upside down pineapple cheesecake. In the end I chose her lemon and poppyseed tea cake as they are one of my favourite cakes. 

They were quick and easy to make and tasted absolutely delicious! The only adaptation I made was to add some lemon juice to the cake as I love a good tangy, lemony cake :)


 adding poppyseeds 

 mini cake mould 

 mini bundts and mini cakes - the shapes didnt turn out from the mini cake mould but the mini bundts looked great! 

Recipe adapted from The Saucy Gourmet 

Makes 30 mini cakes and 4 mini bundts of the size shown

For the cakes 
375g flour
1 tablespoon baking powder
1/2 teaspoon bicarbonate of soda
1/2 teaspoon salt
2 tablespoons poppy seed
140g butter
200g sugar
2 eggs
365g yoghurt (1.5 cups)
juice of 1/2 lemon
zest of 1 lemon

For the lemon glaze
185g icing sugar
2-3 tablespoon of lemon juice

  • Preheat the oven to 180C.
  • Whisk together the flour, baking powder, baking soda, poppy seeds, and salt and set aside.
  • In a large mixing bowl, cream butter and sugar together until pale and fluffy. 
  • Add eggs one at a time, beating until incorporated after each one. 
  • Beat in the lemon zest and lemon juice. 
  • Beat in one half of the dry ingredients until just incorporated. 
  • Beat in one third of the yogurt. 
  • Beat in half of the remaining dry ingredients. 
  • Beat in a second third of the yogurt. 
  • Beat in the remaining dry ingredients and then the remaining yogurt. 
  • Be careful to beat until just incorporated. Do not over beat. 
  • Pour batter into cake tins and bake for 15-18 minutes for the mini cakes, 20-25 minutes for the mini bundt cake. If you are making a large cake you will need to bake for 30-40 minutes, depending on the size of your cake. 
  • The cakes are done when a skewer inserted into the centre comes out clean. 
  • To make the lemon glaze, whisk the icing sugar and lemon juice 1 tablespoon at a time until it reaches the right consistency you require. You can always add more sugar if you want it thicker or more lemon juice if you want it thinner. 


Sunday, 28 October 2012

Ultimate Vanilla Cupcakes and a review


Do you remember my homemade vanilla marshmallows? Shauna Sever the author of Marhsmallow Madness has written another book entitled Pure Vanilla. On the inside jacket, it says "Who says vanilla isn't sexy?" Quite right as I do love a good vanilla cake. All too often, I'd choose different flavours or unusual pairings but you just can't go wrong with a good vanilla cake.


The book is published by Quirk books and has 159 pages in total including the index. There is a short introduction which covers the history of vanilla, from orchid to extract, vanilla in all its forms, vanilla origins, varieties and tasting notes - basically everything you ever wanted to know about vanilla!
It is then divided into 6 chapters and I've listed a few interesting recipes for each section here

Breakfasts - vanilla, brown sugar and black pepper bacon, vanilla bean popovers, honey-vanilla granola clusters
Cakes and Pies - vanilla cloud cake, cherry-vanilla shortbread cake squares, twinkie bundt cake
Cookies and Bars - heirloom vanilla sugar cookies, vanilla creme cookie sandwiches, vanilla latte cookies 
Candies and Confections - vanilla butter minds, golden pear-vanilla jam, vanilla lollipops
Custards and Creams - honey-vanilla panna cotta, creme brulee, floating islands 
Drinks - vanilla mojito, fruity vanilla iced tea, malted white hot chocolate 

The recipes are clearly set out with an introduction in bold and ingredients required down the side. There are bullet points for the method with the first few words of each step highlighted in bold making it easy to read. The font is a nice size and most recipes fit onto 1 page. There aren't a lot of photos in the book which is a shame as the photos that are there are beautiful. 

My verdict - A nice little book all about vanilla and vanilla recipes. Vanilla is such a versatile ingredient, it's great to have a little collection of recipes such as these. My main dislikes about the book would be the lack of photos (personal preference) and the ingredients list in cups and ounces but I do realise it's an American book. 


I made 2 recipes in the book - ultimate vanilla cupcakes and honey-vanilla granola clusters. The cupcakes were absolutely divine - the best vanilla cupcakes I've eaten and is now my go to vanilla cupcake recipe.  I used my homemade vanilla extract in the recipe which I'm sure made it better :) 
The granola was easy to make and the variations are endless. Perfect for breakfast or a mid-morning snack! 


 I want to eat the cupcakes from the page! 

 flour mixture + sour cream/egg mixture

 ready to be frosted 

 lots of lovely vanilla buttercream 

 honey vanilla granola clusters 

Recipes reproduced with permission from the publisher

Ultimate vanilla cupcakes 
Makes 16 cupcakes 

For the cakes
125g flour + 1 tablespoon cornflour (original recipe states 1/2 cup plus 2 tablespoons cake flour + 1/2cup plain flour )
1.5 teaspoon baking powder
1/4 teaspoon salt
113g butter
225g sugar
1.5 teaspoon vanilla extract
1/2 teaspoon vanilla bean paste
1/2 cup sour cream
2 eggs
1 eggs yolk

For the frosting  (I needed 1.5 batches to frost my cupcakes with the high swirl as shown)

250g icing sugar
1 tablespoon milk
1 teaspoon vanilla extract
1 teaspoon vanilla bean paste
200g butter


  • Preheat the oven to 180C. 
  • Sift the flours, baking powder and salt into a medium bowl.
  • In the bowl of a stand mixer fitted with a paddle attachment, beat together butter, sugar, vanilla extract and vanilla bean paste until light and fluffy, about 2 minutes.
  • In a measuring jug, whisk together sour cream, eggs and egg yolk until smotth.
  • Pour half of the wet ingredients into the butter-sugar mixture and beat until smooth.
  • Reduce mixer speed to low and stir in half of the flour mixture.
  • Repeat with the remaining dry and wet ingredients. 
  • Turn off the mixer and fold batter by hand several times to make sure it is well mixed. 
  • Fill cases until 2/3 full. 
  • Bake until golden brown and a toothpick inserted into the centre comes out clean, about 22-25 minutes. 
  • Allow to cool in the pan for 5 minutes before removing to a wire rack to cool completely.
  • To make the frosting, place the icing sugar in the bowl of a stand mixer fitted with a paddle attachment. 
  • Add milk, vanilla extract and salt and mix on low speed until sugar is evenly moistened. 
  • Add butter and gradually increase the speed from low to medium-high. 
  • Beat until fluffy and light in texture, 3 to 4 minutes.
  • Beat in the vanilla bean paste during the last minute. 

Honey Vanilla Granola Clusters

2 large egg whites, at room temperature
100g light brown sugar
85g honey
1/4 cup vegetable oil
1 teaspoon vanilla extract
315g rolled oats

  • Preheat the oven to 160C.
  • Line a rimmed baking sheet with parchment paper.
  • In a large bowl, whisk together egg whites, brown sugar, honey, oil and vanilla extract until smooth.
  • Add oats and stir to coat evenly.
  • Spread mixture onto prepared sheet in an even layer. 
  • Bake for about 20 minutes or until golden and fragrant, stirring once or twice and rotating pan 180 degrees halfway through baking. 
  • Transfer baking sheet to a wire rack and let granola cool on the sheet.
  • Break into clusters and store in an airtight container. 
  • If you like, add your favourite nuts and seeds during the last 5 minutes of cooking. 


Disclaimer: I was provided a copy of this book to review free of charge. I was not required to write a positive review. All opinions expressed are my own. 


Friday, 26 October 2012

Homemade Vanilla Extract

Quick post today to show you how easy it is to make your own vanilla extract. I made mine back in August but not had a chance to blog about it yet. I've been using it in my cakes and it's delicious! It's definitely worth making this at home if you bake a lot as a small bottle of vanilla extract costs quite a fair bit. The best thing about this is that it lasts for years and once you've made the first bottle, you can continue topping it up and you'll have an everlasting supply of vanilla extract! 

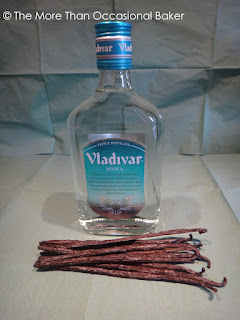
Disclaimer: This is NOT an advertisement for the brand of vodka shown here. I initially bought a beautiful Kilner bottle but in the process of sterilising it by putting it in the oven, the cap melted off so I was unable to use it. Besides it's cheaper and simpler to use the bottle that your alcohol comes in! 


 1 x 350ml bottle of clear alcohol (vodka in this case) and 10 vanilla pods which I ordered online 

 Pour out a small glass of vodka and place the vanilla pods inside. I also scraped out the vanilla seeds into the bottle so that the flavour develops quicker. 

 This is what it looks like to start with 

 after 1 week.. a bit of colour developing 

 after 4 weeks, its ready to use

Tips : 
Store in a dark, cool cupboard.
Shake the bottle every so often. 
Continue topping up with vodka as you use up the vanilla extract.
If you have any spare vanilla pods that you've used in baking, wash and dry them and then pop them in the bottle. 
Pour them into little presentation jars and tie with a ribbon for a Christmas or birthday gift for bakers.


Thursday, 25 October 2012

Banana Loaf and GBBO Learn to Bake book review


In addition to being a bakingaddict and blog challenge addict, I am also a cookbook addict. I was really excited when I was asked if I wanted to review the new Great British Bake Off book as I love the series and have all the other books in my collection.


Learn to Bake 80 easy recipes for all the family is due out on 25th October 2012. RRP is £18.99 but I see it's now selling for £8.54 on amazon. If you fancy winning one for free then read on!

Here's a sample of some of the cakes in the book....


The book has 223 pages and has a lovely colourful layout. One of my bug bears about cookbooks is that they don't have enough pictures so I was pleased to see a lot of photos in this book (more than the previous book - GBBO How to turn everyday bakes into showstoppers) There are step by step photos, photos of the actual bake and photos of kids playing. 


The book is divided into 6 chapters. It starts with a foreward by Mary Berry, then a helpful section on baking ingredients, equipment, tips and conversion tables. The chapters are

Cakes
Cupcakes & Little Bakes
Biscuits
Bread
Pastry
Puddings

My verdict - I really like the style of writing for this book. The recipes are clearly set out with tips and techniques throughout. The font is a good size and I love the splashes of colour in the book.  Perfect for the amateur baker but would also appeal to the more experienced baker. As mentioned I love the amount of photos in the book - it's not 1 per recipe but it's close. My personal favourite of the Great British Bake Off books so far.

The publishers have very kindly offered a book to one of my lucky readers so read on or scroll to the bottom to enter the giveaway. Open to UK residents only. Closing date is 8th November 2012. Winner will be picked at random by rafflecopter.

I decided to try out the banana loaf which was a marbled banana chocolate loaf. It was moist and delicious and everyone loved the marbled look. I'll have to make them into mini loaves next time! 


 alternate colours

 swirl to get the marbled effect 


Recipe reproduced with permission from the publisher

100g unsalted butter
250g self raising flour
150g light brown muscovado sugar
2 large eggs
250g peeled ripe bananas (2-3)
3 tablespoons cocoa powder
3 tablespoons hot water from the kettle
icing sugar and cocoa powder, for dusting
  • Preheat the oven to 180C. 
  • Put the butter in the saucepan and melt gently over low heat; cool.
  • Put the flour and sugar into one of the mixing bowls and stir with the wooden spoon to break up any lumps of sugar. 
  • Add the sugar to the pan of cool but still melted butter and mix well with the fork. 
  • Use the fork to mash the bananas on a plate - there should still be some small lumps. 
  • Add the egg mixture and the bananas to the flour mixture and mix well with the wooden spoon. 
  • Spoon half of the mixture into the other mixing bowl. 
  • Put the cocoa into the heatproof bowl and carefully stir in the hot water to form a smooth paste. 
  • Stir the cocoa paste into one portion of the banana mixture. 
  • (2 options are given in the book - mini loaves or a large loaf. Obviously I made a large one)
  • Using 2 small or large spoons for each mixture (one for scooping the mix and the other for scraping it off the spoon), add alternate spoonfuls of the banana mix and cocoa mix into the loaf tin.
  • You can leave them looking like dark and light spots or swirl the 2 colours together by drawing a chopstick or spoon handle through them.
  • Bake for about 45 minss (large loaf); 20-25 minutes (mini loaves).
  • Test using the skewer test (it should come out clean)
  • Allow to cool on a wire rack. 
  • Before serving, sprinkle lightly with sifted icing sugar and then with cocoa powder.  
Disclaimer: I was provided a copy of the book to review free of charge. I was not required to write a positive review. All opinions expressed are my own. The first three pictures are supplied by the publisher and reproduced with permission. 


And now for the giveaway....


a Rafflecopter giveaway

Wednesday, 24 October 2012

Spiced Apple, Honey and Beer Cake


I'm sure you can tell by now that I love experimenting in the kitchen and creating new recipes when I can. This month's Baking with Spirit hosted by Janine from Cake of the Week has the theme of beer. I have a bottle of apple beer in my fridge from my last trip to Belgium so I got to thinking about making a cake with it and came up with this recipe. It's a vegan recipe with lots of spices, apple, honey and of course beer. The cake itself was quite moist and sticky and you can definitely smell and taste the beer! I'm not overly keen on this cake but I'm glad I tried it and I'm sure if I experimented with the recipe a bit more, I could come up with something much tastier! 


I'm also sending this to Made with love Mondays hosted by Javelin Warrior where the idea is to make something from scratch. 

 
And to simple and in season as apples are in season. Simple and in season was created by Ren from Fabulicious Food and guest hosted this month by Franglaiskitchen


 apple beer from Belgium and fresh Bramley apples 

 adding lots of spices! 

 adding the beer

 note to self - must chop apples into smaller pieces next time

 I decided to make mini loaves as they look so cute...

 ...especially with a ribbon around it! 


An original recipe by bakingaddict
Makes 11 mini loaves as shown. 

400g flour
175g honey
1 teaspoon ground cinnamon
1 teaspoon ground ginger
1 teaspoon ground nutmeg
1 teaspoon ground all spice
1 teaspoon bicarbonate of soda
330ml apple beer
2 Bramley apples - peeled, cored and chopped

  • Preheat oven to 180C.
  • In a large jug, mix the beer and honey together.
  • Sift all the dry ingredients into a large bowl.
  • Pour in the beer and honey mixture and mix well.
  • Finally stir in the chopped apples - you can also grate the apples if you want a finer texture. 
  • Pour into mini loaf cases and bake for approximately 15-20 minutes or until a skewer inserted into the centre comes out clean. 


Monday, 22 October 2012

Plum Cupcakes


It's time for yet another Random Recipe challenge set by Dom from Belleau Kitchen. This month the theme is store cupboard finds where we are asked to reach into our cupboards and pull out the first thing you touch then pick a cookbook, turn to the index and find a recipe which has the item in your hand. So with trepidation I opened my overflowing cupboard and reached far into the back and came up with this.... 

 a bottle of homemade plum jam that my colleague gave me quite possibly hoping for a baked item from it. I've now left that job but I did use it in a cake as she probably intended! :) 


I knew that I wanted to make cake with it so I looked at my bookshelf and pulled out my trusted Hummingbird Bakery Cookbook. I turned to the index and what do you know on page 111 a recipe for plum cupcakes. Score! 

It's a fairly simple recipe with buttermilk and plum jam which creates a very moist cake. It has jam baked in the cake and sandwiched in the middle of the cake. It tasted very much of plums which incidentally is not my favourite fruit. I thought the cakes were a little too sweet and dense but they are definitely worth a try if you have some plum jam to spare. 


I'm also entering this to Tea Time Treats hosted by Kate from What Kate Baked and co hosted by Karen from Lavender and Lovage. The theme this month is jams, chutneys, curds and conserves. The plum jam is homemade (although not by me!) and I used the whole jar for the cake and icing so I hope this entry qualifies!


I'm also sending this to Made with love Mondays hosted by Javelin Warrior as the ingredients are homemade jam and fresh plums to decorate. No artificial flavours or colours here!


 plum jam, brown sugar, 4 egg yolks and buttermilk 

 fill the cake 1/3 full 

 add a teaspoon or so of jam 

 then top with another 1/3 of batter 

 fresh from the oven 

 decorate with slices of fresh plum

 you can see the jammy layer in between 

Recipe from hummingbird Bakery Cake Days
Makes 18 cupcakes

For the cupcakes 
120g butter
340g plain flour
1/2 teaspoon baking powder
1/2 teaspoon salt
4 large egg yolks
300g light brown sugar (I reduced the amount of sugar as it seemed too much)
180ml buttermilk
270g plum jam 

For the frosting
400g icing sugar (again I reduced the amount)
160g butter
50ml milk
50g plum jam (original states 70g but I didnt have enough)
Fresh plum slices to decorate

  • Preheat the oven to 190C.
  • Mix the butter, flour, baking powder and salt until it resembles coarse crumbs.
  • In a large bowl, whisk the egg yolks, brown sugar, buttermilk and 120g of the plum jam until well combined. 
  • Add half to the dry ingredients and mix well. 
  • Add the remaining half and continue mixing.
  • Fill each cupcake case 1/3 full of batter. 
  • Place 1 teaspoon of plum jam followed by another 1/3 of batter. 
  • Bake for approximately 20 minutes or until a skewer inserted into the centre comes out clean.
  • Allow to cool completely on a wire rack.
  • Make the frosting by whisking the icing sugar with butter.
  • Pour the milk in slowly and continue whisking until light and fluffy. 
  • Finally, stir in the plum jam.
  • Spread the frosting on top of your cooled cupcakes and decorate with slices of fresh plum.