Thursday, 27 May 2010

Daring Bakers' May 2010 Challenge - Piece Montée or Croquembouche


The May 2010 Daring Bakers’ challenge was hosted by Cat of Little Miss Cupcake. Cat challenged everyone to make a piece montée, or croquembouche, based on recipes from Peter Kump’s Baking School in Manhattan and Nick Malgieri.

This month’s challenge recipe is for a Piece Montée, which means literally “mounted piece.” You may know this dessert by another name – Croquembouche (“crunch in the mouth”). It is a kind of decorative confectionary centerpiece in an architectural or sculptural form used for formal banquets traditionally served at parties celebrating weddings and baptisms in France.

I had to sit out the last challenge due to various reasons so I was really excited to get back into the kitchen for this challenge. Unfortunately I didn't have time to do it justice as I've been really busy lately and made this at the last minute. I wanted to make a caramel glaze and try my hand at spun sugar but I'll have to save that for another time. However, I was really pleased with the final result and everyone at work loved it as well.

I've never made choux pastry before and was slightly nervous that it would not turn out but fortunately it did. It was so exciting watching it rise in the oven! Making a croquembouche looked daunting initially but it was actually quite simple and not as time consuming as I thought it would be. I'm so glad I now know how to make this as I can re-create it for future special occasions. I used classic flavours - vanilla and chocolate. It was really fun to make and even more fun to eat :)


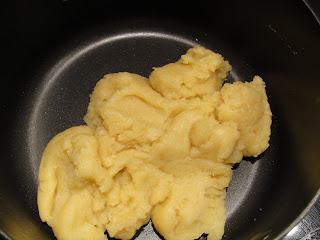
pate choux batter


adding eggs - it looks runny but dont worry, just keep adding the eggs and keep stirring.
piped batter
flatten the tops and brush with egg wash

choux pastry

So pleased that it puffed properly

vanilla cream patissiere

pastry filled with cream


For the Vanilla Crème Patissiere (Half Batch)


1 cup (225 ml.) whole milk
2 Tbsp. cornstarch
6 Tbsp. (100 g.) sugar
1 large egg
2 large egg yolks
2 Tbsp. (30 g.) unsalted butter
1 Tsp. Vanilla

Dissolve cornstarch in ¼ cup of milk. Combine the remaining milk with the sugar in a saucepan; bring to boil; remove from heat.
Beat the whole egg, then the yolks into the cornstarch mixture. Pour 1/3 of boiling milk into the egg mixture, whisking constantly so that the eggs do not begin to cook.
Return the remaining milk to boil. Pour in the hot egg mixture in a stream, continuing whisking.
Continue whisking (this is important – you do not want the eggs to solidify/cook) until the cream thickens and comes to a boil. Remove from heat and beat in the butter and vanilla.
Pour cream into a stainless steel/ceramic bowl. Press plastic wrap firmly against the surface. Chill immediately and until ready to use.


For Chocolate Pastry Cream (Half Batch Recipe):

Bring ¼ cup (about 50 cl.) milk to a boil in a small pan; remove from heat and add in 3 ounces (about 80 g.) semisweet chocolate, finely chopped, and mix until smooth. Whisk into pastry cream when you add the butter and vanilla.

For Coffee Pastry Cream (Half Batch recipe)

Dissolve 1 ½ teaspoons instant espresso powder in 1 ½ teaspoons boiling water. Whisk into pastry cream with butter and vanilla.

Pate a Choux (Yield: About 28)

¾ cup (175 ml.) water
6 Tbsp. (85 g.) unsalted butter
¼ Tsp. salt
1 Tbsp. sugar
1 cup (125 g.) all-purpose flour
4 large eggs
For Egg Wash: 1 egg and pinch of salt

Pre-heat oven to 425◦F/220◦C degrees. Line two baking sheets with parchment paper.
Preparing batter:
Combine water, butter, salt and sugar in a saucepan over medium heat. Bring to a boil and stir occasionally. At boil, remove from heat and sift in the flour, stirring to combine completely.
Return to heat and cook, stirring constantly until the batter dries slightly and begins to pull away from the sides of the pan.
Transfer to a bowl and stir with a wooden spoon 1 minute to cool slightly.

Add 1 egg. The batter will appear loose and shiny.
As you stir, the batter will become dry-looking like lightly buttered mashed potatoes.
It is at this point that you will add in the next egg. Repeat until you have incorporated all the eggs.


Piping:
Transfer batter to a pastry bag fitted with a large open tip (I piped directly from the bag opening without a tip). Pipe choux about 1 inch-part in the baking sheets. Choux should be about 1 inch high about 1 inch wide.
Using a clean finger dipped in hot water, gently press down on any tips that have formed on the top of choux when piping. You want them to retain their ball shape, but be smoothly curved on top.
Brush tops with egg wash (1 egg lightly beaten with pinch of salt).


Baking:
Bake the choux at 425◦F/220◦C degrees until well-puffed and turning lightly golden in color, about 10 minutes.
Lower the temperature to 350◦F/180◦C degrees and continue baking until well-colored and dry, about 20 minutes more. Remove to a rack and cool.
Can be stored in a airtight box overnight.


Filling:
When you are ready to assemble your piece montée, using a plain pastry tip, pierce the bottom of each choux. Fill the choux with pastry cream using either the same tip or a star tip, and place on a paper-lined sheet. Choux can be refrigerated briefly at this point while you make your glaze.
Use one of these to top your choux and assemble your piece montée.

Chocolate Glaze:
8 ounces/200 g. finely chopped chocolate (use the finest quality you can afford as the taste will be quite pronounced; I recommend semi-sweet)
Melt chocolate in microwave or double boiler. Stir at regular intervals to avoid burning. Use the best quality chocolate you can afford. Use immediately.

Hard Caramel Glaze:
1 cup (225 g.) sugar
½ teaspoon lemon juice

Combine sugar and lemon juice in a saucepan with a metal kitchen spoon stirring until the sugar resembles wet sand. Place on medium heat; heat without stirring until sugar starts to melt around the sides of the pan and the center begins to smoke. Begin to stir sugar. Continue heating, stirring occasionally until the sugar is a clear, amber color. Remove from heat immediately; place bottom of pan in ice water to stop the cooking. Use immediately.

Assembly of your Piece Montée:

You may want to lay out your unfilled, unglazed choux in a practice design to get a feel for how to assemble the final dessert. For example, if making a conical shape, trace a circle (no bigger than 8 inches) on a piece of parchment to use as a pattern. Then take some of the larger choux and assemble them in the circle for the bottom layer. Practice seeing which pieces fit together best.
Once you are ready to assemble your piece montée, dip the top of each choux in your glaze (careful it may be still hot!), and start assembling on your cake board/plate/sheet. Continue dipping and adding choux in levels using the glaze to hold them together as you build up.
When you have finished the design of your piece montée, you may drizzle with remaining glaze or use ribbons, sugar cookie cut-outs, almonds, flowers, etc. to decorate. Have fun and enjoy! Bon appétit!



Monday, 24 May 2010

Orange Chiffon Cake


My second attempt at making chiffon cake which turned out even better than the first :) I made an orange one this time using my mum's recipe and it tasted much nicer than the chocolate one. Everyone loved it. It was really light, moist, spongy and citrusy.


Beautiful egg whites

Cake batter

Look how much it rose in the tin!

Egg white foam
5 egg whites
1/2 teaspoon cream of tartar
100g caster sugar

Egg yolk batter
5 egg yolks
252g plain flour
3 teaspoon baking powder
152g caster sugar
1/2 cup orange juice
1/2 cup cooking oil
1/4 cup water
1/2 teaspoon salt
zest of 2 oranges

  • Make egg white foam by beating egg whites and cream of tartar until soft peaks form.
  • Add the sugar and continue beating until stiff peaks form.
  • Sieve flour, baking powder and salt twice and set aside.
  • Add egg yolks, orange juice and orange zest, oil and water and beat until well mixed.
  • Blend into egg white foam gently until everything is incorporated.
  • Pour batter in an UNGREASED 22cm tube pan.
  • Bake in a preheated oven at 130C for 35 minutes then 160C for a further 25minutes.
  • Remove from the oven and invert the cake tin onto a wire rack.
  • Allow to cool completely before unmoulding from tin.


Saturday, 22 May 2010

Peanut Butter Cookie Bars


This recipe is from another favourite blog of mine by Megan B of Confessions of a Bake-aholic. Just like the congo bars, I knew I had to make these when I saw them. I never used to like eating peanut butter but now am a huge fan of it. I especially love Reece's peanut butter cups and peanut butter M&M's. Peanut butter and chocolate is a perfect combination.
I can see why these were the people's choice winner of the 2010 cookie fest. The addition of oats gave it a really nice crumbly texture. The peanut butter frosting was absolutely divine! I could quite easily eat the whole tray.
I modified the recipe very slightly but it turned out great. Will definitely be making a lot more of this in the future.

cookie bar fresh from the oven
Add a layer of chocolate on top
Then peanut butter frosting
Some chocolate shavings
Voila :)


Cookie Bar
170g butter
150g caster sugar
150g dark brown sugar
170g creamy peanut buttr
2 eggs
1/2 teaspoon vanilla extract
3/4 teaspoon baking soda
1/2 teaspoon salt
1 1/2 cups oats
1 1/2 cups flour
200g plain chocolate

Peanut Butter Frosting
113g butter, softened
113g creamy peanut butter
1 1/2 cups icing sugar (add until it's at a desired consistency)
1/2 teaspoon vanilla extract
2 tablespoons milk

Preheat oven to 190C
Cream butter and sugars.
Add peanut butter and eggs and beat until smooth.
Add vanilla, soda, salt, oats and flour to form a dough.
Place into a square pan approx 9" x 9" (this is what I used) and bake for 15-20 minutes.
Meanwhile, melt the chocolate in a small bowl over a pan of simmering water.
Spread chocolate over the bar and allow to cool completely.
Combine all the ingredients together to make the peanut butter frosting.
Spread over cooled bars.
Decorate with chocolate shavings if desired.


Wednesday, 19 May 2010

Congo Bar


I came across these on Bakerella's blog recently and knew I had to make it. If you've not read bakerella's blog, I highly recommend it. She makes the best baked goods around including really cute cake pops.
So what is a congo bar? I've never even heard of it until now. It's apparently a cross between a brownie and a cookie. Heaven. Sometimes you just can't decide especially for a self confessed cookie-holic and brownie-holic like me. Beats cake anyday in my book :)
I took Bakerella's advice and made these by hand. They turned out beautifully and I'm pretty sure I could have eaten the whole tray! It's like a really decadent chocolate chip cookie with the texture of a brownie. I made these late at night (again!) and didn't have all the ingredients to hand. So I improvised and think it's probably better this way! I didn't have enough chocolate chips so I added some M&M's and chopped chocolate. I have to say I was shocked when I saw how much sugar was required - 1lb (454g) so I reduced this and it still tasted a little sweet to me.
Give this a go and I guarantee you'll love it :)


I love the brightly coloured M&M'sYummy batter Fresh from the oven. I added some chocolate shavings on top for fun. Might even try sprinkling some 100s&1000s next time.

Would you like a slice?

Recipe adapted from Bakerella

 
2 3/4 cup all purpose flour
2 1/2 teaspoons baking powder
1/2 teaspoon salt
2/3 cup butter, softened
325g light brown sugar
3 eggs
1 teaspoon vanilla
100g milk chocolate chips
185g M&Ms
~50g chopped chocolate (optional)

  • Preheat oven to 180C
  • Sift flour, baking powder and salt into a large bowl. Set aside.
  • Stir brown sugar into softened (not melted) butter in another large bowl until butter disappears.
  • Add eggs one at a time to butter mixture and stir well after each egg.
  • Add vanilla, chocolate chips, M&Ms and chopped chocolate if using. Mix well.
  • Add dry flour mixture and stir until well combined.
  • Pour into baking pan (I used a square one as pictures) and bake for 30 minutes until the top is golden brown.


Monday, 17 May 2010

Very Lemony Crunch Cake


This is yet another amazing recipe from Fiona Cairns Bake & Decorate. I made this on a whim at about 10pm on a sunday night as you do. I seem to have a tendency to bake late at night! I also wanted to use my new silicone bakeware (I think I mentioned in a previous post about recent purchases of baking goods/kitchenware) However the tin is actually too big so the cake came out a little flat. I'll probably make a double recipe next time to fill the tin.
The resulting sponge was really moist and lemony with a crunchy top exactly as described in her book. Just what I was looking for. I'll definitely be making this again and again as it was so simple and yet so satisfying. Plus I don't need to get any special ingredients.

new silicone cake tin

the magic a kitchenaid can do :)

fresh from the oven

close upperfect with a nice cup of tea :)

For the cake
175g unsalted butter, softened, plus more for the tin
175g self-raising flour
a pinch of salt
2 eggs, lightly beaten
175g golden caster sugar
zest, finely grated, and juice of 1 large lemon

For the topping
juice of 1 large lemon
100g white granulated sugar


  • Preheat the oven to 180C.

  • Lightly butter an 18cm diameter, 7.5cm deep, round springform tin and line the base and sides with parchment paper.

  • Sift the flour and salt into a bowl and set aside.

  • Melt the butter in a small pan and set aside to cool slightly.

  • Using the whisk attachment of an electric mixer, or a bowl and electric whisk, beat the eggs and sugar together until very light and fluffy (this may take 5 minutes)

  • Blend in the melted butter; then very gently fold in the flour and zest.

  • Finally, slowly fold in the juice.

  • Pour the batter into the tin and bake for 30-35 minutes or until the cake springs back to the touch, or a skewer inserted into the centre comes out clean.

  • Meanwhile, make the crunchy topping by simply mixing the juice and sugar together in a small bowl.

  • Immediately the cake comes from the oven, prick tiny holes all over it with a fine skewer or cocktail stick.

  • Pour the lemon syrup evenly all over the surface.

  • Leave to cool completely in the tin.

Friday, 14 May 2010

Iron Cupcake London Challenge May - Fruit

It's been a while since the last Iron Cupcake Challenge as we didn't have one in April which is just as well as I would have had to miss it. I'm so glad it worked out that way as it would have been a shame to miss the fruit challenge. This month was slightly quieter than previous months but the standards were just as good if not better. Everyone was really creative and there was fruit galore. Click here for full details of the event.
I made sticky toffee cupcakes with salted caramel buttercream which contain dates. Everyone kept asking what fruit? I thought I'd go for the subtle approach. Another great baker had the same idea (sticky toffee)- I like to think great bakers think alike :) Check out her blog here. I guessed there would be a lot of berries and citrus fruit and my fellow bakers didn't fail to disappoint.
Here are some photos from the evening
Winner on the right - watermelon cupcakes.


My entry :)
My 2 fav professional entries which won

Next month's theme is 'celebration' as Iron Cupcake London is celebrating it's first birthday. Any ideas?

Thursday, 13 May 2010

Sticky Toffee Cupcakes with Salted Caramel Buttercream


I've been dying to make these cupcakes ever since I saw them in Fiona Cairns book 'Bake & Decorate Tea Time Luxury'. One of my favourite bloggers, Heavenly Housewife wrote a post about this book recently and I knew I had to get a copy. As it happens the theme for this month's Iron Cupcake Challenge was fruit so I made these as my entry. I usually like to make a test run before the challenge in case it needs tweaking but didn't have time this time. Fortunately the cakes turned out fine. The icing however was a different story. I burnt the caramel the first time round and couldn't use it as it had a bitter after taste. I then had to go out to meet some friends and therefore started my second batch of caramel at 11pm (on a sunday night)! I watched it even more closely and probably could have left it a little longer but I didnt want to take any chances. I then had to wait for it to cool completely before making the buttercream. It tasted really good and I thought my troubles were over.
Apparently not as disaster strikes twice. Approximately 2 hours later, I was ready to pipe the buttercream on my cakes and unfortunately I had bits of caramel that had crystallised clogging up my piping tube. Had to use a different piping bag in the end which had a removable nozzle so I could easily clear the obstruction each time it occurred. It took much longer than I expected to frost all the cakes as I had to re-do quite a few of them. The silver lining though is that the pattern is really pretty - it looks like a rose, doesnt it? I've not used this nozzle before so was really pleased with the end result.
Would I make this again? YES! In fact I made another batch on Tuesday night as everyone got to look at it on Monday but couldn't eat it as it was for the challenge. Voted one of my best baking creations by my colleague who has sampled almost everything on here. The cake is really moist and light and the salted caramel buttercream is amazing. I'll confess, I had a small bowlful of buttercream for breakfast on Tuesday :) Thought I deserved it after all this effort!


date mixture

KitchenAid in action (Again? I know I can't help it, I just love it so much)


Burnt caramel! :(

Perhaps slightly underdone but great caramel

salted caramel buttercream
Cakes waiting to be frosted

Final result after hours of stress!

Recipe from Fiona Cairns. Makes 12
For the cakes
180g dates, pitted and chopped
1 tsp vanilla extract
180g self-raising flour
1 tsp bicarbonate of soda
80g unsalted butter, softened
150g light muscovado sugar
2 eggs, lightly beaten

For the buttercream
Caramel method
125g white caster sugar
80ml double cream
1/2 teaspoon salt (to taste)
1 tsp vanilla extract

Dulce de leche method
3-4 tbsp dulce de leche
1/2 tsp salt (to taste)
1 tsp vanilla extract

160g salted butter, softened
200g icing sugar, sifted

  • Preheat the oven to 180C
  • In a heatproof bowl, pour 180ml boiling water over the dates and leave to soak for 20 minutes.
  • Then, with a fork, dently break up the dates and stir in the vanilla.
  • Sift the flour and bicarbonate of soda into a bowl and set aside.
  • Cream the butter and sugar until light and fluffy.
  • Add the eggs gradually, beating between each addition and slipping in 1 tbsp flour about halfway through to prevent curdling.
  • Lastly, fold in the remaining flour and then the date mixture.
  • Spoon into cupcake cases and bake for 15-20 minutes.
  • Remove and leave to cool.

  • To make the caramel, dissolve the sugar and 60ml water in a small, solid-based pan over a gentle heat, then increase the heat to a boil.
  • Wait a few minutes, leaving the pan undisturbed but watching it like a hawk and, as soon as it changes to a wonderful caramel colour (like strong tea) and is thicker, remove immediately from the heat.
  • Stand well back and add the cream.
  • Be very careful as it's searing hot and may splatter a little.
  • it will reach or 'seize' and you may think it has gone wrong; it hasn't.
  • Keep stirring, adding the salt and the vanilla.
  • Leave until stone cold.
  • If using dulce de leche, simply mix it with the salt and vanilla.

  • For the buttercream icing, cream the butter and icing sugar for at least 5 minutes.
  • Add the caramel or the dulce de leche.
  • Pipe with a piping bag or spread with a palette knife.