Monday, 31 October 2011

Halloween Cake Pops


It has been a mega halloween baking effort from me this year. I managed to make about 100 cake pops and cake balls over a few days which have all been eaten! Plus Halloween candy and cupcakes which will be featured next.  I went on a cake pops class earlier this year taught by Leigh of Craft Cakes at the Oak Studio. Been planning to make cake pops since then but not had a chance until now. Luckily I still remembered how to but really need to practice my decorating skills. I did fail art at school so really you can't blame me! I also had some help from my friend P who was staying over and helped decorate the cake pops. The first time, we used writing icing which was difficult to control resulting in the cake pops above.
I then asked for some help from Olivia of livalittlebakery as her cake pops looks amazing, check it out here.
So the second time round, I used sugarflair colour paste with a paintbrush. However my brush was not fine enough and by then I was really tired and just wanted to get them done. Lesson learnt for next time. Leigh also had a great tip of using royal icing which I will definitely try next time.


 prepare your items. I forgot to add in the tic tacs which I used for the pumpkin stem. Sainsbury's has an amazing baking range at the moment including these orange buttons. 

 dip cake balls and allow to set. I 

 I had this brilliant idea of using a pumpkin to display my cake pops and am glad it worked. Its also my first time carving a pumpkin so I'm pretty pleased with myself :) I need to carve the mouth a bit higher though. 

 yummy mummies (all decorating ideas are from Bakerella's cake pops - highly recommend if you want to make amazing looking cake pops) 

 2nd time - I tried making some skulls - ugh. Good thing its Halloween so ugly is pretty haha. I also got these oasis foam blocks and wilton candy melts from hobbycraft - great for cake pops. They were still a little difficult to balance using the empty egg cartons. 
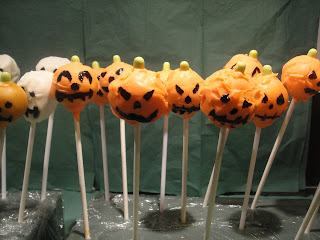

 pumpkins using black sugarflair paste with a (too thick) brush and wilton candy melts - brighter orange colour but I think the silverspoon buttons gave a smoother appearance. 

 little pumpkins when I ran out of lollipop sticks and time to draw more faces... still looked good and tasted great. 

If you need a reminder on how to make the actual cake pops, click here

Happy Halloween Everyone! 

Tuesday, 25 October 2011

Banana, carrot and orange muffin


From apples to bananas and carrots, I feel like I'm going through my alphabet...ABC! Hmm could be an interesting challenge but might be tricky when I get to X.  Can you think of a food that begins with the letter 'X' that I can bake? 
Anyway we digress. This is a really simple recipe, one of those mix everything and bake (my favourite kind) and perfect for breakfast/tea or as a snack. The muffins are really soft and moist and the orange flavour is quite strong. If you don't like the ctirusy tang then either omit the orange zest or put a minimal amount in. I had to put most of these in the freezer so they would last longer otherwise they were in danger of being eaten very quickly! They freeze really well and make an excellent breakfast on the go. 


 preparing the batter - love the colours

 adding the egg whites 

 yummy batter 

 delicious! 

185g flour
150g caster sugar
1 teaspoon baking powder
1 teaspoon bicarbonate of soda
1/2 teaspoon salt
1/2 teaspoon cinnamon
1/4 teaspoon ground nutmeg
2 eggs, separated
1 tablespoon honey
zest of 1 orange
2 bananas, mashed
150g carrots, grated
1/2 cup vegetable oil

  • Preheat the oven to 170C.
  • Combine the dry ingredients in a large bowl.
  • Add 2 egg yolks, honey and orange zest and mix well. 
  • Fold in the mashed bananas, grated carrots and oil.
  • In a separate bowl, whisk the egg whites until stiff peaks form.
  • Add the egg whites to the batter and fold in carefully. 
  • Spoon into muffin cases and bake for 25-30 minutes or until a skewer inserted in the middle comes out clean. 
  • Allow to cool on a wire rack. 

Monday, 24 October 2011

Apple Streusel Cake


October is National Apple Month.  I've already been baking quite a bit with apples and other fruits that are in season this autumn. There are quite a few blogging challenges around the blogosphere so I'd like to submit this recipe for the cookbook party hosted by Louise of months of edible celebrations. Check out her website to see what else October is the month for... I was quite surprised! I'm also submitting this recipe to Simple and in Season.


This recipe is from the hummingbird bakery cake days (page 42). It's a really simple recipe and turned out beautifully. I added an extra layer of apples so you can see that there is only a very thin layer of sponge but lots of apples and streusel topping. It smelled amazing whilst it was baking and once it was out of the oven.  I really love the combination of apples and cinnamon - a match made in heaven. I think this is better than the cinnamon crumble apple cake that I made recently.


 make the streusel topping 

 layer the apples on top - I added a second layer after this! 

 add the streusel topping and bake 

 fresh from the oven 


Recipe from hummingbird bakery cake days

For the cake
60g unsalted butter
140g plain flour
100g caster sugar
1 large egg
1/2 teaspoon vanilla extract
1 teaspoon baking powder
1/2 teaspoon salt
80mls whole milk
3 granny smith apples

For the streusel topping
70g plain flour
1/2 teaspoon ground cinnamon
40g unsalted butter, chilled and diced
70g soft light brown sugar


  • Preheat the oven to 170C. 
  • Grease and line a 20cm spring-form cake tin.
  • Firstly, make the streusel topping by sifting the flour and cinnamon into a bowl.
  • Add the butter and rub together using your fingertips until they resemble breadcrumbs.
  • Add the sugar and set aside.
  • Secondly, make the sponge by creaming the butter and sugar together until pale and fluffy.
  • Add the egg and vanilla essence and mix well. 
  • Sift the flour, baking powder and salt and then add half to the creamed butter mixture followed by half of the milk.
  • Repeat with the rest of the flour mixture and milk. 
  • Pour the batter into the prepared tin. 
  • Peel, core and slice the apples and arrange on top of the cake batter. 
  • Sprinkle the streusel topping on top evenly.
  • Bake for 35-45 minutes or until golden brown.
  • Cake can be eaten warm or cold. (I had mine warm with ice cream and it was delicious!)

Sunday, 23 October 2011

National Baking Week


If you didn't already know, it's national baking week Oct 17th-23rd 2011.  Ruth Clemens of the pink whisk and Great British Bake Off Finalist 2010 is the face of national baking week. You can watch a live Q&A session with Ruth here.
I saw the video of the national baking week cake online and couldn't wait to see it in person so I was really excited to go and see it in person today. It is a giant cake of London tube stops and landmarks and I absolutely love the details in it. It's definitely worth visiting if you are in the area or if you live in London for that matter. The display can be seen at King's Cross St Pancras International near the eurostar departures.  However, if you can't get there in person, I hope these pictures will give you an idea of what it looks like. I wonder how long it took to make and how many bakers were involved.

 view from the top. I love how it looks like the London tube map 

 ground level 

 I love the names of the stations - swiss roll cottage and victoria sponge are my favourites but they were all very creative and clever. 


Saturday, 22 October 2011

Butterscotch Marshmallow Bar


I finally got round to making something from the Hummingbird bakery cake days having bought the book months ago. It's quite a good book (lovely pictures with a good, clear layout) although some of the recipes are similar to the original hummingbird bakery cookbook. I've already bookmarked quite a few but it joins my eternal 'to bake' list which seems to get longer everyday! 
This is a quick and simple bake and guaranteed to be a crowd pleaser as most people love marshmallows (weirdly, not me!), butterscotch (yum) and nuts. The blurb in the book says "they're unlikely to last long - your friends just won't be able to resist" Well it definitely disappeared quickly at work with lots of compliments :) 
I have to say it does not look like the picture in the book but it definitely tasted good. I also got to learn about cooking sugar until it reaches the soft ball stage. 

 base 

 the soft ball stage (this was a new learning experience for me so I thought I'd add in a photo to try and illustrate what it should look like - I have now ordered a jam thermometer so should be easier next time!)

 sprinkle marshmallows on top 

 Add the butterscotch and nuts 

For the base
150g flour
40g icing sugar
120g unsalted butter, softened

For the topping
100g pink and white mini marhsmallows
210g caster sugar
150g soft light brown sugar
190g golden syrup
70g unsalted butter
60ml double cream
1 teaspoon vanilla essence
60g crunchy peanut butter
30g mixed chopped nuts (I only had pecans so went with that this time)

  • Preheat the oven to 170C; grease and line a 22cm x 31cm baking tray.
  • Mix the ingredients for the base until a dough forms (by hand or with an electric mixer using the paddle attachment).
  • Press the dough into the prepared baking tray, making a slight lip around the edge and bake for 20 minutes or until the edges are a light golden brown and the middle is pale but cooked. 
  • Place the marshmallows on top of the baked base, spreading them out evenly. 
  • Place both types of sugar with the golden syrup and 240ml of water and bring to the boil.
  • Allow the mixture to boil until the sugar reaches the soft-ball stage (see notes below and picture above).
  • Remove from the heat and stir in the butter. 
  • Bring the butterscotch back up to the boil and allow to bubble away for approximately 3 minutes.
  • Take the pan off the heat and stir in the double cream, vanilla essence and peanut butter. 
  • Stir continuously until the peanut butter has melted.
  • Pour the mixture on to the base and sprinkle the chopped nuts on top. 
  • Allow to set at room temperature for a few hours or preferable overnight. 
  • Slice into bars and serve. 

Notes: 
To check whether your sugar syrup has reached the soft ball stage, use a spoon to drop a small amount into a bowl of very cold water. 
If the syrup has been cooked to the correct heat, it will form a soft ball in the water.
Removed from the cold water, this ball won't retain its shape but will flatten in your hand. 


Wednesday, 19 October 2011

Giant Oreo Cookie Cake


As most of you may know, I changed jobs recently. My lovely colleagues bought me an amazing cake stand and I also got this really cool giant cookie mould! (Thank you Kate!!) I've had my eye on it for a while so was really pleased when I was presented with it. If you don't already know, I love oreos and baking with oreos so I was really excited to make a giant oreo cookie! It really is more like a chocolate cake with buttercream frosting but it looks like a giant cookie. The texture is dense and chocolatey and it holds its shape really well. I was a bit worried it would not look like the picture!
I used the recipe from Williams Sonoma and found it far too sweet for my liking even though I reduced the sugar amount slightly. I've included the original amounts below as you may have a super sweet tooth but I would recommend 1/3 reduction if you prefer it less sweet.
PS apologies for the last two photos, I had to take it with my phone whilst at work after it was sliced.

 giant cookie mould 


Williams Sonoma Giant Oreo Cookie Cake 

For the cake
45g cocoa powder, plus more for dusting 
200g chocolate, broken into pieces
200g unsalted butter, cut into cubes
125g flour
1 teaspoon baking powder
3/4 teaspoon salt
390g sugar
4 eggs
1 3/4 teaspoon vanilla extract

For the buttercream frosting
560g icing sugar
325g unsalted butter
3.5 tablespoons milk, plus more if needed
1.5 teaspoon vanilla extract
pinch of salt

  • Preheat the oven to 180C. 
  • Using a small pastry brush, grease 2 sandwich cookie cake pans with butter, making sure to coat all the details and crevices in the pans.
  • Dust thoroughly with cocoa powder and tap out any excess.
  • To make the cake, melt the chocolate in a heatproof bowl over a pan of barely simmering water. 
  • Remove from the heat and stir in the butter, a few pieces at a time, until blended. 
  • Let the chocolate mixture cool slightly. 
  • In a bowl, whisk together the flour, cocoa powder, baking powder and salt until combined and set aside. 
  • Ina  large bowl, whisk the sugar, eggs and vanilla until well combined.
  • Add the chocolate mixture and whisk until incorporated. 
  • Whisk in the flour mixture until combined. 
  • Divide the batter evenly between the pans and spread evenly.
  • Gently tap the pans on the counter to release any air bubbles. 
  • Bake until the tops of the cakes are shiny and a skewer inserted into the centre comes out with a few crumbs attached, about 35 minutes. 
  • Transfer the pans to a wire rack and allow to cool for 15 minutes before inverting the cake onto a cutting board/work surface. 
  • To make the buttercream frosting - in the bowl of an electric mixer fitted with the flat beater, combine the icing sugar, butter, milk, vanilla and salt and beat on low speed for about 1 minutes. 
  • Increase the speed to medium and beat until fluffy, about 3 minutes. 
  • If the frosting is dry, add more milk, 1 teaspoon at a time until it is creamy but still holds peaks.
  • Using a large spatula, carefully turn 1 cake over the the printed side faces down. 
  • Spread the buttercream evenly over the flat side of the cake. 
  • Place the second cake, printed side up on top. 

Tuesday, 18 October 2011

Cinnamon Crumble Apple Cake


I'm having a great time baking with apples recently as it's delicious, versatile and in season! So I'm pleased that this month's pink whisk challenge is apples.
I chose a cinnamon crumble apple cake from Waitrose (yes not BBC Good Food for a change!).  Initially, I thought it was a disaster but it tasted good so it wasn't a complete disaster! I burnt the cake slightly and was very disappointed that the middle had sunk. I then realised that I put quite a lot of apples on top (more than the recipe suggested) which probably weighed the cake down. The crumble didn't quite work out as expected, probably because my butter was not cold.  I actually contemplated not bringing it in to work (as planned) but I'm glad I did in the end as it tasted much better than it looked. The sponge was moist and light and the apple crumble with the cinnamon was divine. 


 I added a bit more cinnamon as I love the flavour and smell 


Recipe from waitrose.com 

  • 3 small eating apples
  • 2 tsp ground cinnamon
  • 250g caster sugar
  • 250g pack Lurpak Butter Slightly Salted
  • 250g self-raising flour
  • 4 medium eggs

  • Preheat the oven to 180°C, gas mark 4. 
  • Grease and line the base of a 23cm round, deep cake tin. 
  • Peel, core and thinly slice the apples, toss in 1 tsp of the cinnamon and set aside. 
  • To make the crumble topping, measure 50g each of the caster sugar, butter and flour into a bowl. Add the remaining cinnamon and rub everything together with your fingertips until it forms a rough crumble. Set aside.
  • Put the remaining sugar and the eggs in a large bowl and use an electric whisk to mix together. Whisk for about 10 minutes until the mixture is pale and thick, and leaves a trail on the surface when the whisk blades are lifted.
  • Melt the remaining butter in a pan, cool slightly, then drizzle into the whisked mixture, folding it in carefully to preserve as much air as possible. 
  • Sieve the flour over the top and fold in. 
  • Turn the mixture into the cake tin and scatter the apple slices evenly over the top. 
  • Sprinkle the crumble over and bake for 50-55 minutes, until the cake is firm to the touch and golden brown. 
  • Allow to cool for 10 minutes in the tin. 

Saturday, 15 October 2011

Plum and almond crumble slice


Autumn is one of my favourite seasons. I like that it's the season of change and preparation for winter. I also love autumnal foods so I was quite excited to see the Autumnal Baking Challenge hosted by Kate of What Kate Baked . I decided to make this amazing recipe which I got from... BBC Good Food (no surprise there!) It turned out even better than I expected and everyone really enjoyed it. The biscuit base is really soft and crumbly and you can definitely taste the butter that went in there! The plums lend a nice tartness and the almonds balance it out with a lovely crunch. I think this would work well with apples, pears or even rhubarb. 

 making the base

 add the filling

 top with plums 

 and almonds and bake

 delicious! 


250g butter (must be very cold)
225 caster sugar
300g ground almonds
140g plain flour, plus 25g 
2 eggs
1 teaspoon cinnamon 
1 teaspoon baking powder
approx 6 plums, stoned and cut into sixths
50g flaked almonds

  • Heat oven to 180C/fan 160C/gas 4. Butter and line a 20 x 30cm baking tin with baking paper. Put the butter, sugar and ground almonds into a food processor, then pulse until the mixture resembles very rough breadcrumbs. Spoon out half the mix into a bowl and set aside.
  • Add 140g flour into the mix in the processor and whizz until it just forms a dough. Tip into the tin and press down with the back of a spoon. Bake for 15-20 mins until golden. Leave to cool for 10 mins.
  • To make the filling, put the remaining butter and the sugar and almond mix back into the processor, saving a few tbsp for the topping. Add the eggs, the 25g flour, cinnamon and baking powder and whizz to a soft batter. Spread over the base.
  • Top with the plum pieces and a little extra caster sugar and cinnamon. Bake for 20 mins, then sprinkle with the remaining crumble mix and flaked almonds. Cook for another 20 mins or until golden. Leave to cool in the tin before slicing.